1: Gingival Tissue Management
Excess gingival tissue encroaching into the proximal defect was managed using electrocautery to re-establish proper access, visibility, and margin control. Following administration of local anesthesia, a fine electrocautery tip was used in a controlled manner to excise the overgrown gingival tissue. Care was taken to confine the procedure to the soft tissue and avoid damage to the underlying tooth structure.
Tissue contouring was performed to recreate a physiologic gingival architecture and to clearly expose the cervical and proximal margins of the defect. Continuous suction and intermittent activation were employed to minimize heat generation and prevent collateral tissue injury. Hemostasis was achieved simultaneously due to the coagulative effect of electrocautery, providing a dry and well-defined operative field.
Post-excision, the area was gently irrigated with saline to remove debris and assess the margins. The improved access and visibility facilitated accurate isolation and subsequent restorative procedures.
2: Isolation & Caries Removal
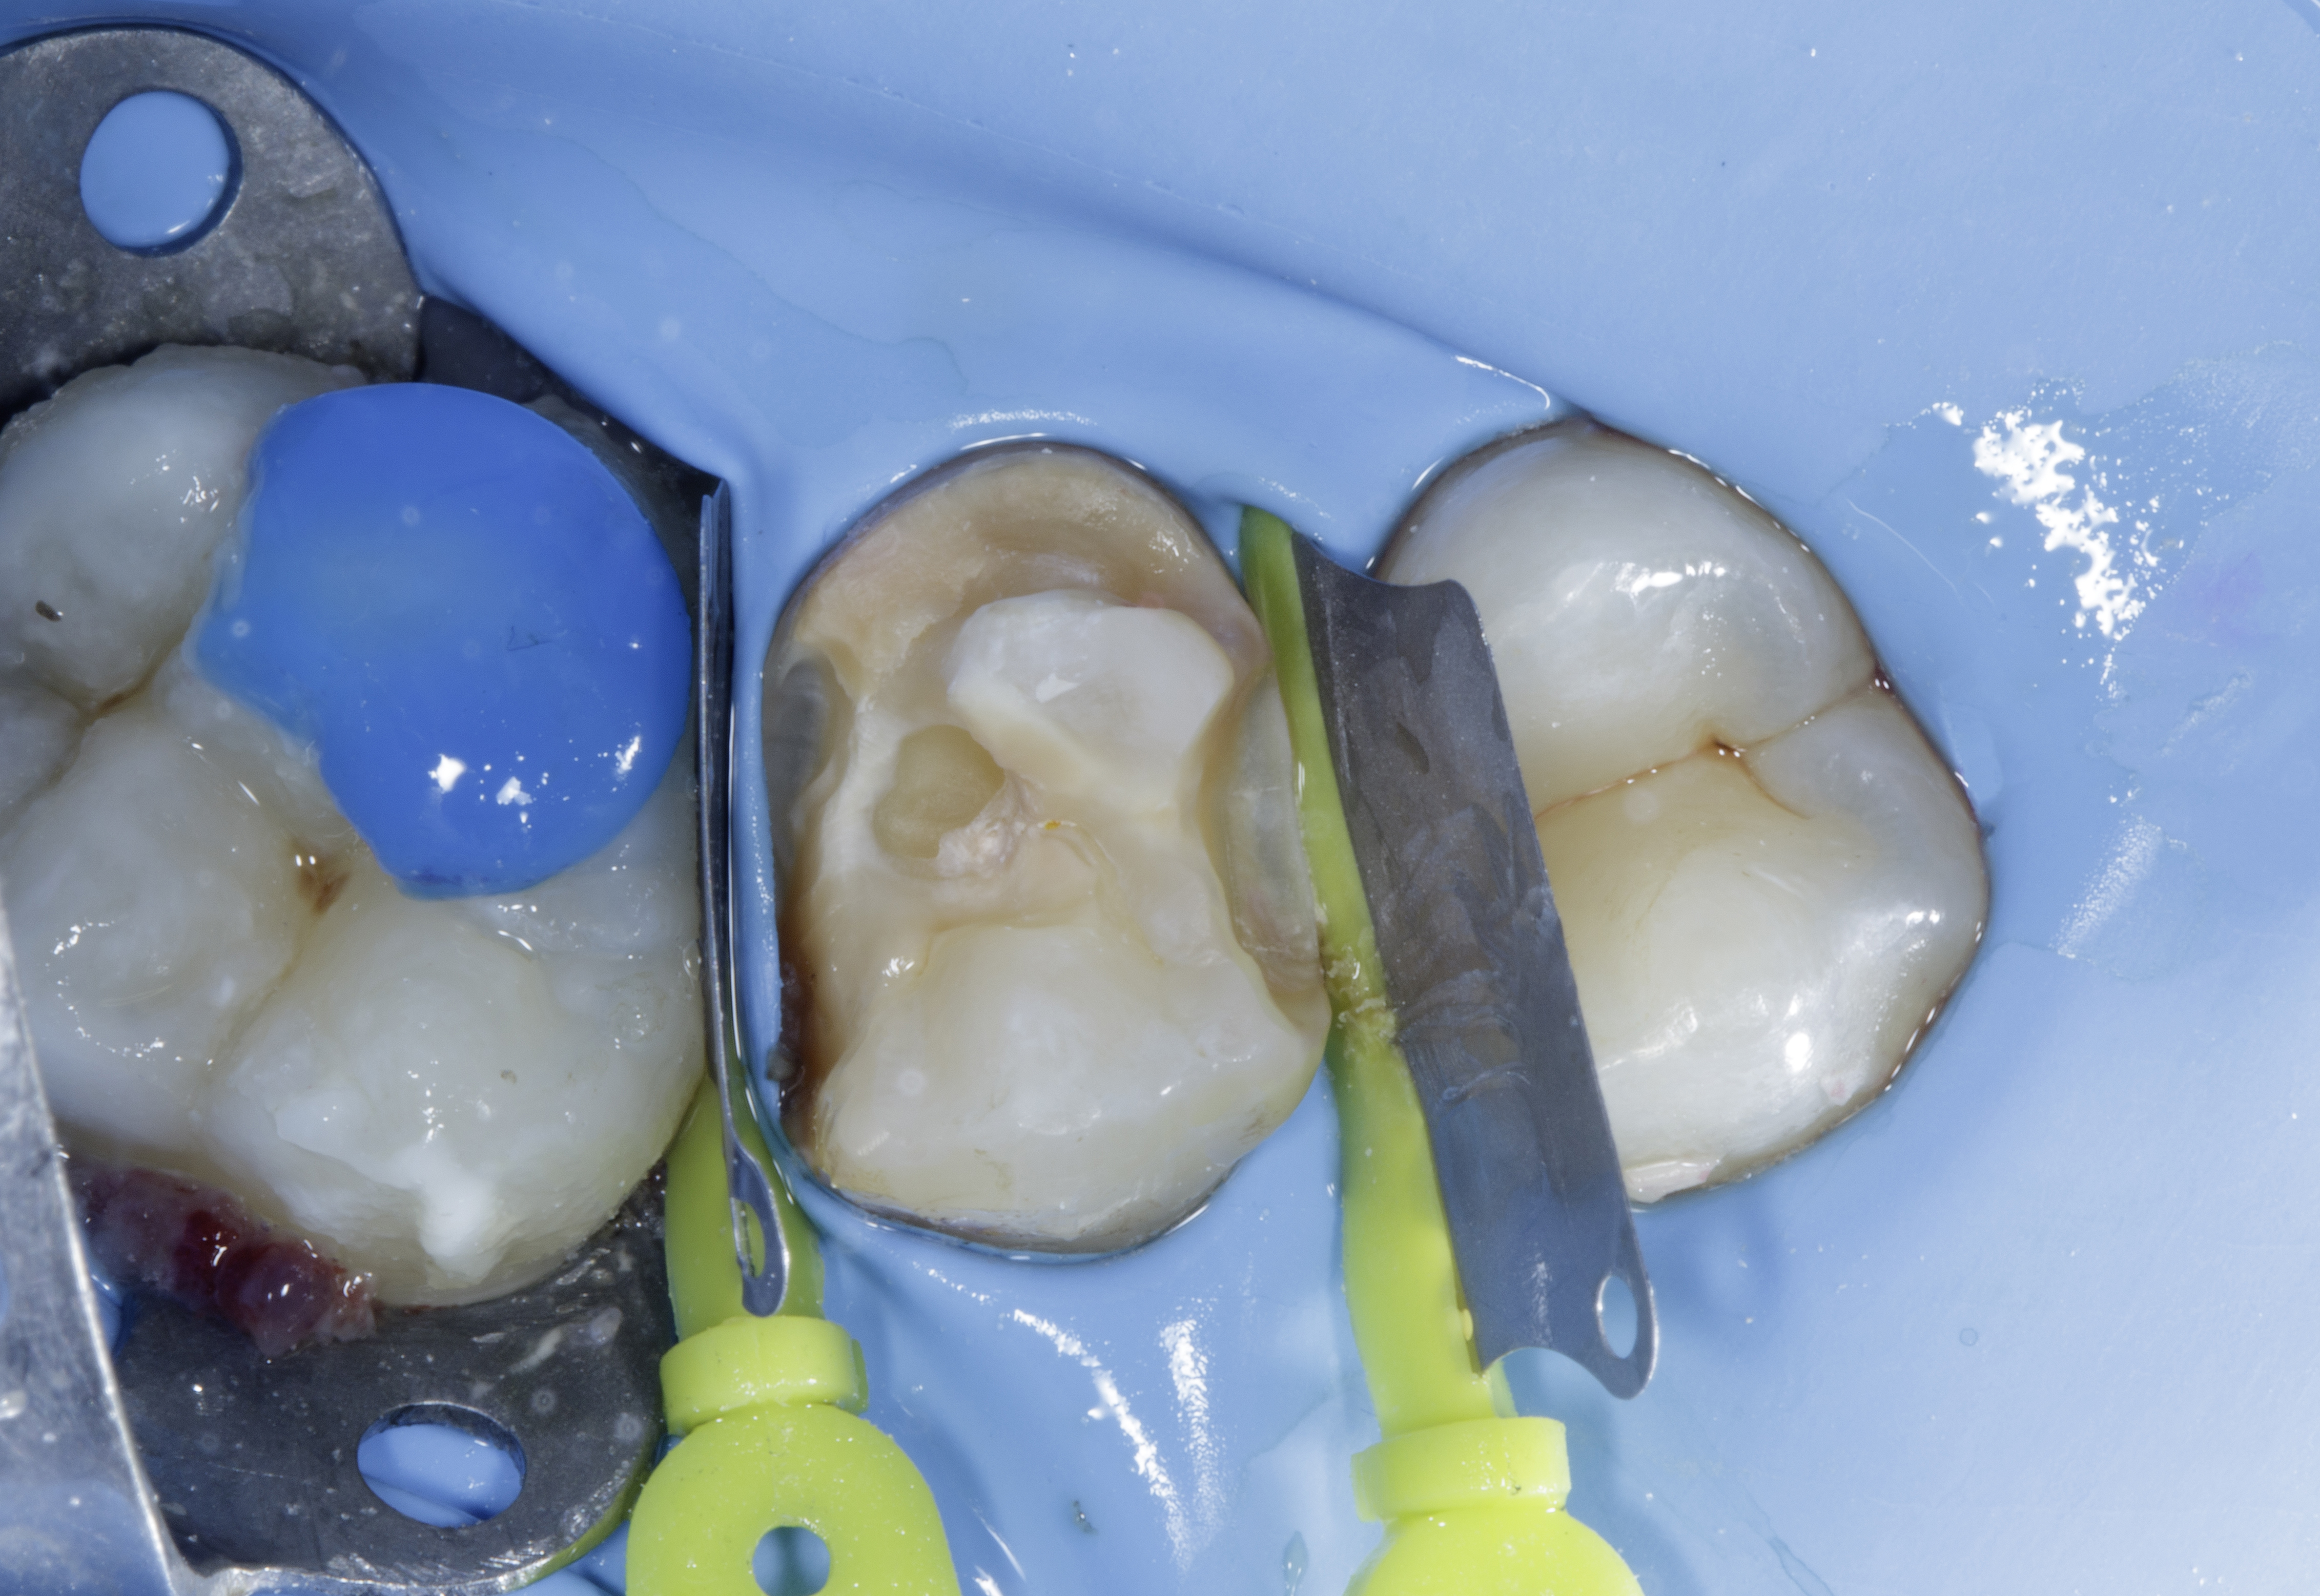
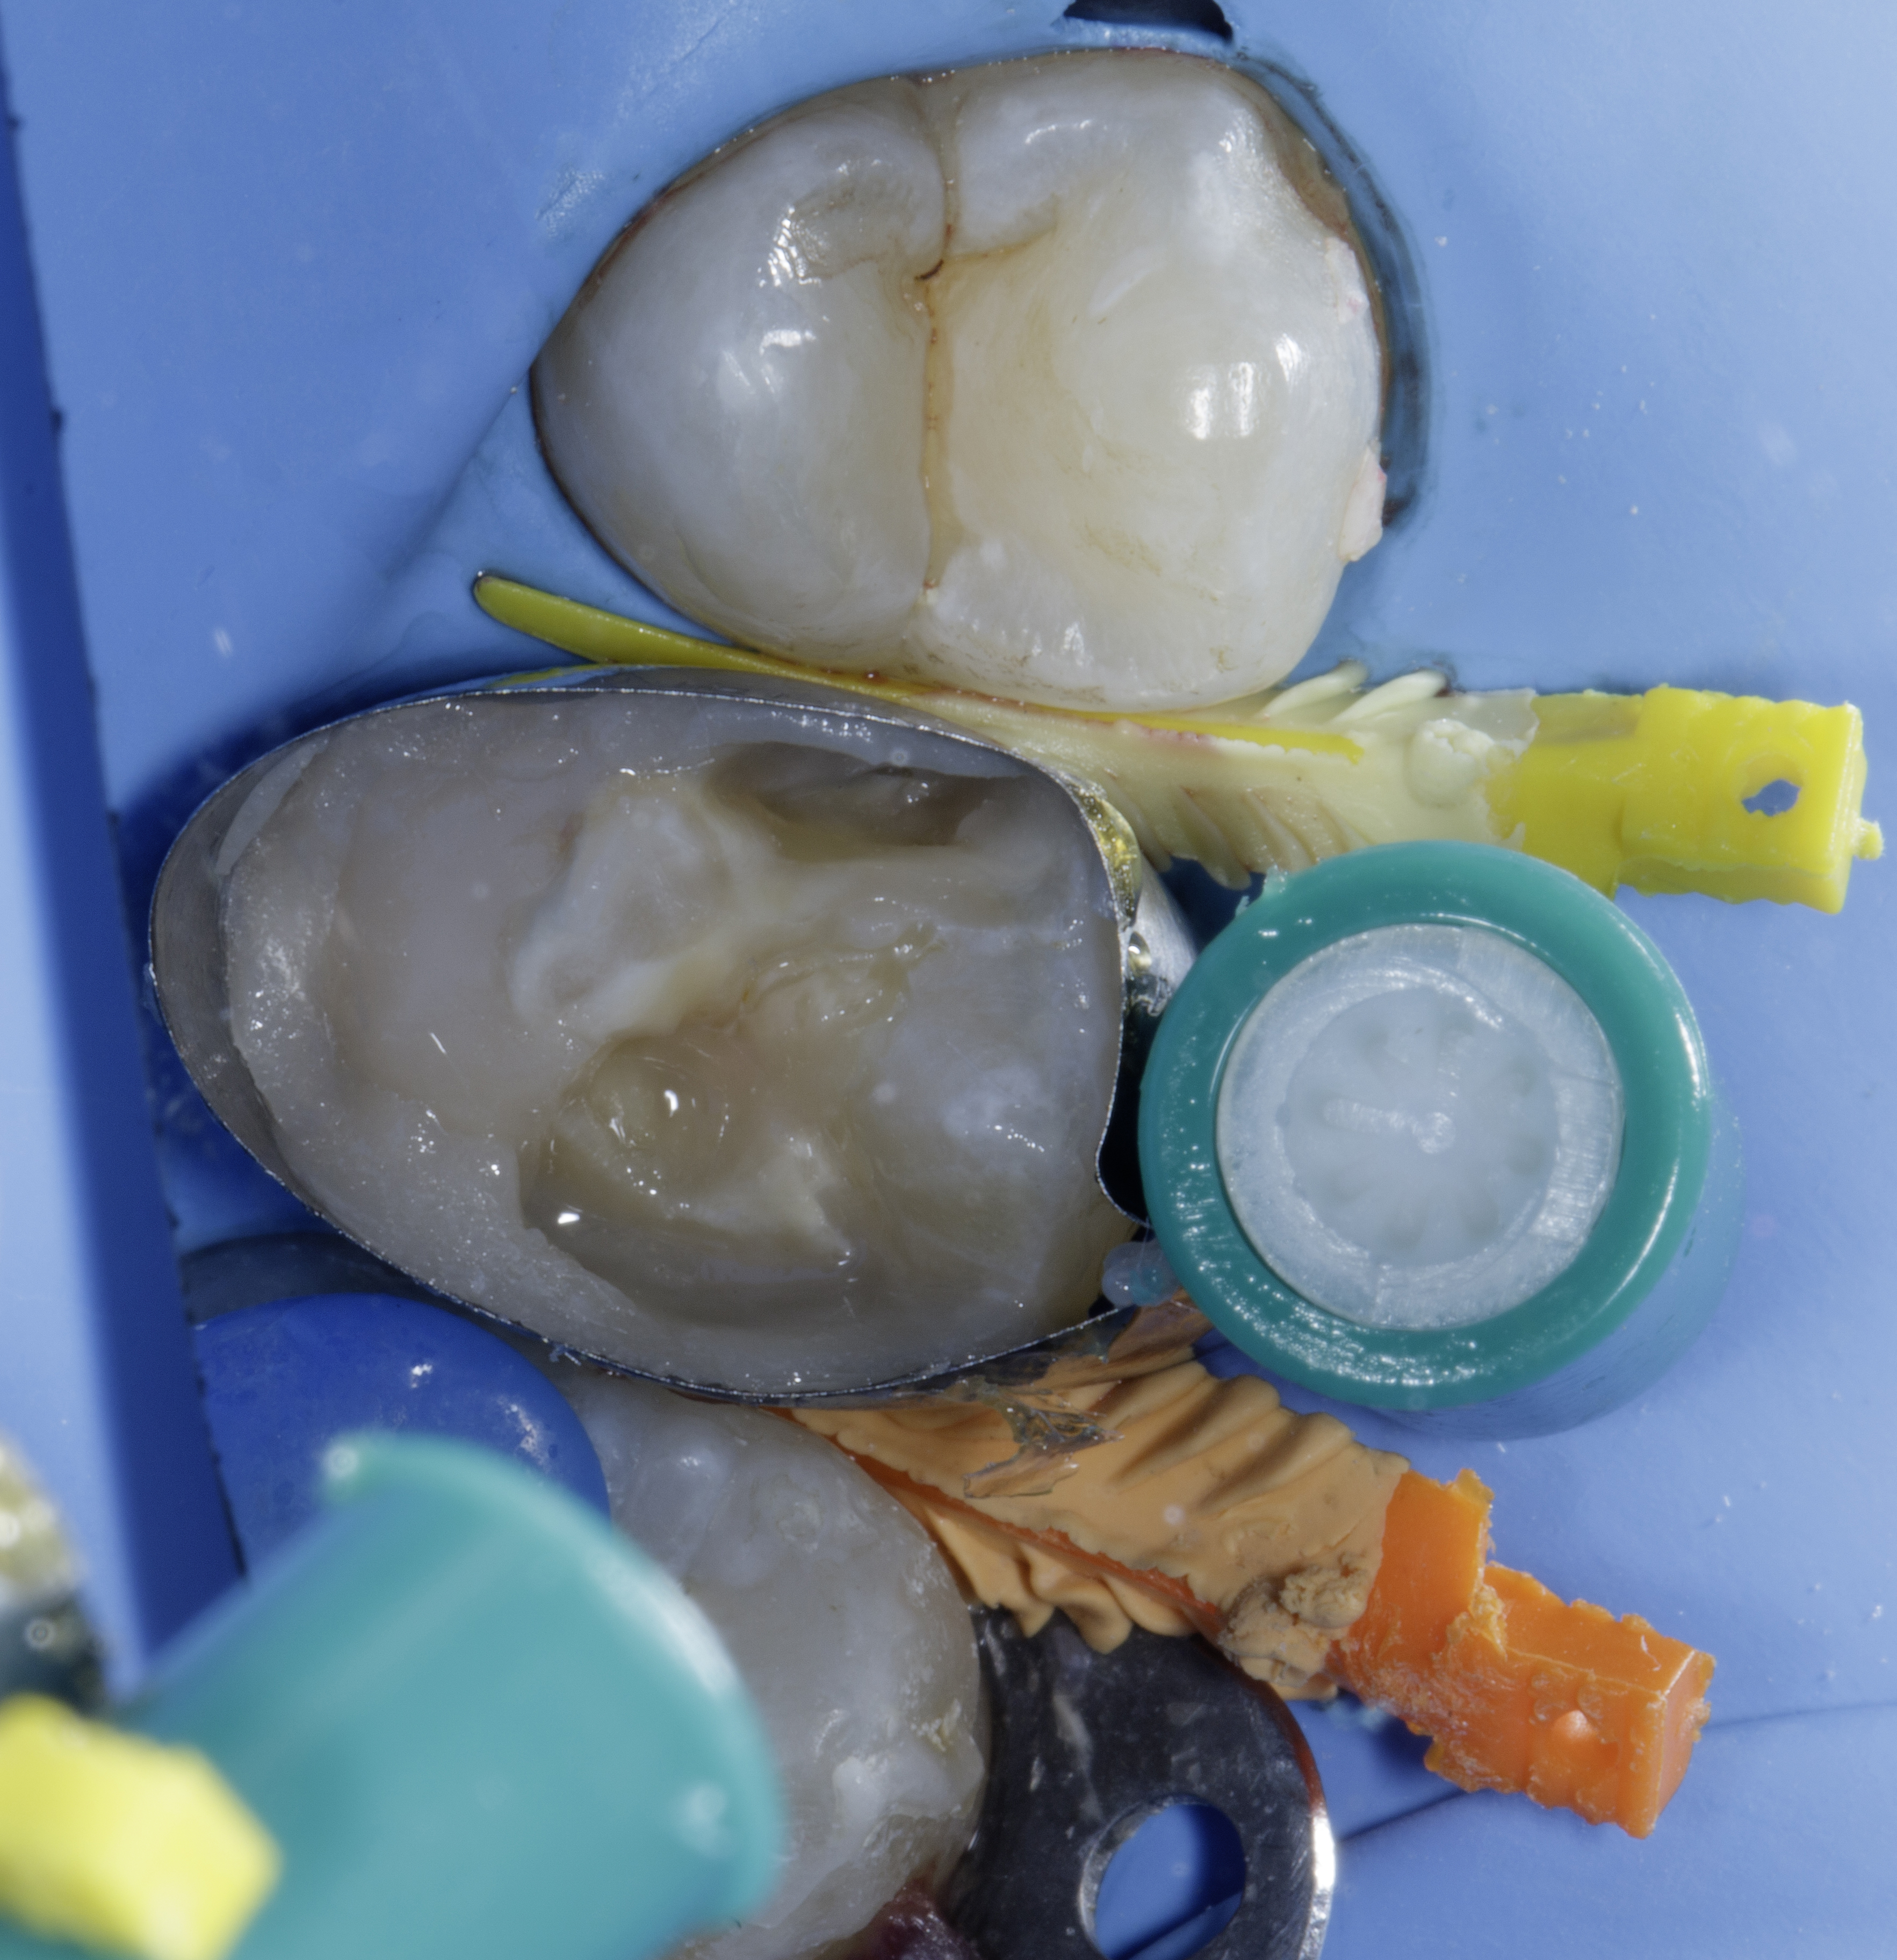
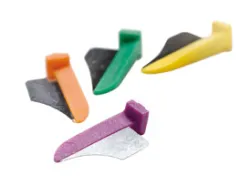
Rubber dam isolation was achieved using a Brinker clamp, selected to avoid interference with matrix band and wedge placement during restoration of proximal contact defects. The adjacent tooth was protected with a Fender wedge to prevent inadvertent bur damage to sound tooth structure. (Figure 2)
As the distal defect extended subgingivally, the Fender wedge was removed to allow better access to the lesion. The rubber dam was carefully inverted and adapted to achieve optimal isolation while ensuring adequate exposure of the subgingival margins.
|
|
| Figure 2: Rubber dam isolation supplemented by a Fender wedge to safeguard the adjacent tooth during the procedure. |
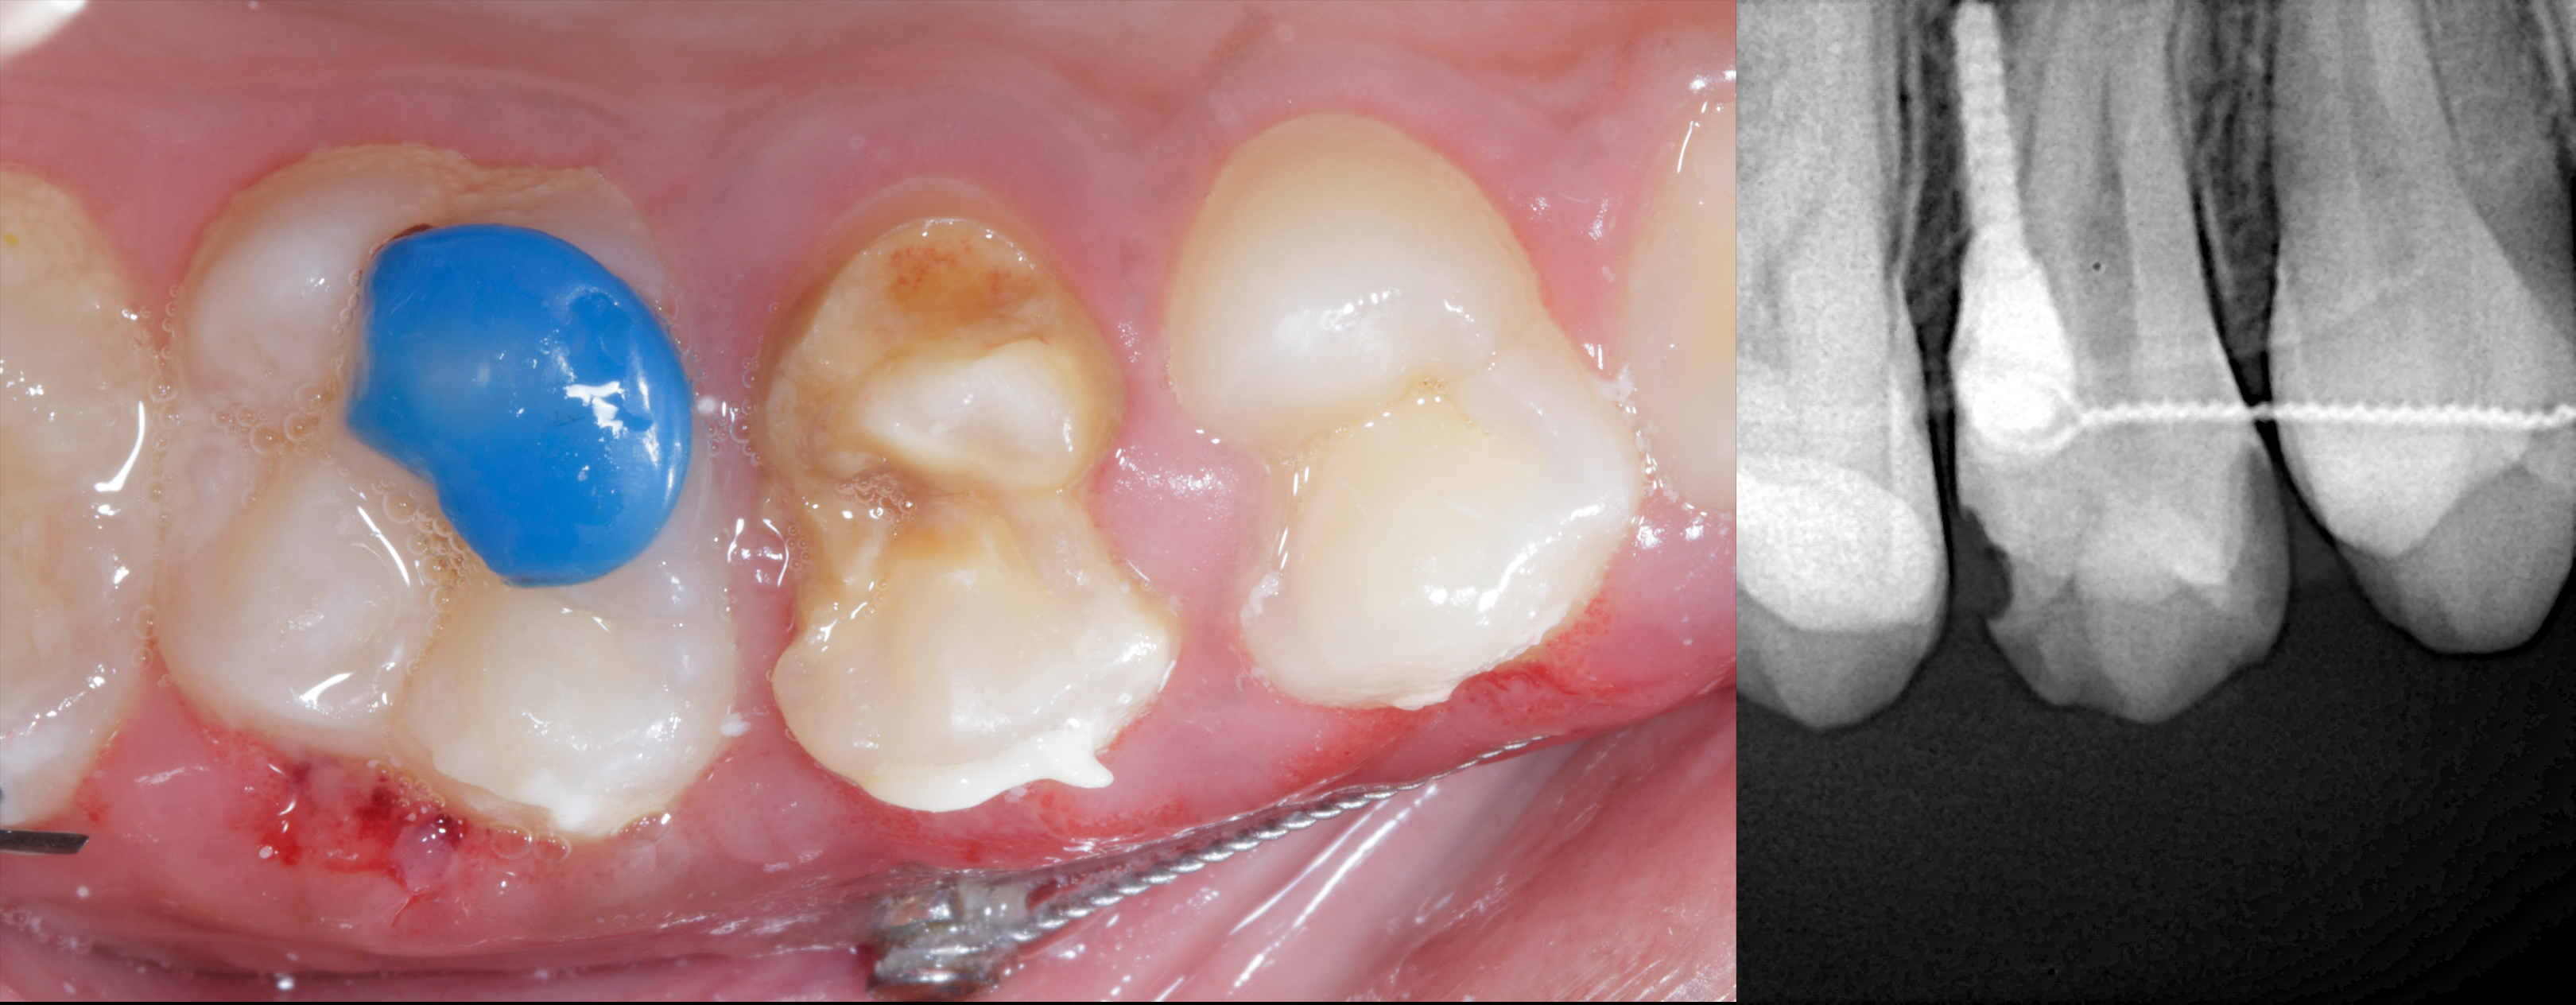
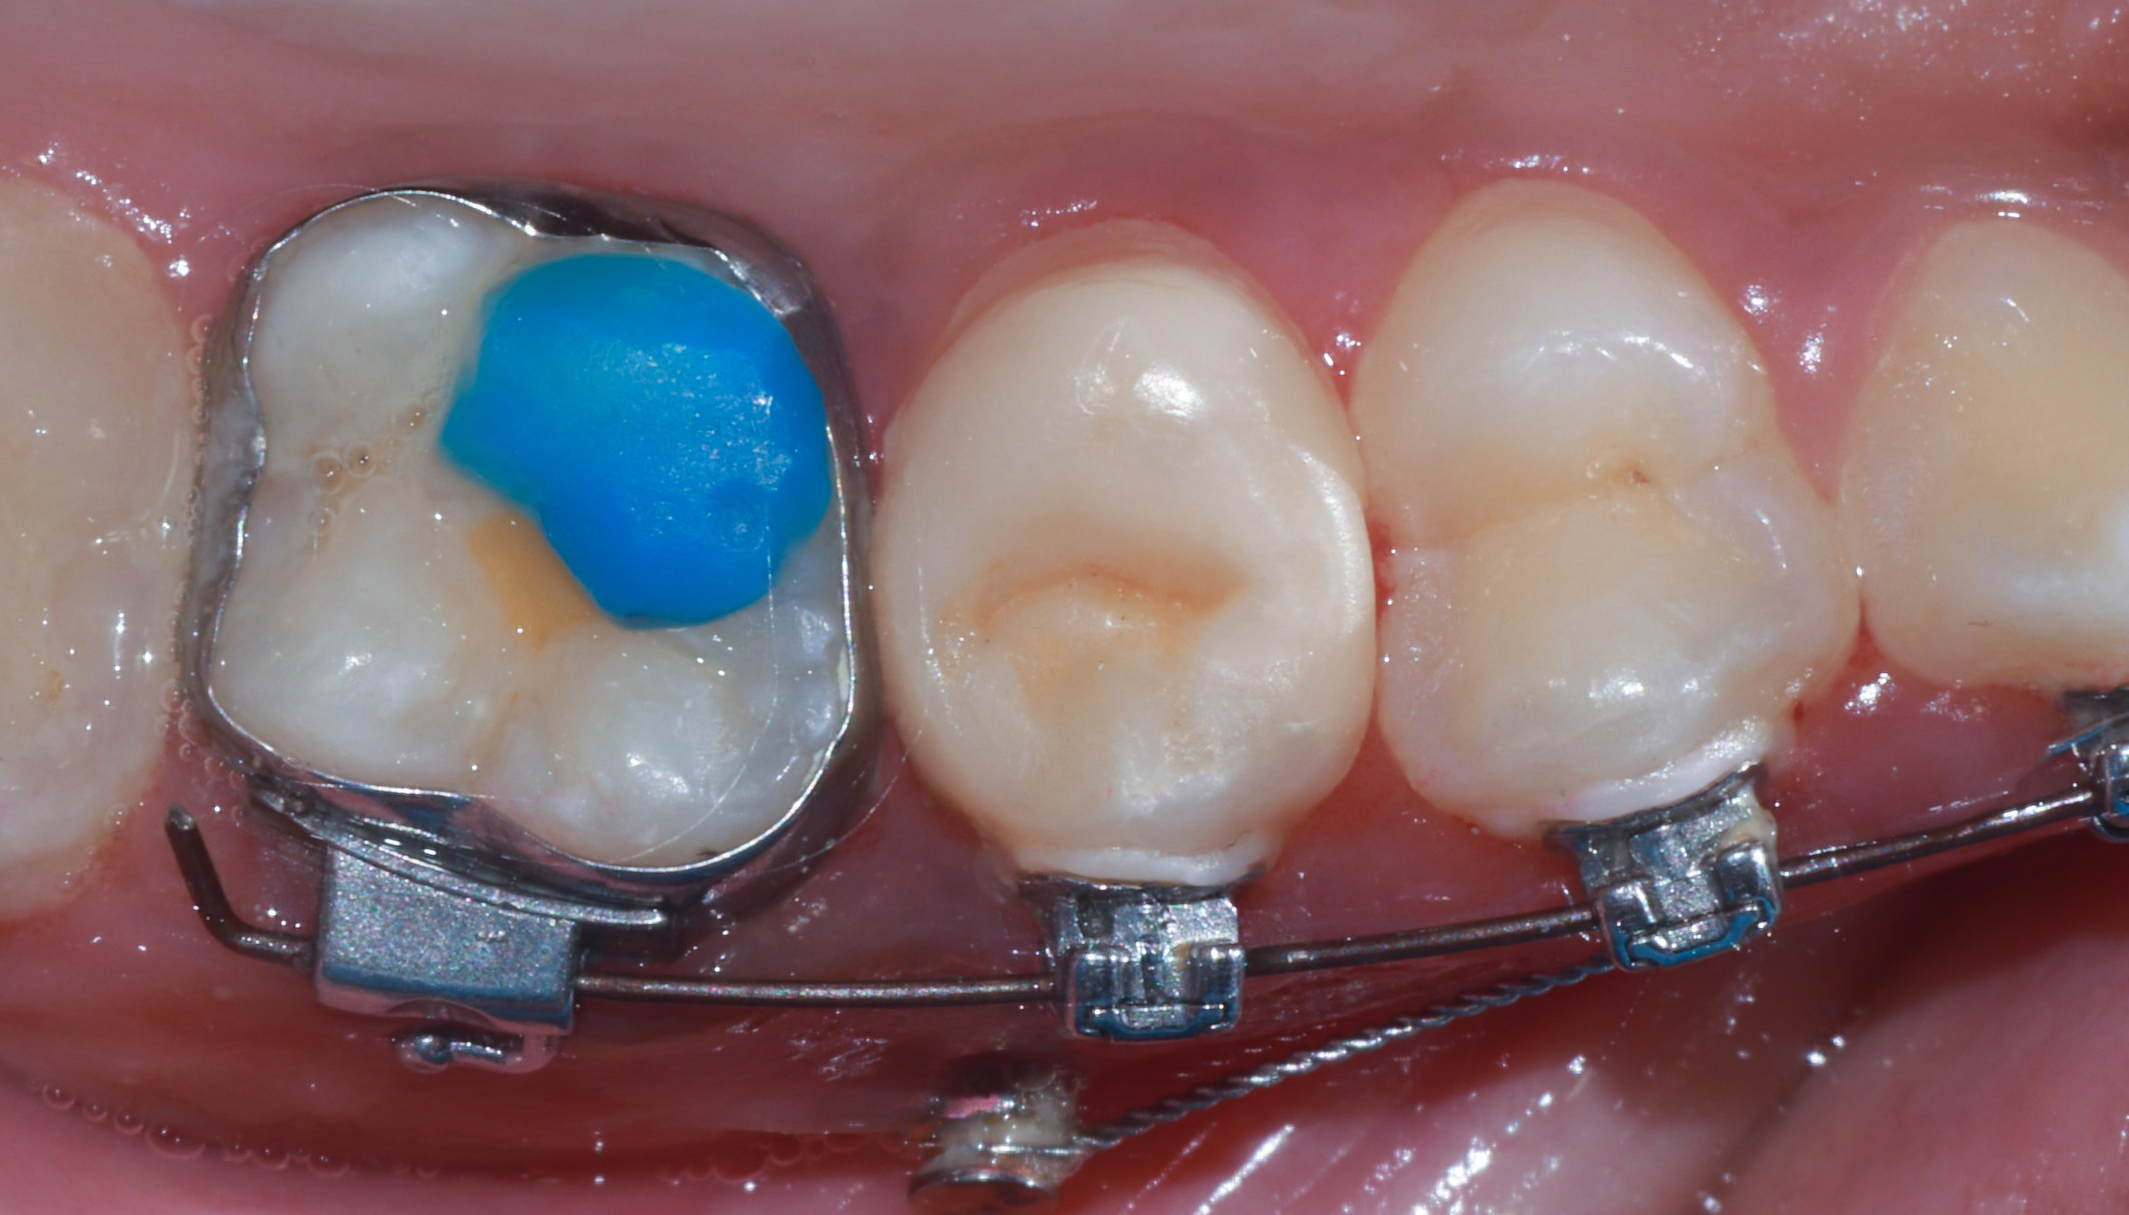
Caries excavation was initiated using a round bur in a slow-speed handpiece. A caries detection dye was applied to aid in differentiation between
infected and affected dentin, ensuring complete removal of demineralized, non-remineralizable tissue while preserving as much sound structure as possible. (Figure 3)
3: Cavity Preparation & Surface Treatment. (Figure 3)
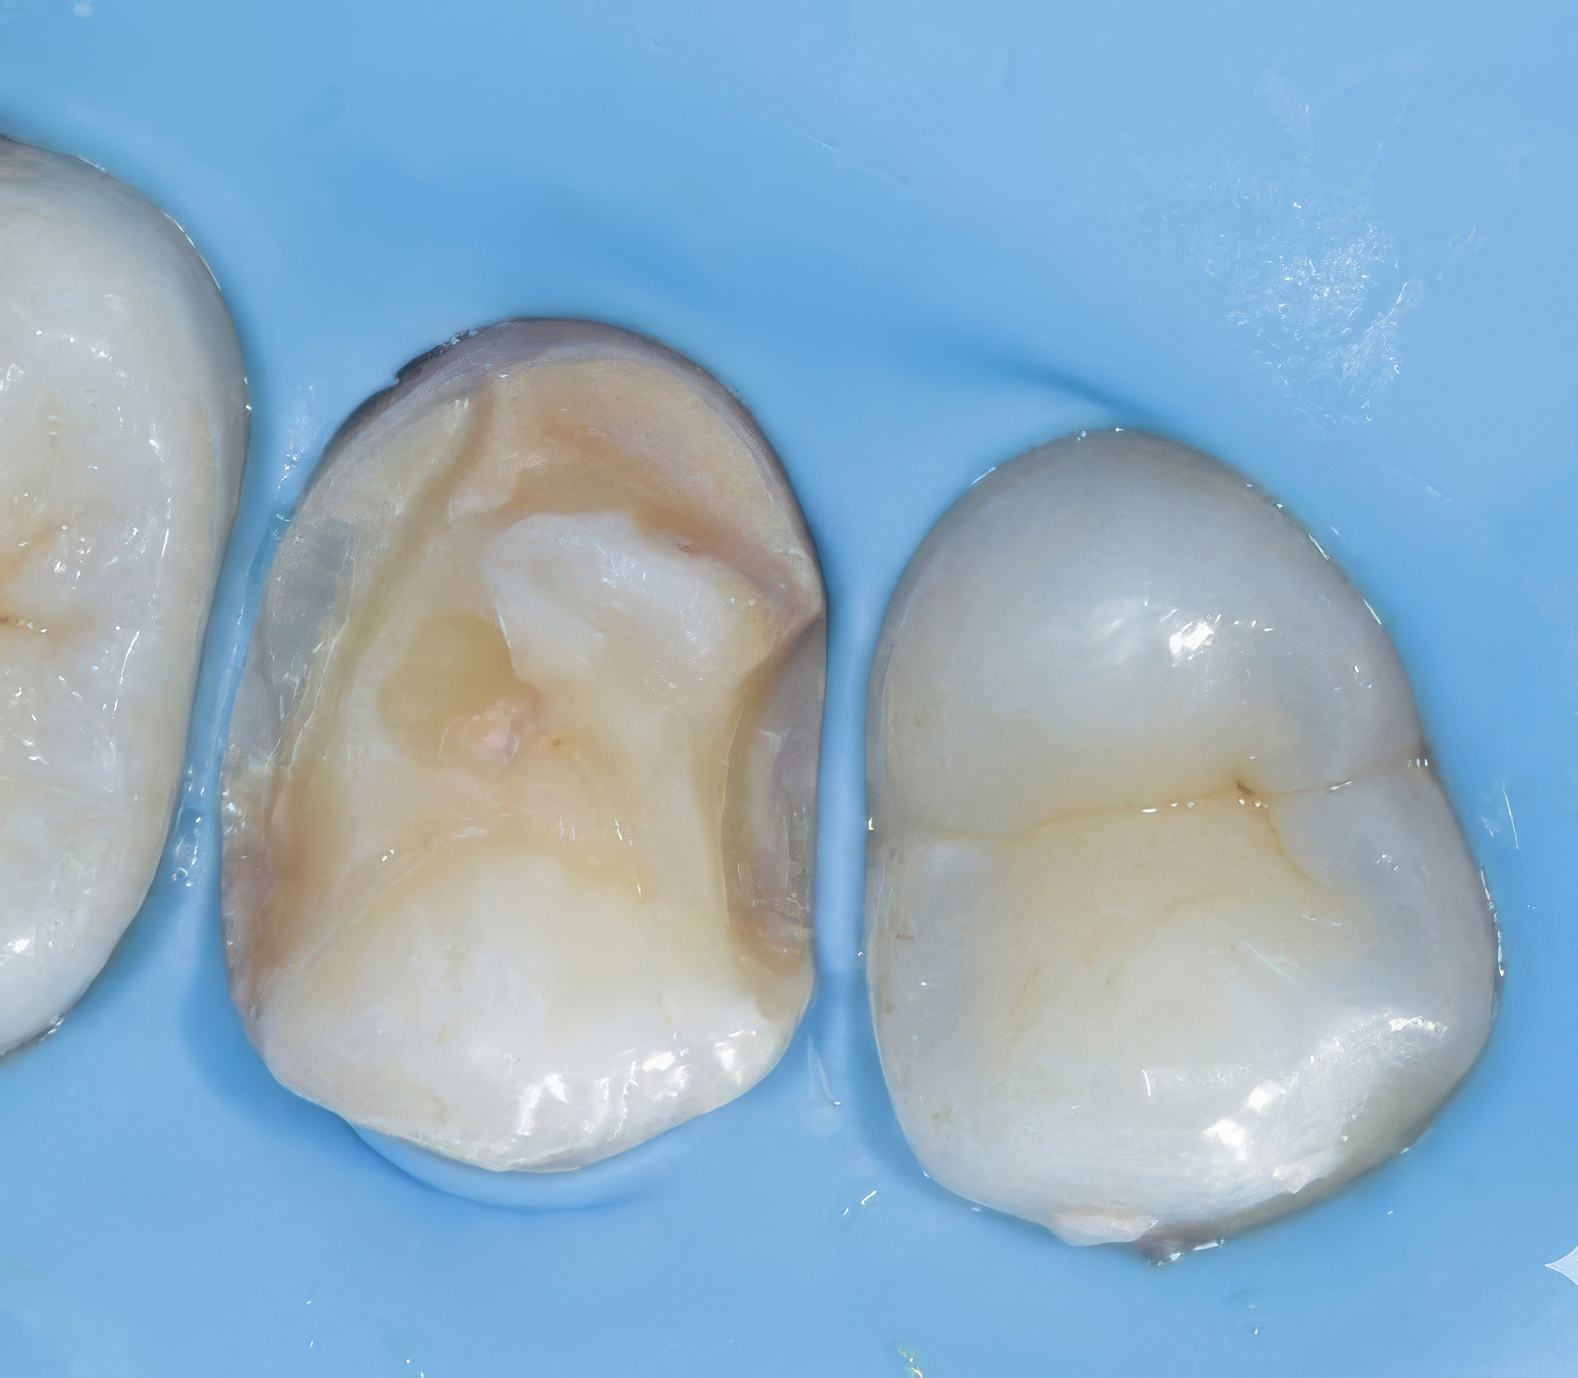
After caries removal unsupported enamel was removed and cavosurface margins were refined to achieve a stable and clean peripheral seal. Internal line angles were rounded to reduce stress concentration within the restoration.
Air abrasion was performed using 50 µm aluminum oxide particles for approximately 7–10 seconds to effectively decontaminate the cavity, remove residual debris, and create a micro-retentive surface. This step also enhances surface energy and improves adhesive penetration, particularly in areas of hypoplastic enamel.
Following air abrasion, the cavity was thoroughly rinsed with water spray and gently air-dried to eliminate any residual abrasive particles.
Selective enamel etching was carried out using 35–37% phosphoric acid applied specifically to enamel margins for 15–20 seconds. This enhances micromechanical retention by creating a retentive etch pattern, particularly important in hypoplastic enamel where bonding can be less predictable.
The etched surfaces were thoroughly rinsed and gently air-dried, ensuring that enamel exhibited a characteristic frosted appearance, while dentin was maintained in a moist state to prevent collagen collapse.
The preparation at this stage presented a clean, well-conditioned substrate with optimized surface characteristics, ready for adhesive application and restorative build-up.
|
|
| Figure 3: Post-caries excavation, Cavity preparation & the surface treatment by air-abrasion and selectively etched to optimize bonding. |
4: Matrix selection & Placement
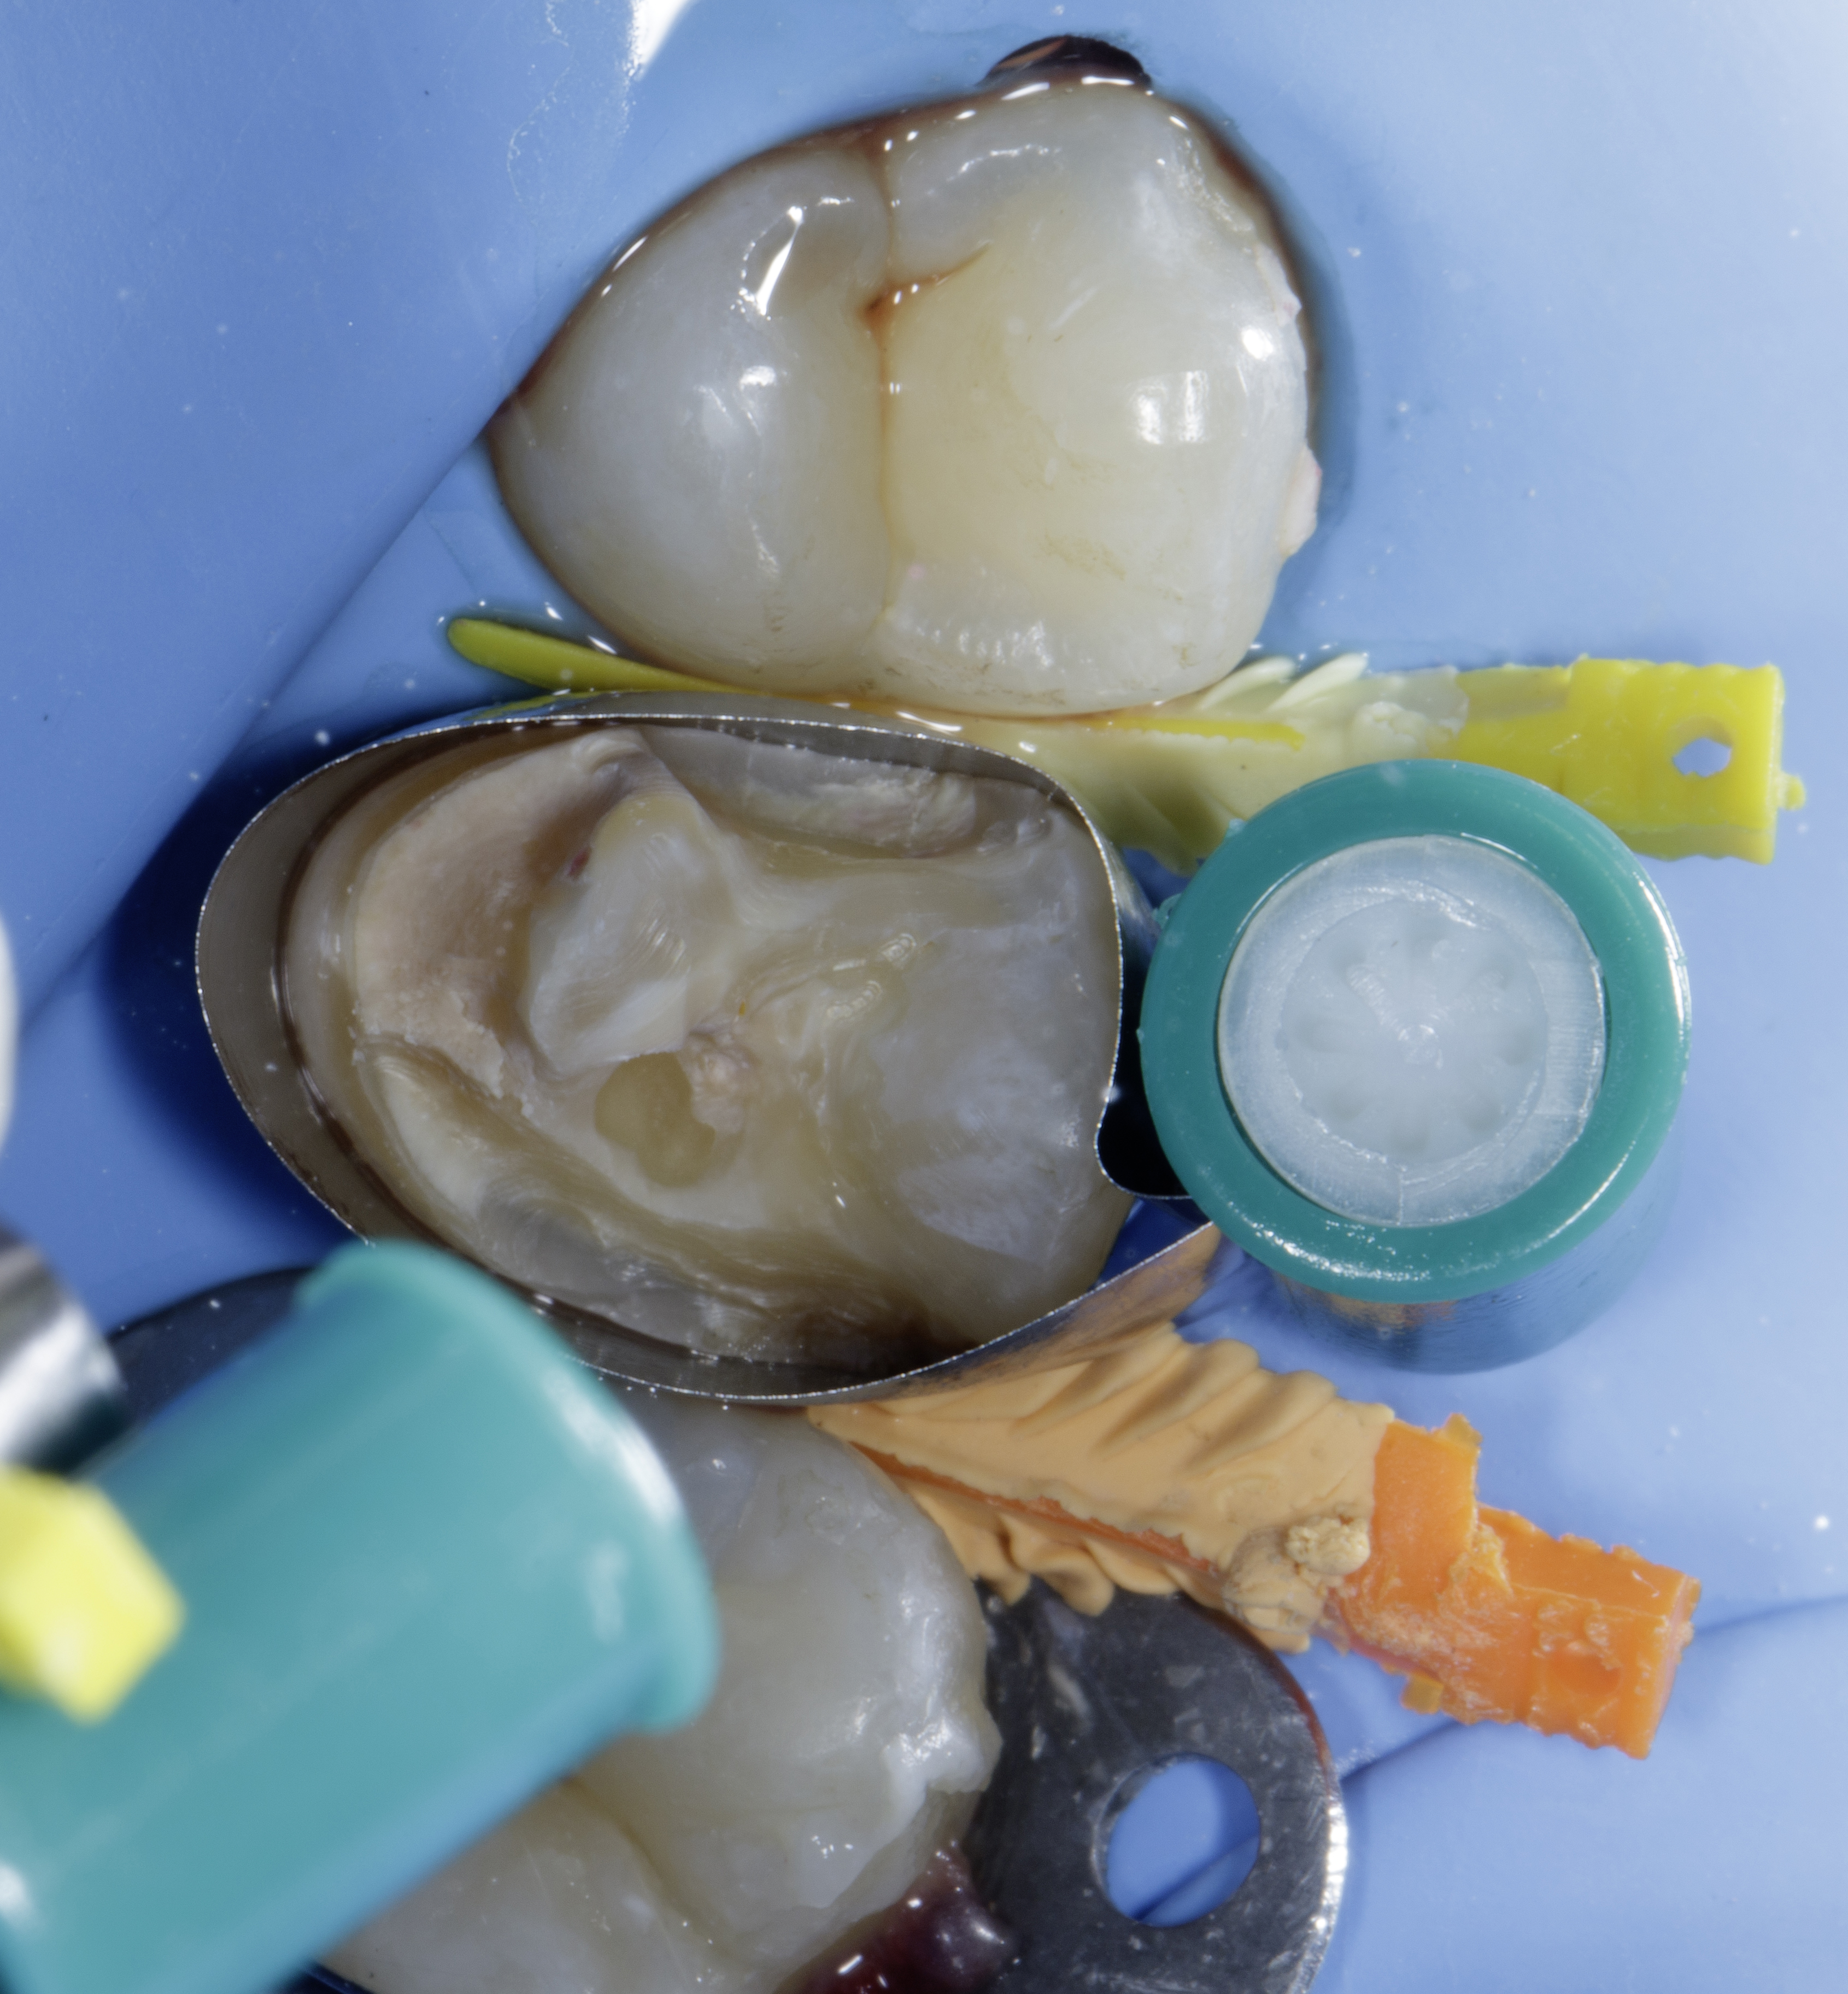
A sectional matrix system (Garrison ReelMatrix System) was selected to restore the proximal defect with optimal anatomical accuracy. The matrix band was carefully positioned to adapt closely to the cervical margin of the proximal box, ensuring proper sealing of the deep margin. Stabilization was achieved using anatomically contoured Garrison Strata-G wedges, which are selected as per the interdental space, which provided effective gingival seal, slight tooth separation, and improved matrix adaptation.
The wedge selection and placement were critical in managing the subgingival extent of the defect, preventing overhang formation and ensuring a well-defined emergence profile. Proper band adaptation at the cervical margin also facilitated predictable composite placement and reduced the risk of leakage, overhang so the marginal discrepancies. (Figure 4)
|
|
| Figure 4: Garrison ReelMatrix used to restore both proximal defects simultaneously, stabilized with Strata-G wedges to ensure proper sealing and prevent overhangs. |
5: Bonding protocol & Peripheral Build-up Using Shofu Bioactive composite
A universal adhesive (BeautiBond Xtreme, Shofu) was selected. It is a seventh-generation, single-component, HEMA-free adhesive incorporating Quad-Adhesive Technology, designed to bond effectively to enamel, dentin, and a variety of indirect restorative substrates including zirconia, metals, and ceramics. Its low film thickness (~5 µm) allows for optimal adaptation without compromising marginal integrity.
The adhesive was actively applied to the prepared surfaces with a rubbing motion for approximately 10 seconds to facilitate adequate penetration and hybrid layer formation. This was followed by gentle but thorough air-drying for about 3 seconds, then blow with stronger air to volatilize the solvent (acetone) and ensure uniform distribution of the adhesive without pooling, You will see the glossy surface and no visible movement that’s the sign of perfect bonding layer.
Subsequently, the adhesive layer was light-cured for 40 seconds to achieve optimal polymerization and bonding performance due to large and deep defect.
Initial Composite Layer (Adaptation Layer)
A thin layer of injectable composite (Beautifil Injectable XSL, Shade A2O, Shofu) was placed within the defect and carefully adapted over the entire dentin surface. Owing to its excellent flow characteristics and “slow leveling” (XSL) behavior, the material effectively adapts to internal irregularities and line angles, ensuring intimate contact with the cavity walls and minimizing the risk of voids or air entrapment.
The composite was applied in a minimal thickness (approximately 0.5mm), allowing for better adaptation and controlled polymerization. Using a thin initial layer reduces the overall volume of composite polymerized at one time, thereby limiting polymerization shrinkage stress.
Additionally, this adaptation layer improves stress distribution at the adhesive interface and helps protect the hybrid layer during subsequent composite build-up. Although the cavity configuration factor (C-factor) remains inherently high in such preparations, incremental placement and reduced composite volume per layer contribute to better stress management and improved marginal integrity.
Proximal Wall Build-up (Snowplow Technique)
Following placement of the initial adaptation layer, proximal wall reconstruction was initiated using a combination of injectable composite (Shofu Beautifil Injectable Xsl) and a packable composite (Shofu Beautifil LS II A2) employing the snowplow technique. This technique is particularly beneficial in deep proximal boxes to enhance marginal seal and reduce void formation. A thin layer of uncured injectable composite was first placed along the cavity walls, after which the packable composite was introduced and condensed. Both materials were then light-cured simultaneously. This approach enhances marginal adaptation, improves internal adaptation, and minimizes the risk of void formation or air entrapment at the interface.
Both composites incorporate Surface Pre-Reacted Glass-ionomer (S-PRG) fillers, which are associated with ion release and have been reported to contribute to reduced plaque accumulation and improved bioactivity—features that are particularly advantageous in patients undergoing orthodontic treatment, where oral hygiene maintenance may be compromised.
Additionally, Beautifil LS II, with its high filler loading (~87–88 wt%) and shrinkage is just 0.85%, provides favorable mechanical properties, including enhanced strength and wear resistance, making it suitable for stress-bearing posterior restorations.
Re-establishing the proximal walls by creating accurate marginal ridges effectively converts the original MOD cavity into a Class I configuration, thereby simplifying subsequent occlusal layering and enabling more controlled anatomical reconstruction. (Figure 5)
|
|
| Figure 5: Transformation of an MOD defect (creating both marginal ridges) into a Class I cavity using the snowplow technique with Beautifil Injectable XSL and Beautifil LS II composites. |
6: Incremental Morphological Layering
Composite was placed using an incremental, cusp-by-cusp layering technique to replicate natural tooth morphology, ensuring accurate cusp formation and occlusal anatomy. Incremental placement reduces the volume of composite cured at one time, thereby minimizing polymerization shrinkage stress. Proper anatomical reconstruction also facilitates efficient food deflection across the occlusal table, contributing to functional harmony. Characterization stains were applied minimally to enhance the natural esthetic appearance.
|
|
| Figure 6: Post treatment showing natural form and function. |
7: Contact Management During Orthodontic Treatment & Polishing
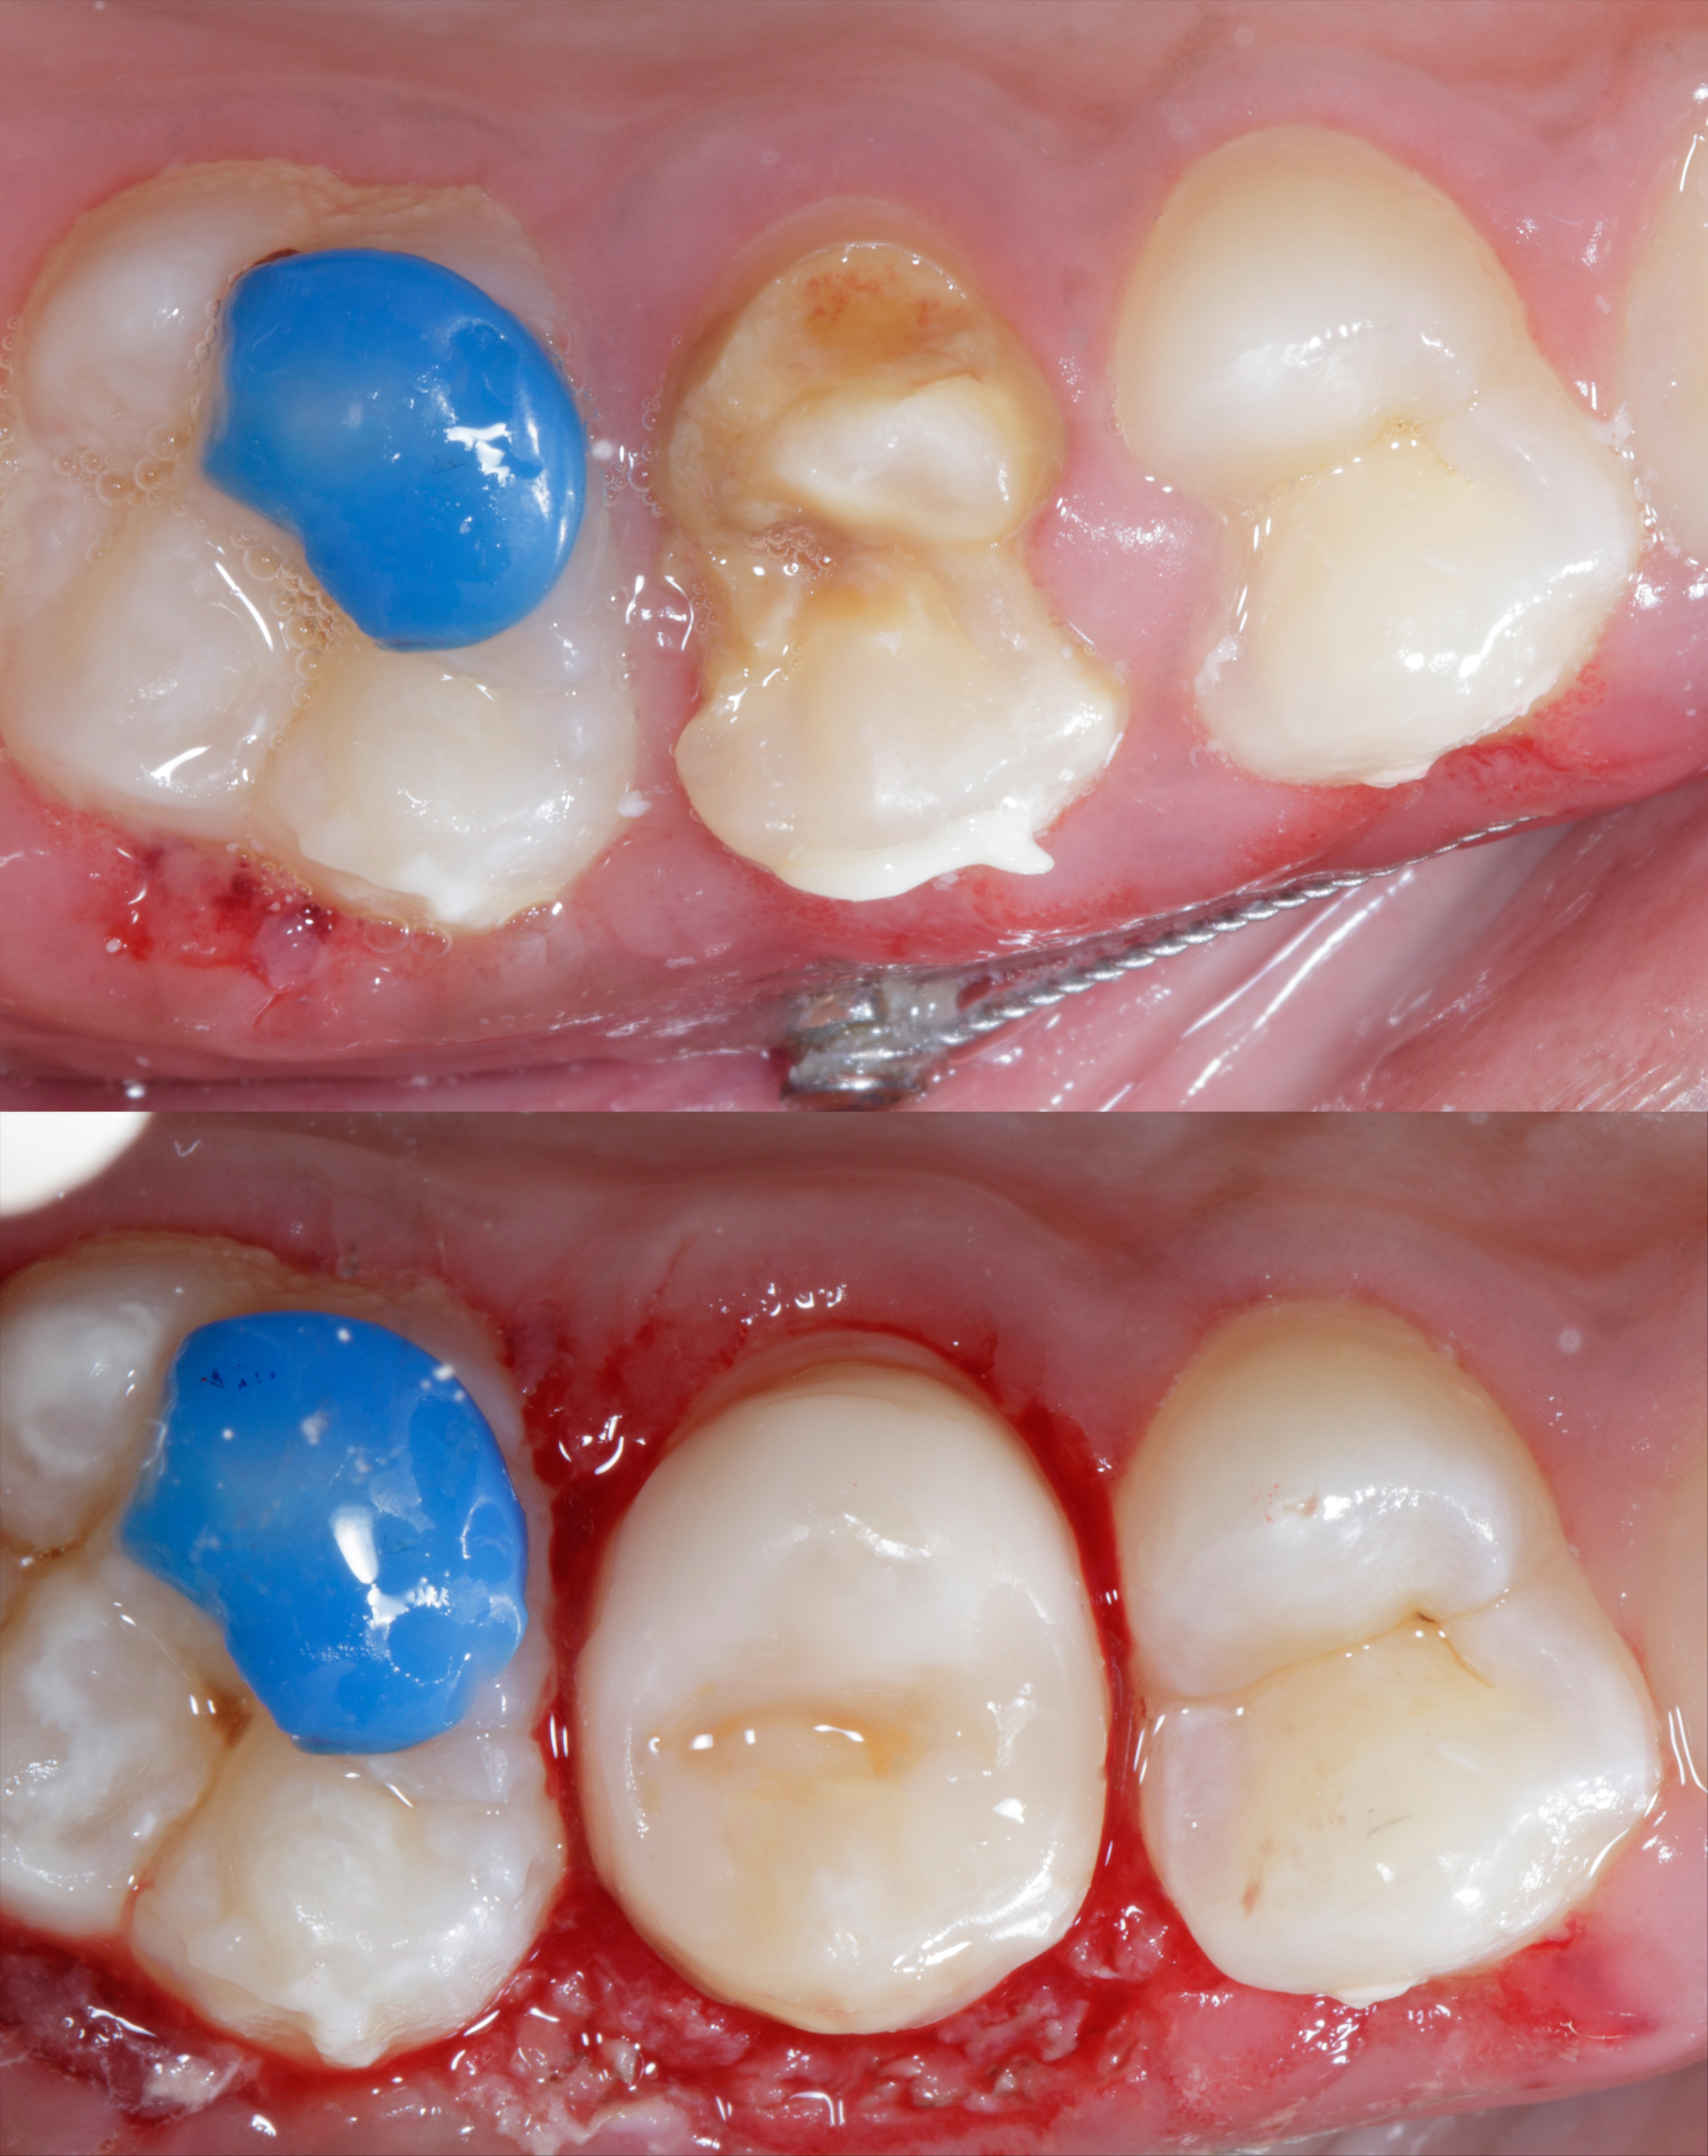
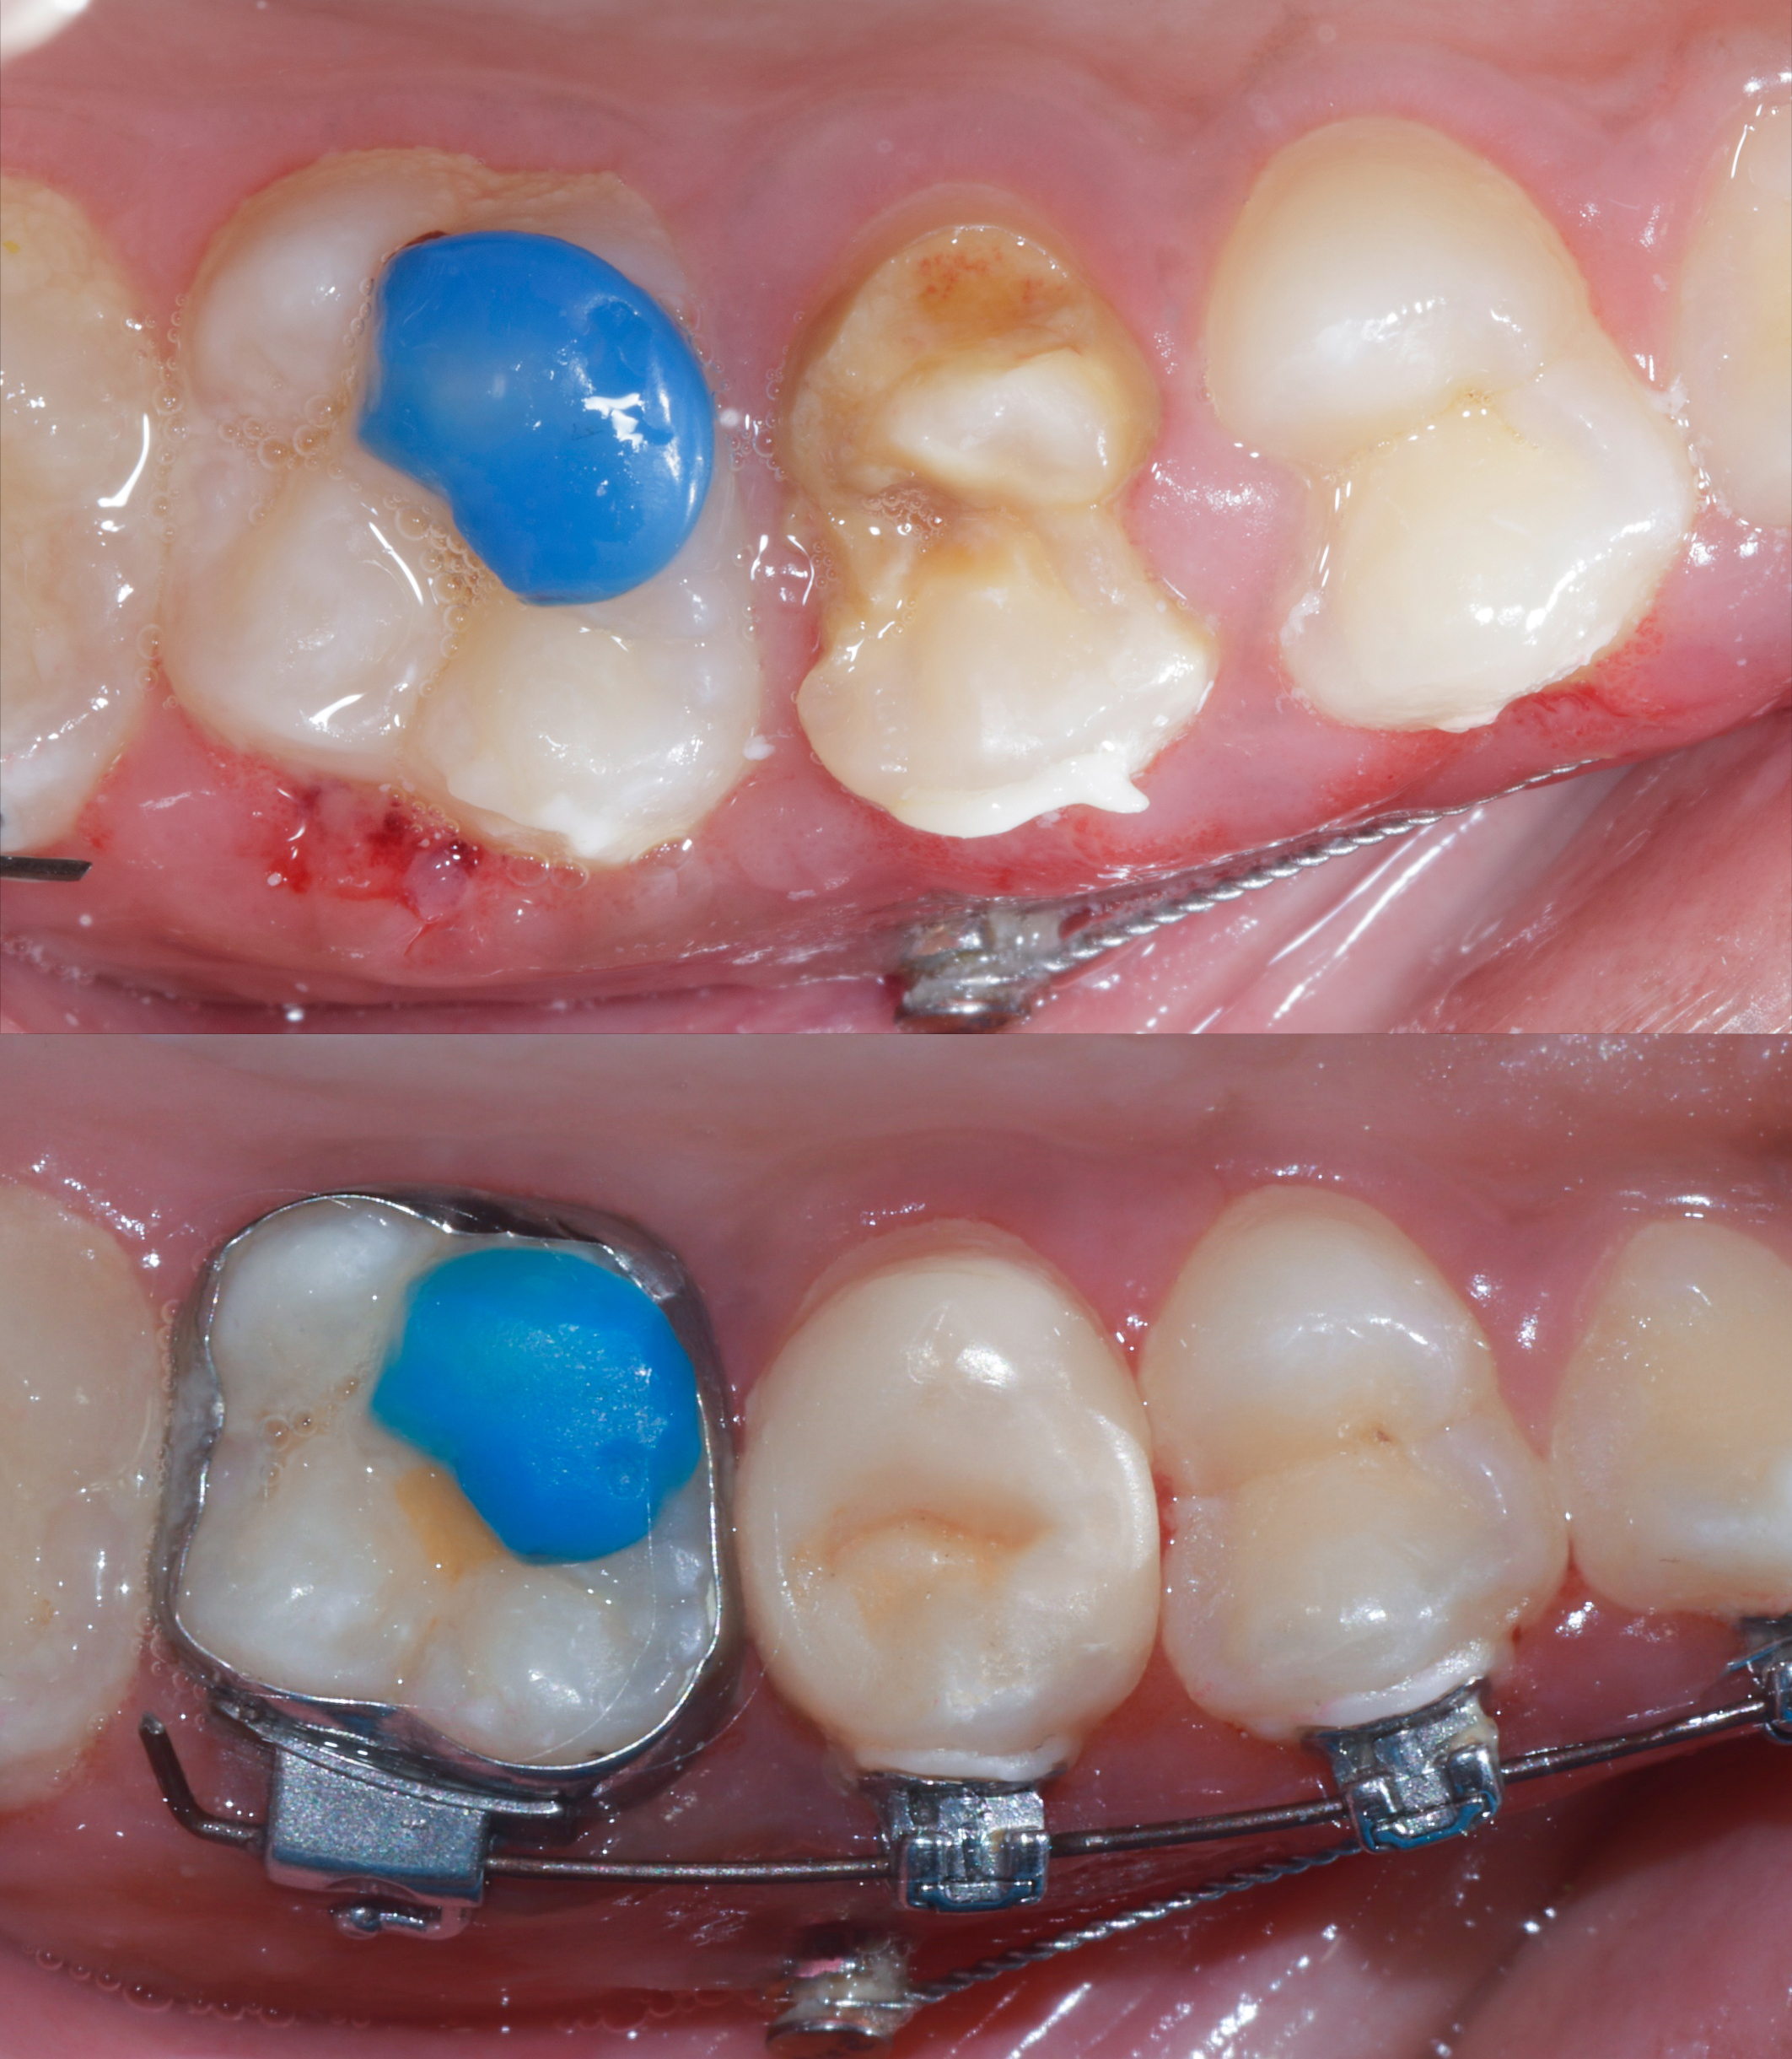
The Rubber dam is removed & the distal contact was intentionally kept slightly relieved to accommodate ongoing orthodontic tooth movement and to avoid creating resistance to tooth repositioning. This was achieved using sequential abrasive discs to carefully refine the proximal contact area. This modification was planned in consultation with the orthodontist.
Subsequently, the restoration was finished and polished using a multi-step protocol. Initial contouring and surface refinement were performed with polishing discs, followed by enhancement of surface using OneGloss. Final high-gloss polishing was achieved with diamond polishing paste and a buffing system, resulting in a smooth, enamel-like surface that promotes esthetics and reduces plaque accumulation. In view of ongoing orthodontic bite opening, occlusal contacts were not finalized at this stage. The restoration was instead shaped to maintain correct cuspal anatomy and proper marginal ridge alignment with adjacent teeth, allowing for future occlusal refinement.
|
|
| Figure 7: Post one month shows tissue healing. |
8: Radiographic Evaluation
An intraoral periapical radiograph (IOPA) was obtained to assess proximal contour, marginal adaptation, and overall integrity of the restoration. (Figure 8)
|
|
| Figure 8: Pre and post IOPA collage showing natural mesial / distal contour due to use of Garrison ReelMatrix. |