FREE SHIPPING on orders over $475
FREE SHIPPING on orders over $475 | No Code Needed
A 4-year-old female patient presented to the clinic for a routine dental examination. The parents reported that the child had recently undergone a dental screening at school, where the examining dentist had identified a small defect on the mandibular right second primary molar (tooth 85).
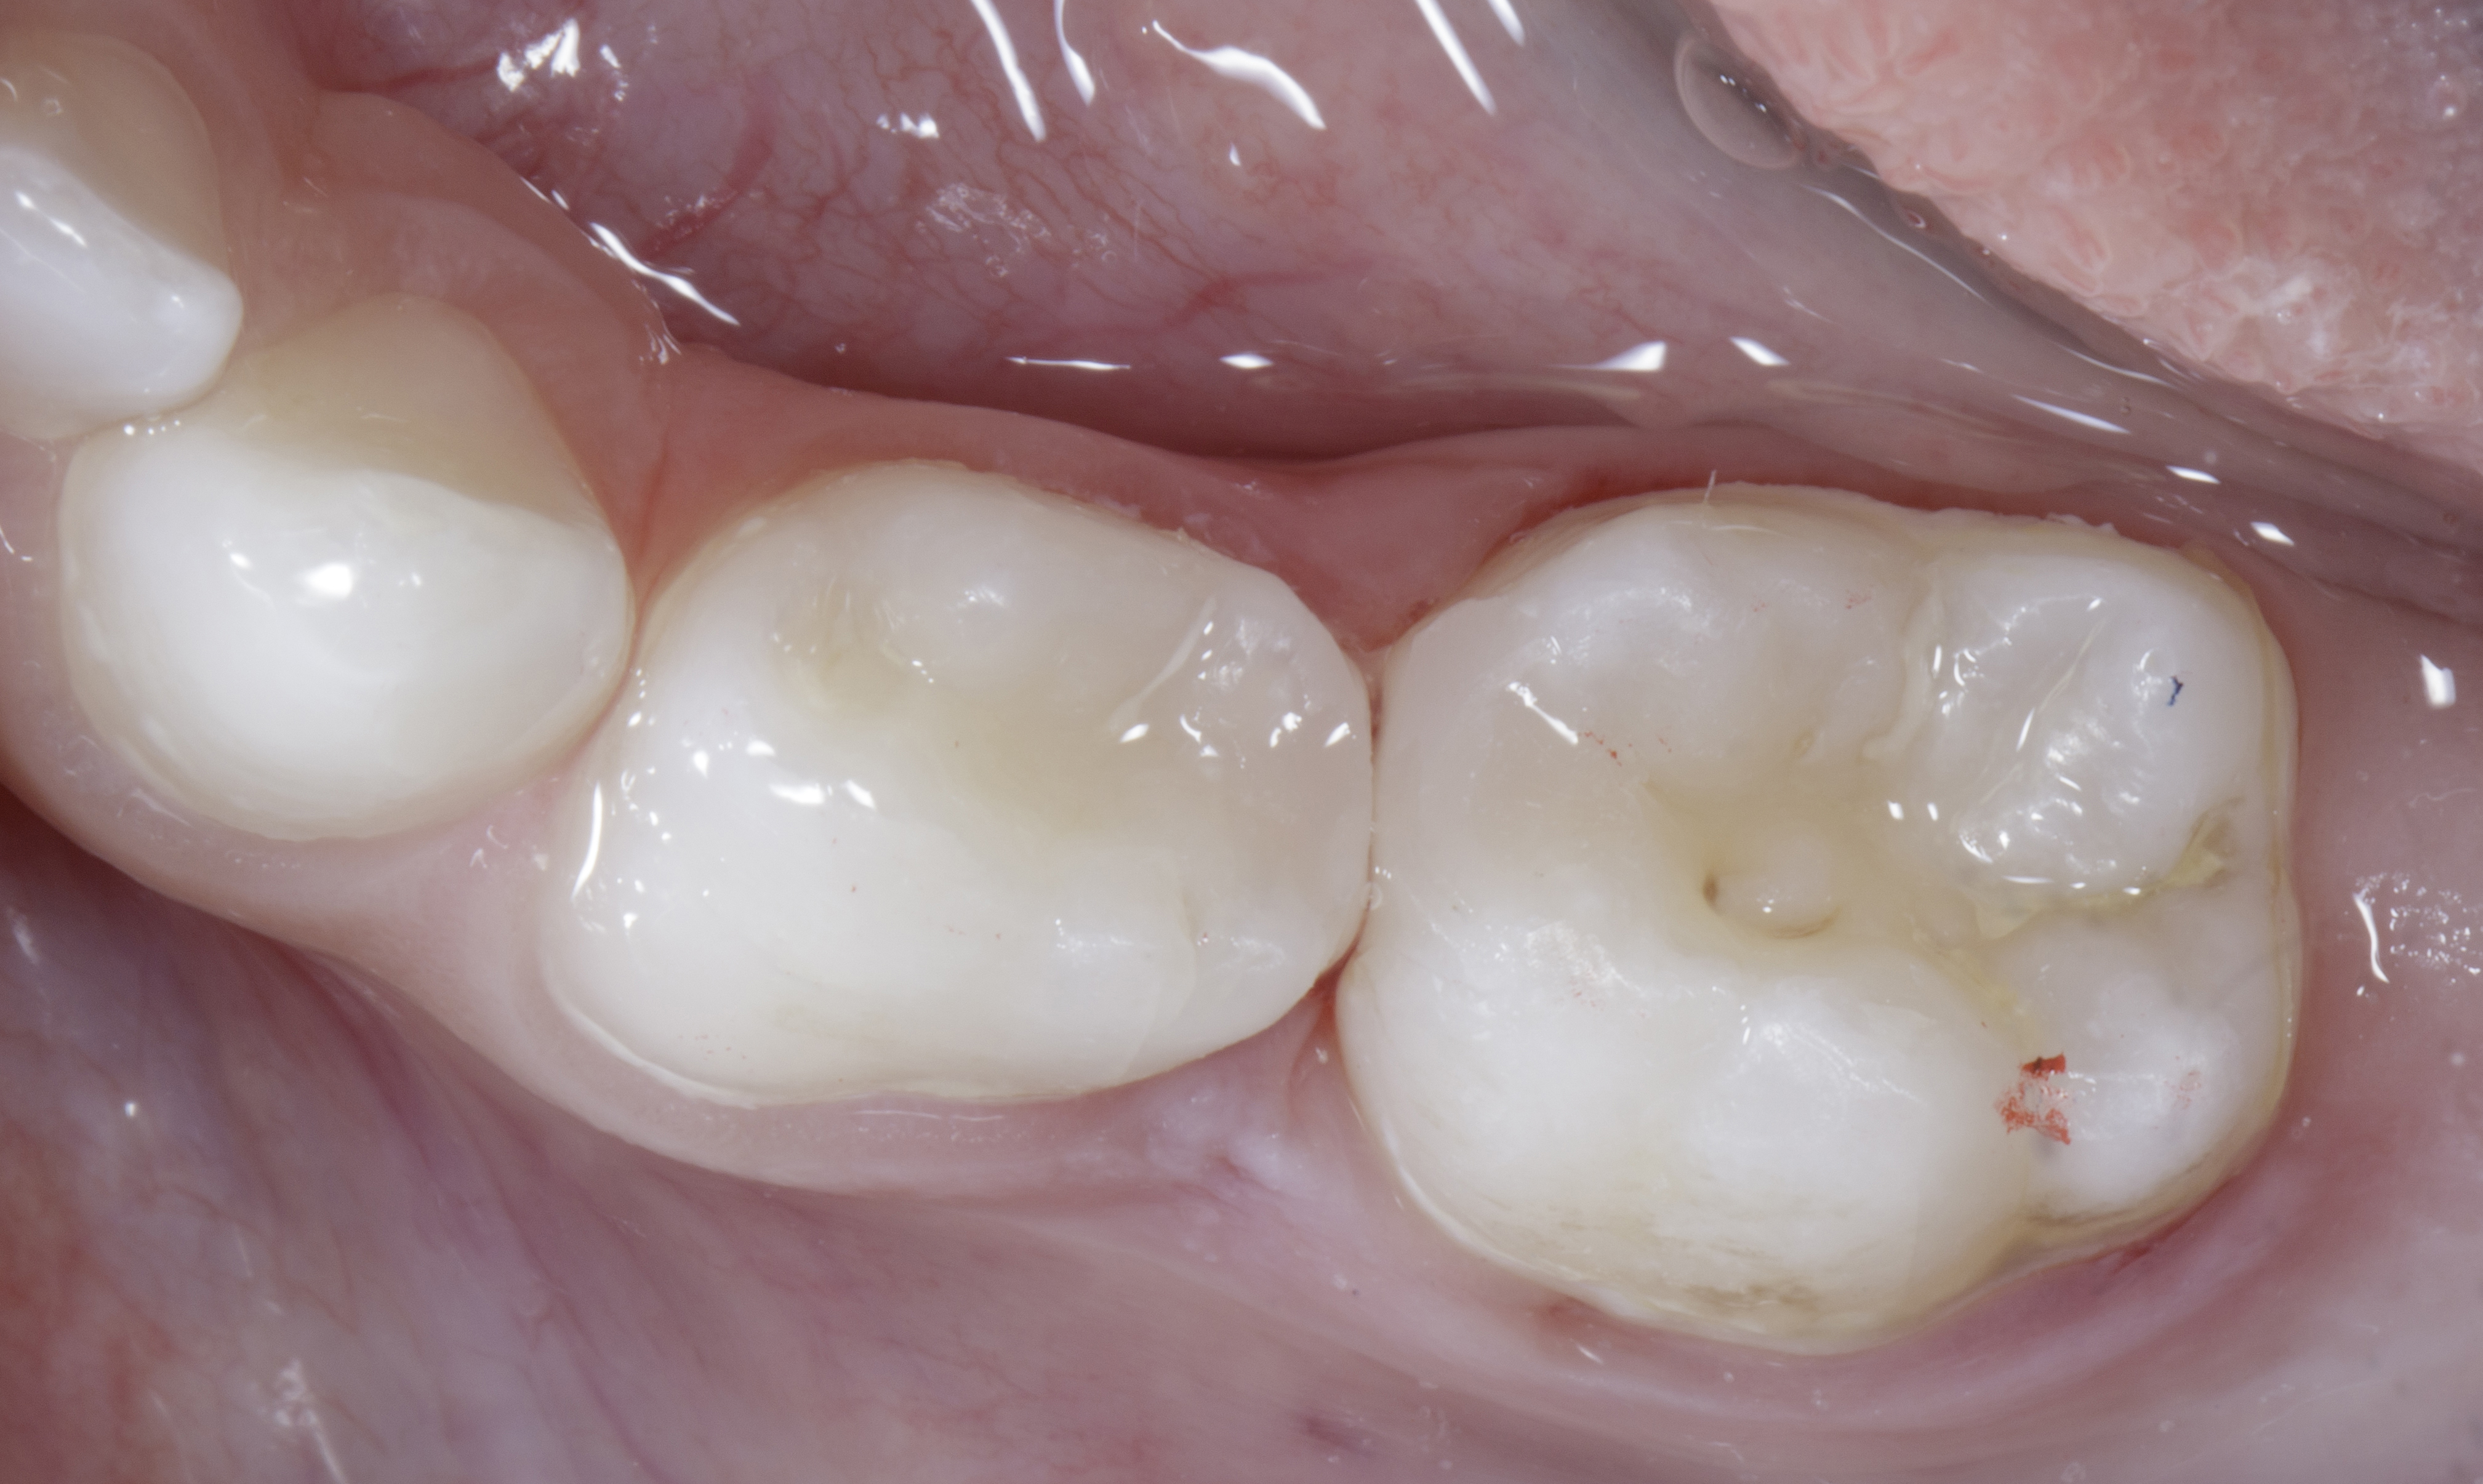
However, a more detailed clinical assessment at our clinic revealed dark discoloration involving both the mandibular right first and second primary molars (teeth 84 and 85). High-magnification clinical photography was performed to evaluate the suspicious proximal areas more closely and document the visible changes.
Based on the clinical findings, an intraoral periapical radiograph was obtained to further assess the proximal surfaces and the extent of the suspected lesions. Radiographic examination confirmed adjacent Class II carious lesions involving both primary molars (84 and 85), with no apparent radiographic involvement of the pulp.
This case highlights the importance of comprehensive clinical and radiographic assessment in paediatric patients, as early proximal lesions may not always be fully appreciated during routine visual examination. Identifying both lesions at an early stage allowed treatment planning with the objective of preserving the remaining sound tooth structure and restoring the natural proximal anatomy of both primary molars (Fig. 01).
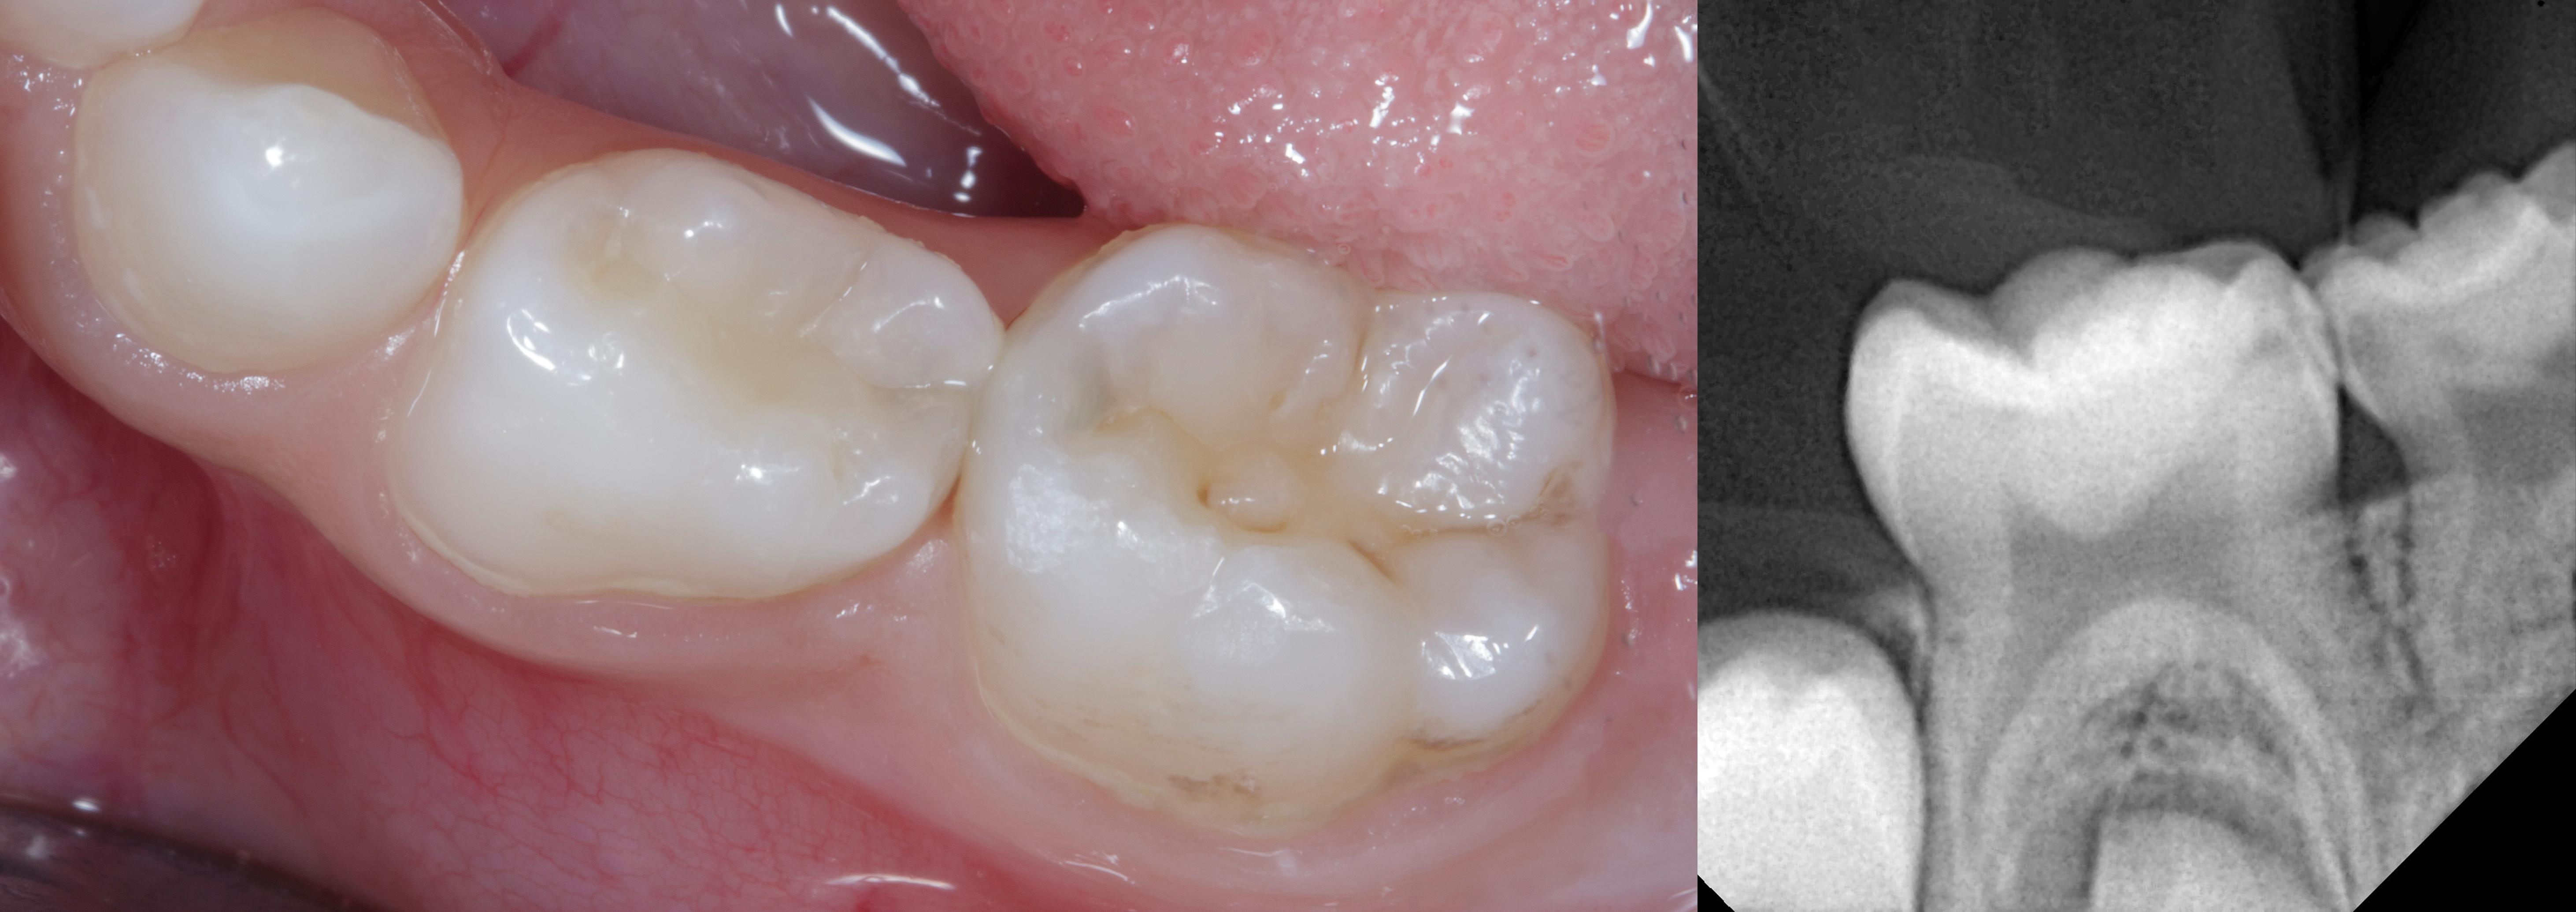
Preoperative clinical photographs showing dark discoloration involving the mandibular right primary molars (84 and 85), supported by the IOPA radiograph confirming adjacent Class II carious lesions with no apparent radiographic pulpal involvement. |
Before initiating clinical treatment, the foremost priority was to establish rapport with the 4-year-old child and create a comfortable, reassuring environment. Building trust and reducing dental anxiety were essential to ensuring a positive treatment experience.
Fortunately, the child's father was also undergoing dental treatment at our clinic, allowing her to become familiar with the dental environment through his visits. This helped create a reassuring atmosphere and reduced the unfamiliarity associated with visiting a dental office.
Rather than proceeding directly with restorative treatment, the first visit was dedicated to familiarising the child with the dental setting and instruments. A routine professional cleaning and polishing procedure was performed to introduce her gradually to dental treatment in a non-threatening manner. This initial acclimatisation helped build confidence and establish a positive association with the dental experience.
Based on the clinical and radiographic findings, the treatment plan involved caries removal from both adjacent primary molars (84 and 85), followed by direct composite restorations using the Garrison QUAD sectional matrix system.
The restorative procedure was planned under local anaesthesia using a 30-gauge short needle to minimise injection-related discomfort. Articaine was selected as the local anaesthetic agent, with infiltration anaesthesia planned for the procedure. The anaesthetic technique and dosage were determined according to the child's age, body weight and clinical requirements.
The overall treatment strategy focused on combining effective pain control, a child-friendly clinical approach and an efficient restorative workflow to achieve predictable restorative outcomes while maintaining the child's comfort and cooperation.
Glass ionomer cement (GIC) is frequently considered a suitable restorative material in paediatric dentistry because of its chemical adhesion to tooth structure, fluoride release and relative tolerance to less-than-ideal moisture control.
However, material selection in this case required careful consideration of the specific restorative demands. Both primary molars presented with adjacent Class II defects, where establishing durable proximal contacts, adequate marginal integrity and appropriate anatomical contours was particularly important. The relatively lower fracture resistance and wear resistance of conventional GIC made it a less favourable choice for this restorative situation.
An additional consideration when restoring adjacent Class II defects is the ability of the restorative material to reproduce proximal anatomy and establish firm, well-defined contacts. Composite resin offers an advantage through its sculptability and ability to adapt against the sectional matrix band, allowing the operator to reproduce natural proximal contours and develop predictable proximal contacts. Conventional GIC, owing to its comparatively lower strength and different handling characteristics, may offer less control when reconstructing precise proximal anatomy, particularly when restoring two adjacent proximal surfaces.
Considering these clinical requirements, SHOFU BEAUTIFIL II LS was selected for the restorations. This material incorporates proprietary GIOMER technology based on Surface Pre-Reacted Glass-ionomer (S-PRG) fillers, which have the ability to release and recharge six ions: fluoride, strontium, sodium, aluminium, silicate and borate. These properties contribute to fluoride release and recharge, acid-neutralising potential and anti-plaque effects, including reduced plaque adhesion and bacterial activity under investigated conditions. Such characteristics make GIOMER technology an interesting restorative option in paediatric patients, where maintaining a favourable oral environment and managing the risk of recurrent caries are important considerations.
Additionally, BEAUTIFIL II LS incorporates SRS (Steric Repulsion Structured) monomer technology, designed to reduce polymerisation shrinkage and associated shrinkage stress. Its filler technology and mechanical properties also support restorative sculptability, wear resistance and surface polishability.
Although composite placement requires effective moisture control, the child's cooperation and the planned use of rubber dam isolation allowed us to establish a controlled operative environment. BEAUTIFIL II LS was therefore selected to address the mechanical and anatomical requirements of adjacent Class II restorations while offering the additional material-related benefits of GIOMER technology.
Rubber dam isolation was established using a medium-thickness rubber dam sheet, initially secured with a wingless B1 clamp on tooth 85. However, due to the anatomical configuration of tooth 84, the dam sheet showed a tendency to disengage. To achieve stable isolation and prevent displacement during cavity preparation, an additional clamp was placed on tooth 84.
This two-clamp configuration provided secure and reliable isolation while maintaining adequate access to both operative sites. Care was taken to position the clamps so that they did not interfere with the placement and adaptation of the sectional matrix bands and separation ring (Fig. 02).
Following isolation, initial access to the carious lesions was achieved using a high-speed round bur. Bulk caries removal was subsequently followed by final caries excavation using slow-speed carbide burs, guided by the application of a caries-disclosing dye to help identify residual carious dentin. The cavity preparations were then refined using a Calla Lily bur to create a bevel along the enamel margins, exposing additional enamel surface to enhance the available area for adhesive bonding while maintaining a conservative preparation design.
Finishing discs were used to refine the cavosurface margins and eliminate irregularities. Any unsupported enamel was removed to establish well-defined peripheral margins for the subsequent adhesive restorative procedure.
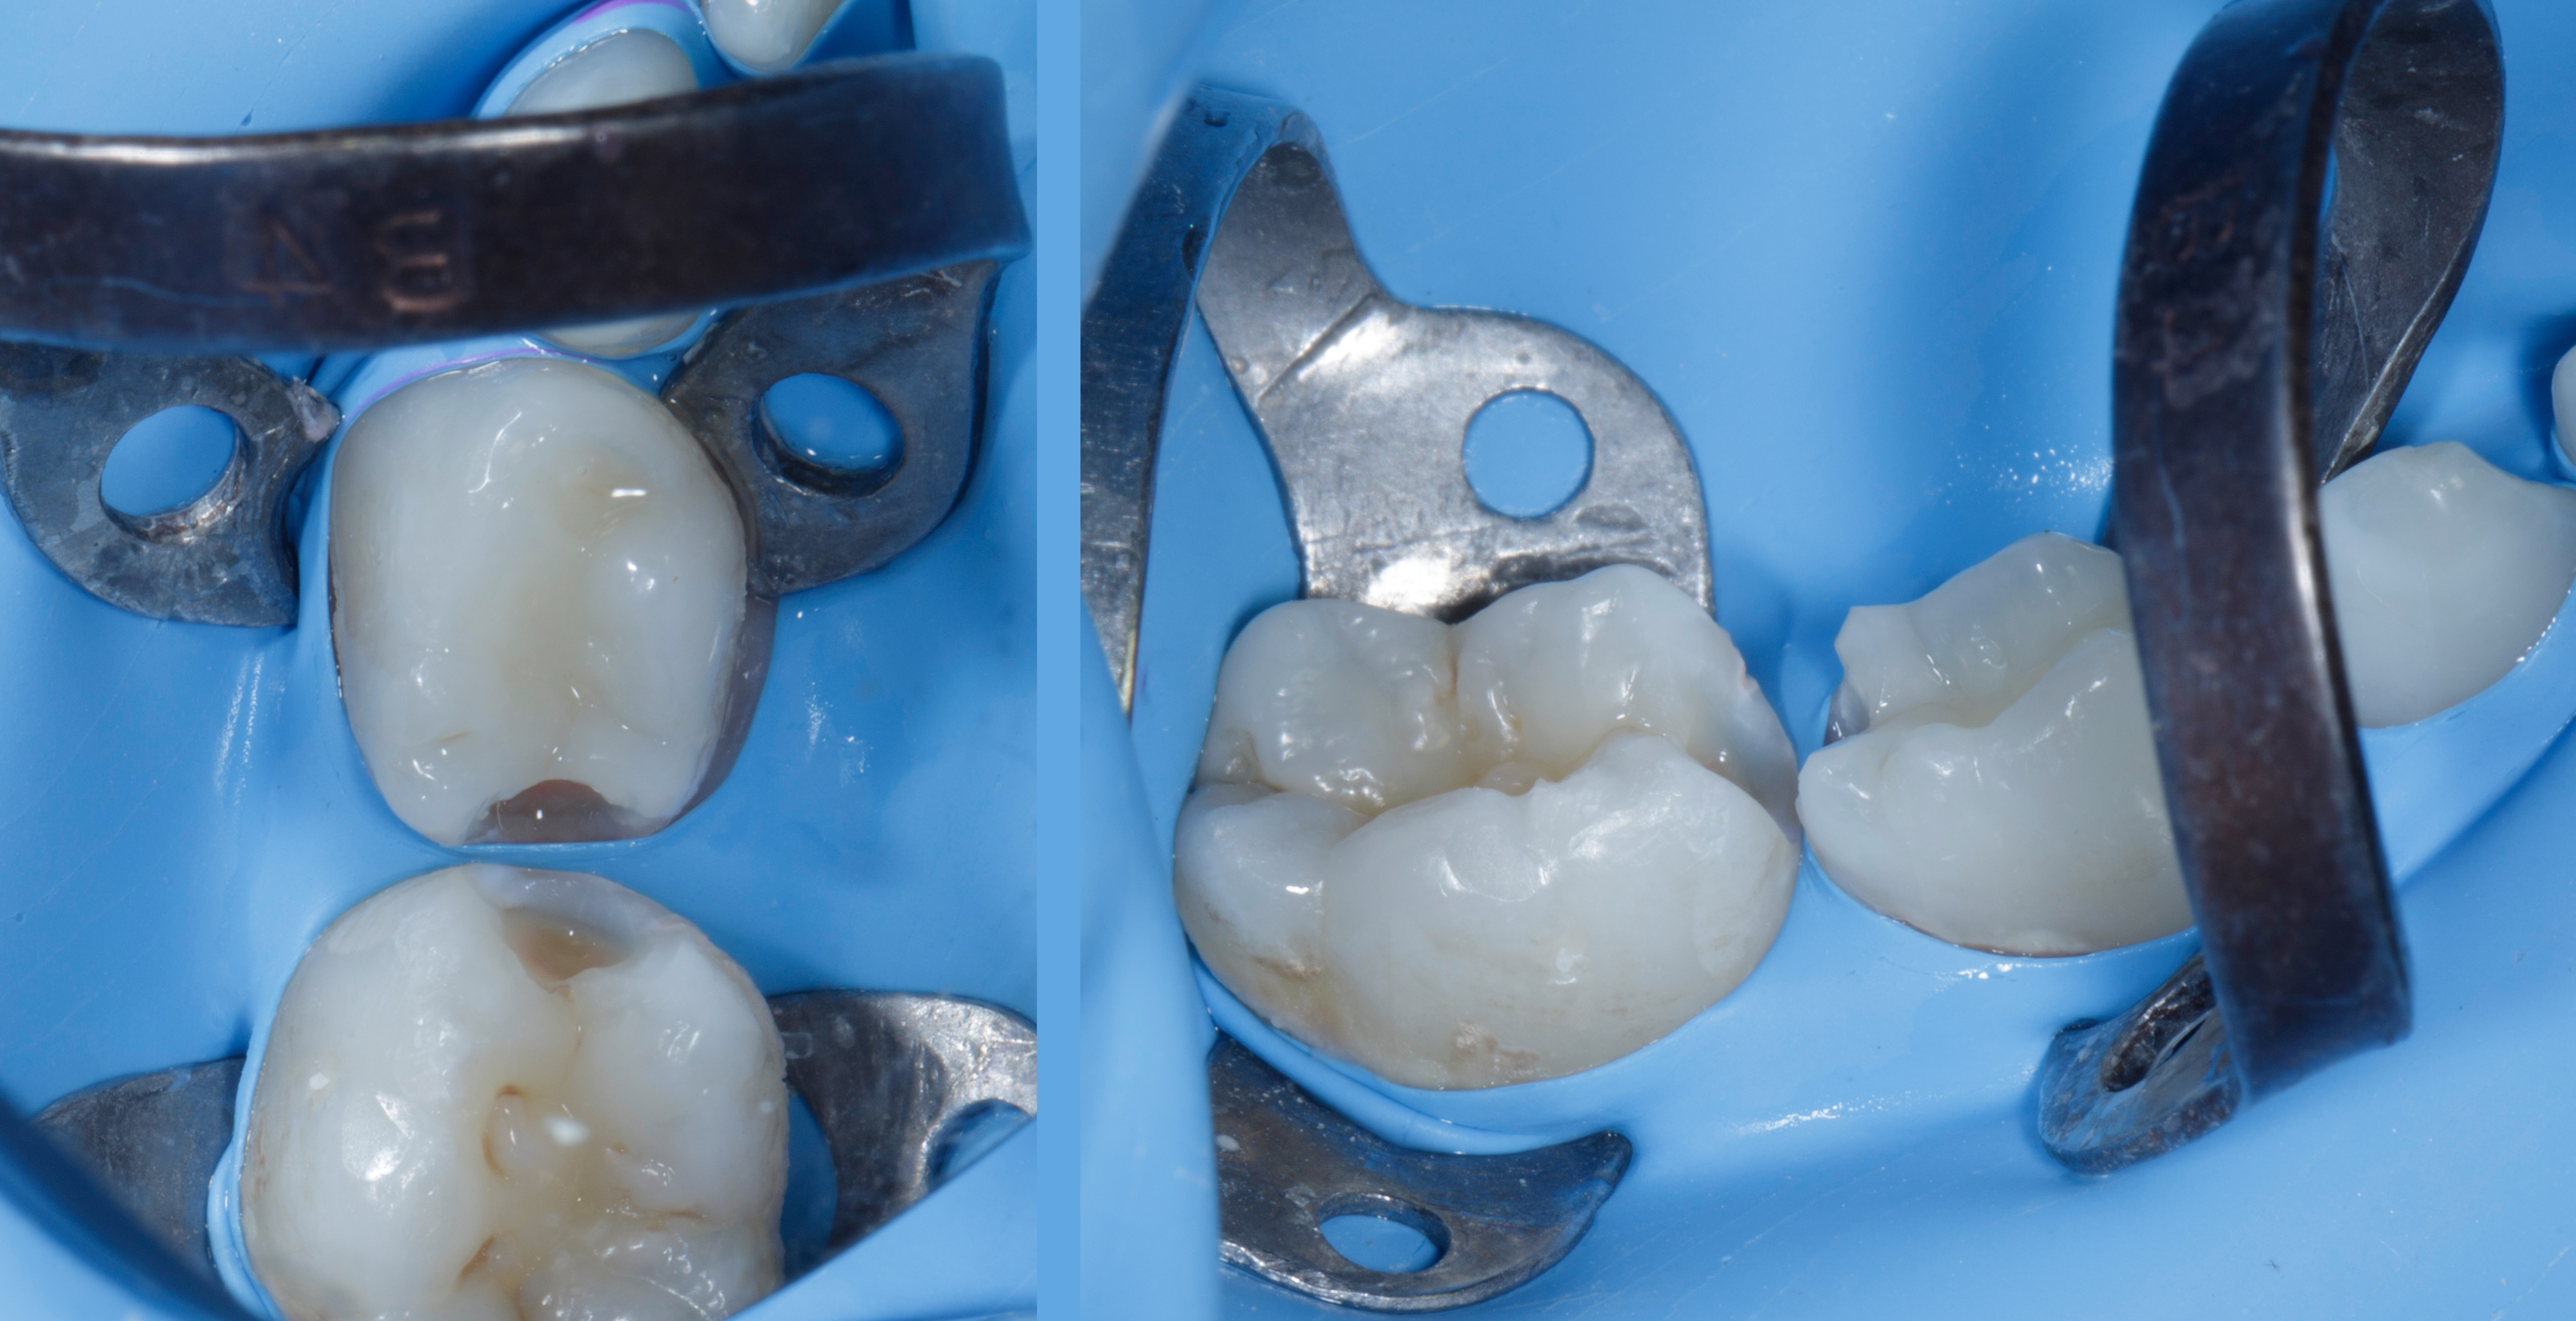
Clinical photographs showing rubber dam isolation of the mandibular right primary molars (84 and 85) using a two-clamp configuration, followed by caries excavation and refinement of the adjacent Class II cavity preparations prior to adhesive restoration. |
Phosphoric acid etching was performed, with enamel etched for 15 seconds and dentin for approximately 3–5 seconds. The shortened dentin-etching duration was selected in consideration of the structural and morphological differences between primary and permanent dentin. Published studies have investigated reduced etching times in primary dentin, suggesting that shorter exposure may influence adhesive performance under certain conditions. This approach was intended to limit excessive dentin demineralisation while facilitating subsequent adhesive interaction with the prepared tooth structure. The adhesive bonding agent was subsequently applied according to the clinical protocol (Fig. 02).
Clinical assessment indicated approximately 1 mm of available interproximal clearance, allowing placement of the sectional matrix bands and subsequent management of the proximal surfaces (Fig. 02). Considering the height and configuration of the defects, firm Garrison FXH 100 matrix bands were selected. These bands have a thickness of 38 µm and a height of 4.3 mm, making them suitable for the anatomical dimensions of primary molars. Their firmer construction is designed to resist deformation, with the manufacturer reporting approximately 70% greater resistance compared with standard dead-soft matrix bands.
The selection of these firm, appropriately sized bands was intended to provide better resistance to deformation during placement and composite sculpting, while supporting the reconstruction of the proximal contours of both primary molars.
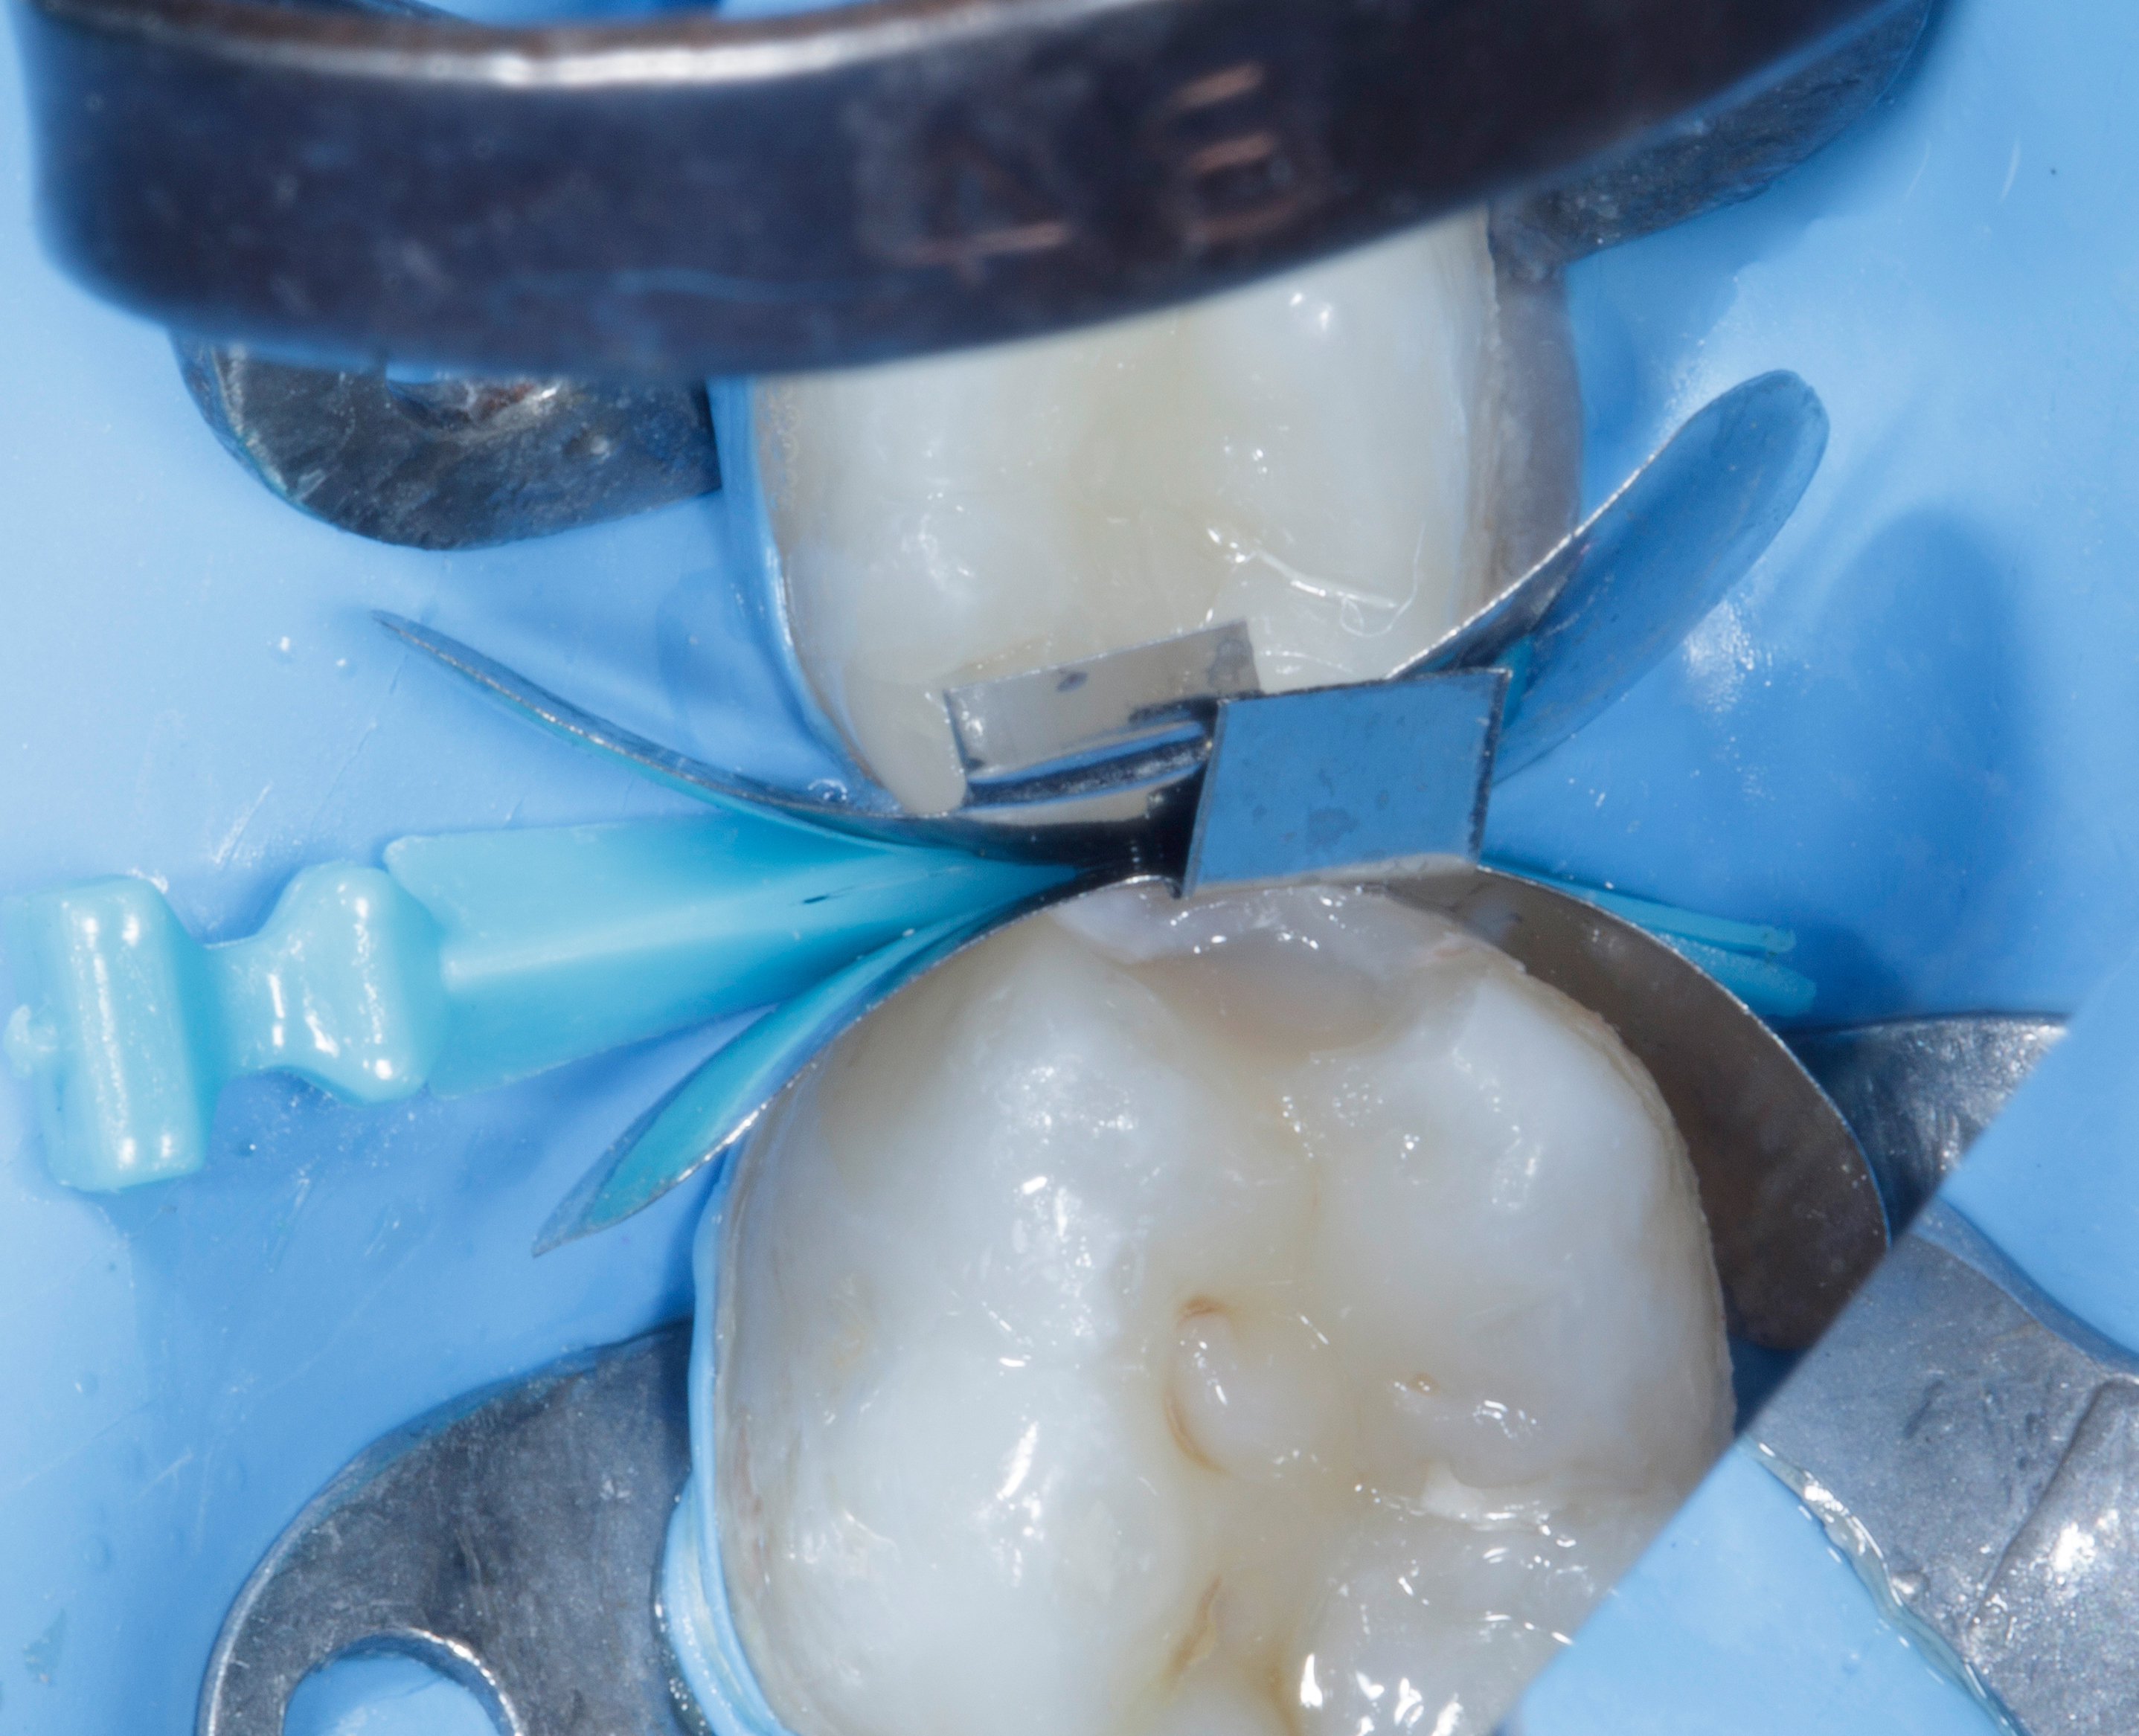
Garrison FXH 100 matrix bands secured with an blue Quad wedge. The gingival seal is carefully checked to ensure intimate adaptation of the bands to the gingival floor. |
The Garrison QUAD Matrix System was selected for this challenging restorative situation, in which both adjacent proximal surfaces required reconstruction. Its ring-and-wedge configuration is designed to stabilise the matrix assembly, support gingival adaptation and provide controlled tooth separation.
Both FXH 100 matrix bands were positioned simultaneously around teeth 84 and 85 and secured using the blue Garrison QUAD wedge. This initial arrangement stabilised the bands and facilitated their adaptation at the gingival margins, establishing the foundation for subsequent placement of the separation ring (Fig. 03).
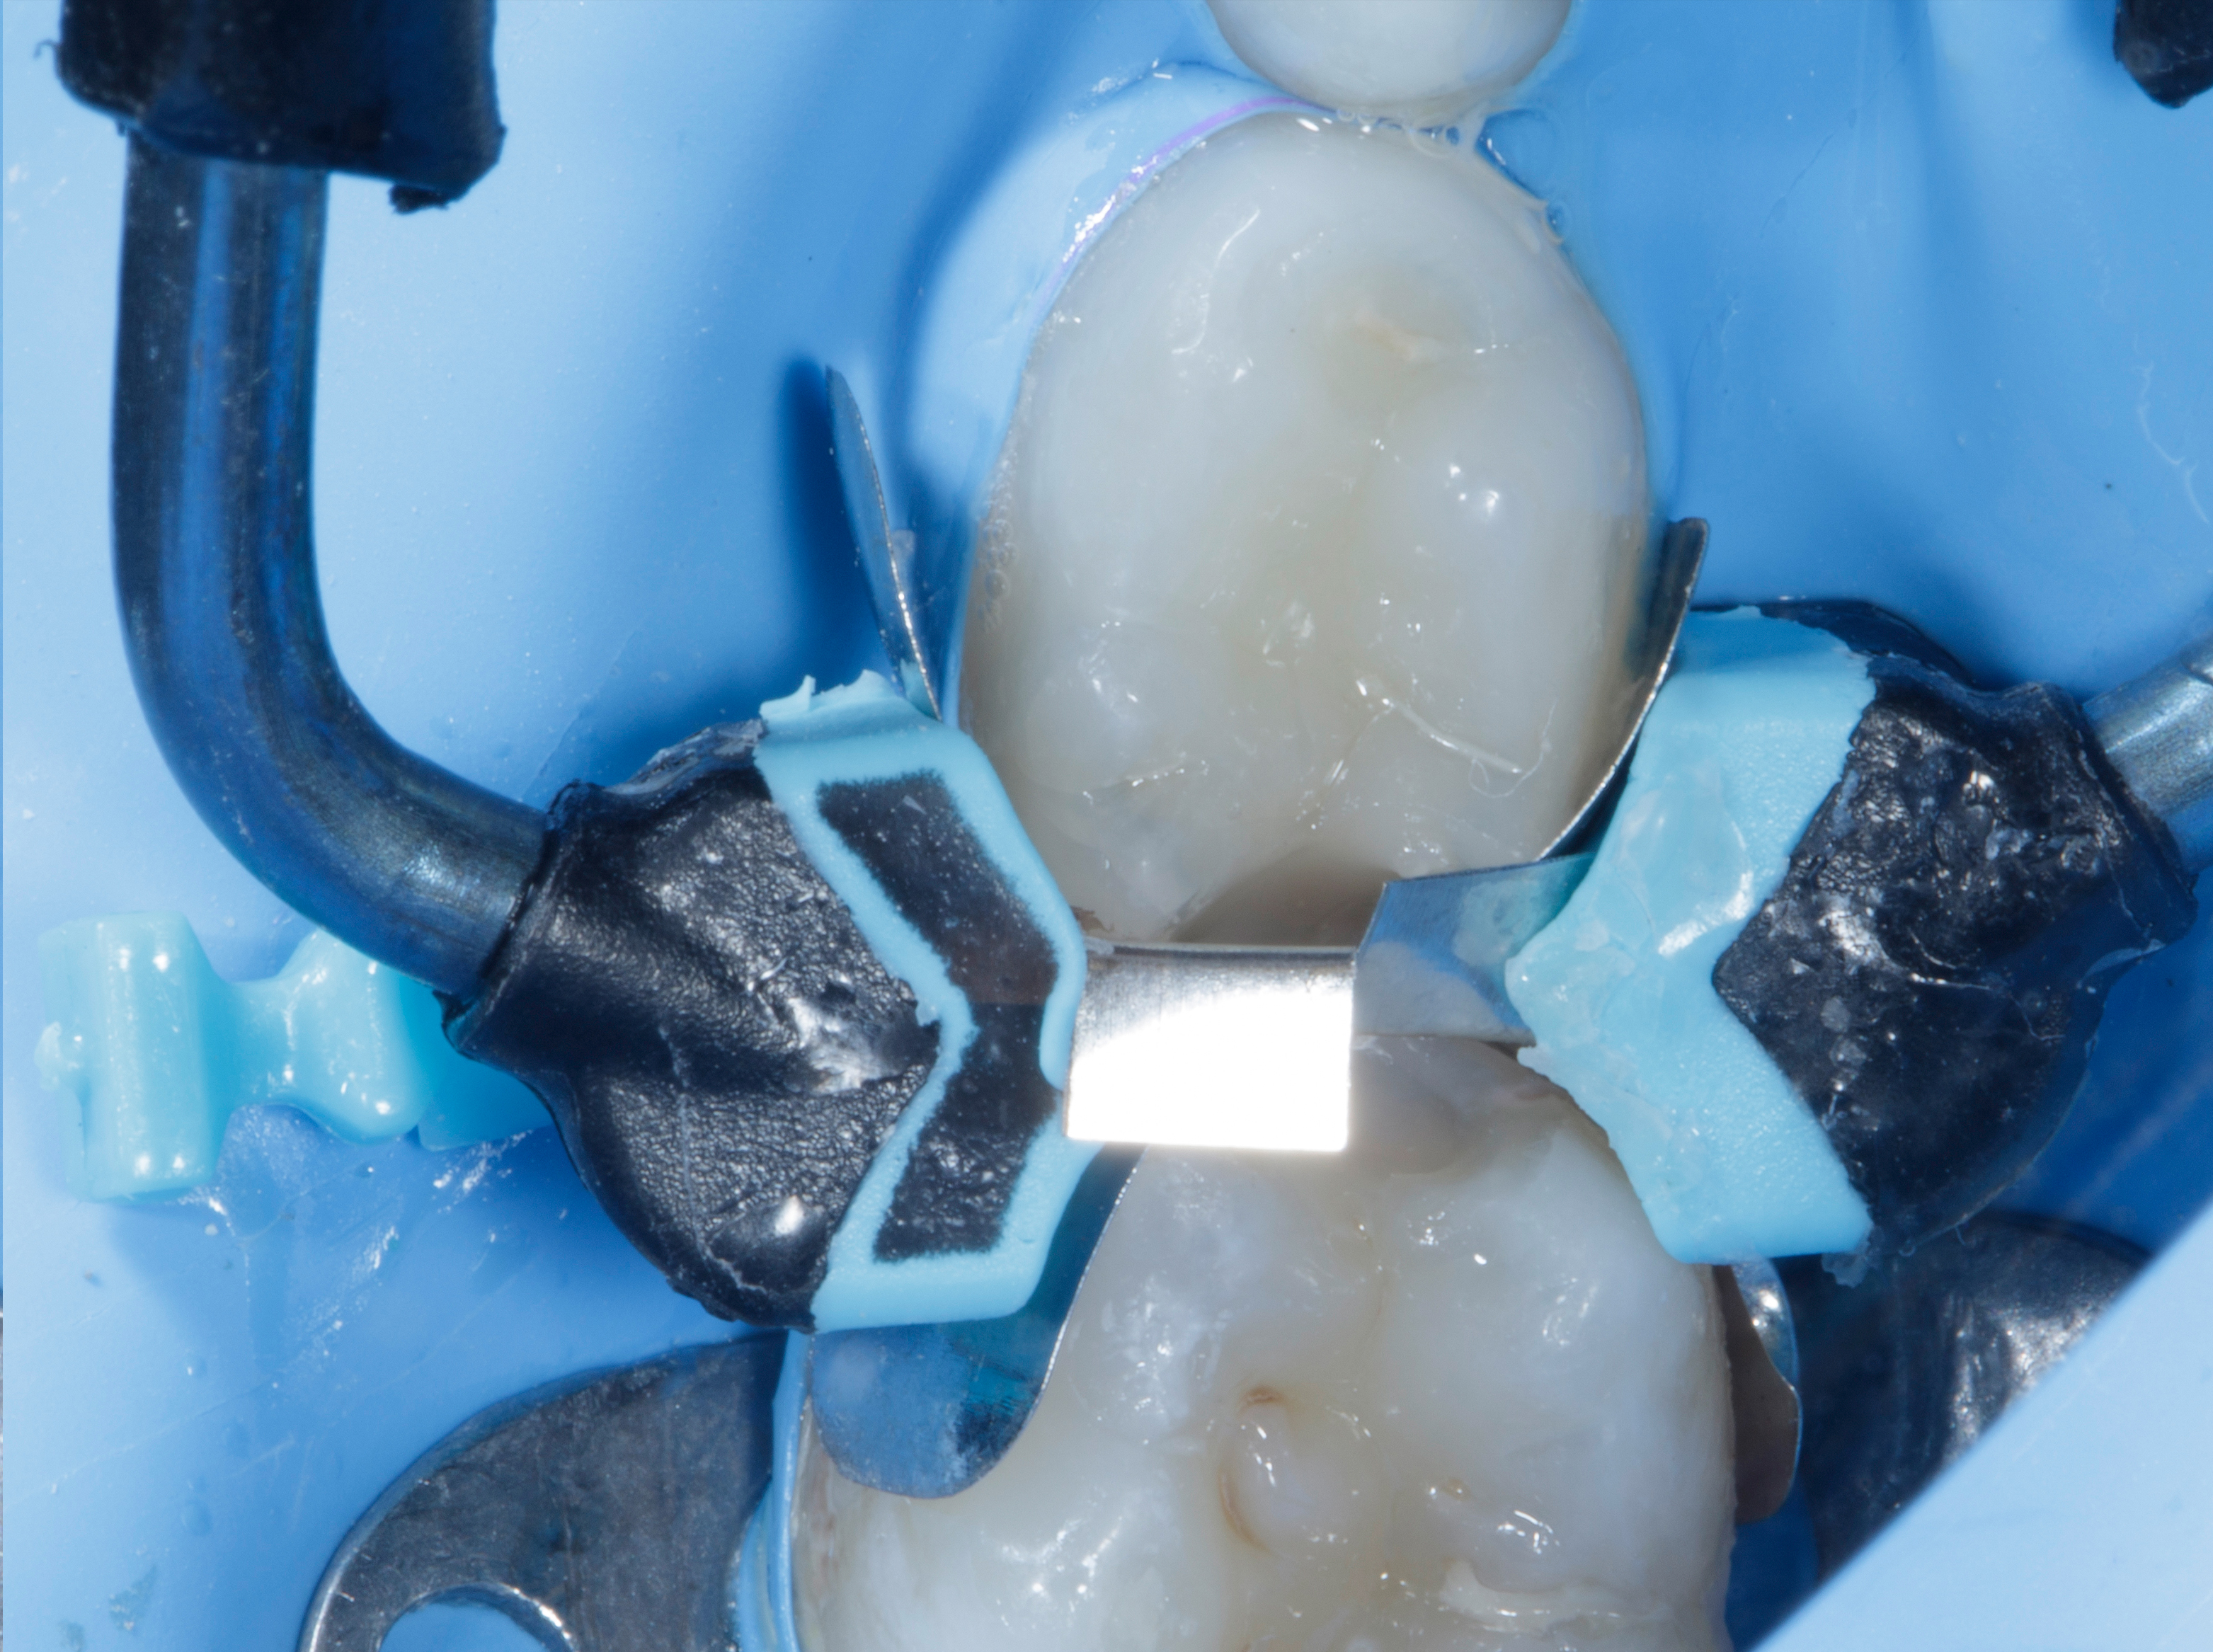
The Garrison Quad Blue ring is placed to stabilize the matrix system and enhance adaptation. The gingival floor seal is rechecked before proceeding with the restorative procedure. |
To facilitate placement of the separation ring, the additional B4 clamp on tooth 84 was removed, providing adequate space for positioning the QUAD ring. Interestingly, following ring placement, the rubber dam sheet remained stable and did not disengage from tooth 84, allowing effective isolation to be maintained (Fig. 04).
The blue Garrison QUAD Universal Ring was then positioned across the adjacent teeth in conjunction with the blue QUAD wedge. The QUAD ring incorporates asymmetrical tips designed to engage with the split-tip QUAD wedge. This interaction helps stabilise the matrix assembly and supports adaptation around the prepared proximal surfaces (Fig. 04).
An important consideration when using a separation ring on primary molars is their characteristic buccal and lingual anatomy - Unlike permanent molars, primary molars generally have less pronounced buccal and lingual cervical undercuts for ring-tip engagement. Consequently, the separation ring may have a tendency to slip or dislodge during placement. To minimise this risk, the QUAD ring should be positioned and gently advanced in a more cervical direction, ensuring adequate engagement of its tips with the tooth surfaces. This helps improve ring stability and maintain the matrix assembly in position during the restorative procedure.
Following placement, the complete matrix assembly was carefully checked for stability, proper band adaptation and a satisfactory gingival seal at both proximal margins (Fig. 04).
The combination of firm FXH 100 matrix bands, the QUAD wedge and the separation ring provided a stable restorative framework for managing the adjacent Class II defects. This was particularly important for reconstructing the compromised proximal anatomy and developing appropriate proximal contacts and contours on both primary molars.
One of the significant advantages of the QUAD Matrix System in this clinical situation was the ability to restore both adjacent Class II defects sequentially without dismantling or removing the matrix assembly. Tooth 84 was restored first, followed by tooth 85, while maintaining the same matrix configuration throughout the restorative procedure. This simplified the restorative sequence, eliminated repeated matrix repositioning and improved procedural efficiency.
After confirming adequate matrix adaptation and gingival sealing at both cavity preparations, the adhesive procedure was initiated.
The adhesive bonding agent was actively applied to the prepared cavity surfaces for 20 seconds, ensuring adequate interaction with the tooth structure. This was followed by gentle air-drying until visible fluid movement ceased. The adhesive was subsequently light-cured for 40 seconds on each tooth, following the clinical protocol.
A thin layer (approximately 0.5 mm) of self-levelling, highly filled flowable composite (SHOFU Injectable XSL – Slow Levelling) was applied to the cavity floor to enhance adaptation to the internal cavity surfaces and minimise the risk of void formation. Its flow characteristics, with a flow capability of up to 1 mm, allow it to adapt closely to the internal contours of the preparation, helping to minimise air entrapment and improve internal adaptation.
In addition to improving internal adaptation, this intermediate layer was intended to assist in managing polymerisation shrinkage stresses at the adhesive interface, particularly in a high C-factor cavity configuration. Anatavara et al. (2016), in a finite element analysis, demonstrated that flowable composite liners could reduce stress concentrations within dentin, the adhesive layer and the hybrid layer under simulated conditions. Although these findings are based on computational modelling, they provide a biomechanical rationale for using a thin flowable composite layer as an intermediate adaptation and stress-management layer beneath the subsequent restorative composite increments.
The remaining portion of each Class II preparation was restored using packable composite (SHOFU BEAUTIFIL II LS, Shade A1), the selection of which has been discussed earlier. Particular attention was given to recreating the proximal contour and marginal ridge anatomy. The marginal ridge was carefully sculpted using a fine restorative instrument to establish the appropriate ridge height, contour and occlusal embrasure. The sectional matrix band provided support during reconstruction of the proximal wall and marginal ridge.
After completing the restoration of tooth 84, the matrix assembly was left undisturbed. The same restorative protocol was subsequently followed for tooth 85, allowing both adjacent Class II defects to be restored sequentially using a single matrix assembly (Fig. 05).
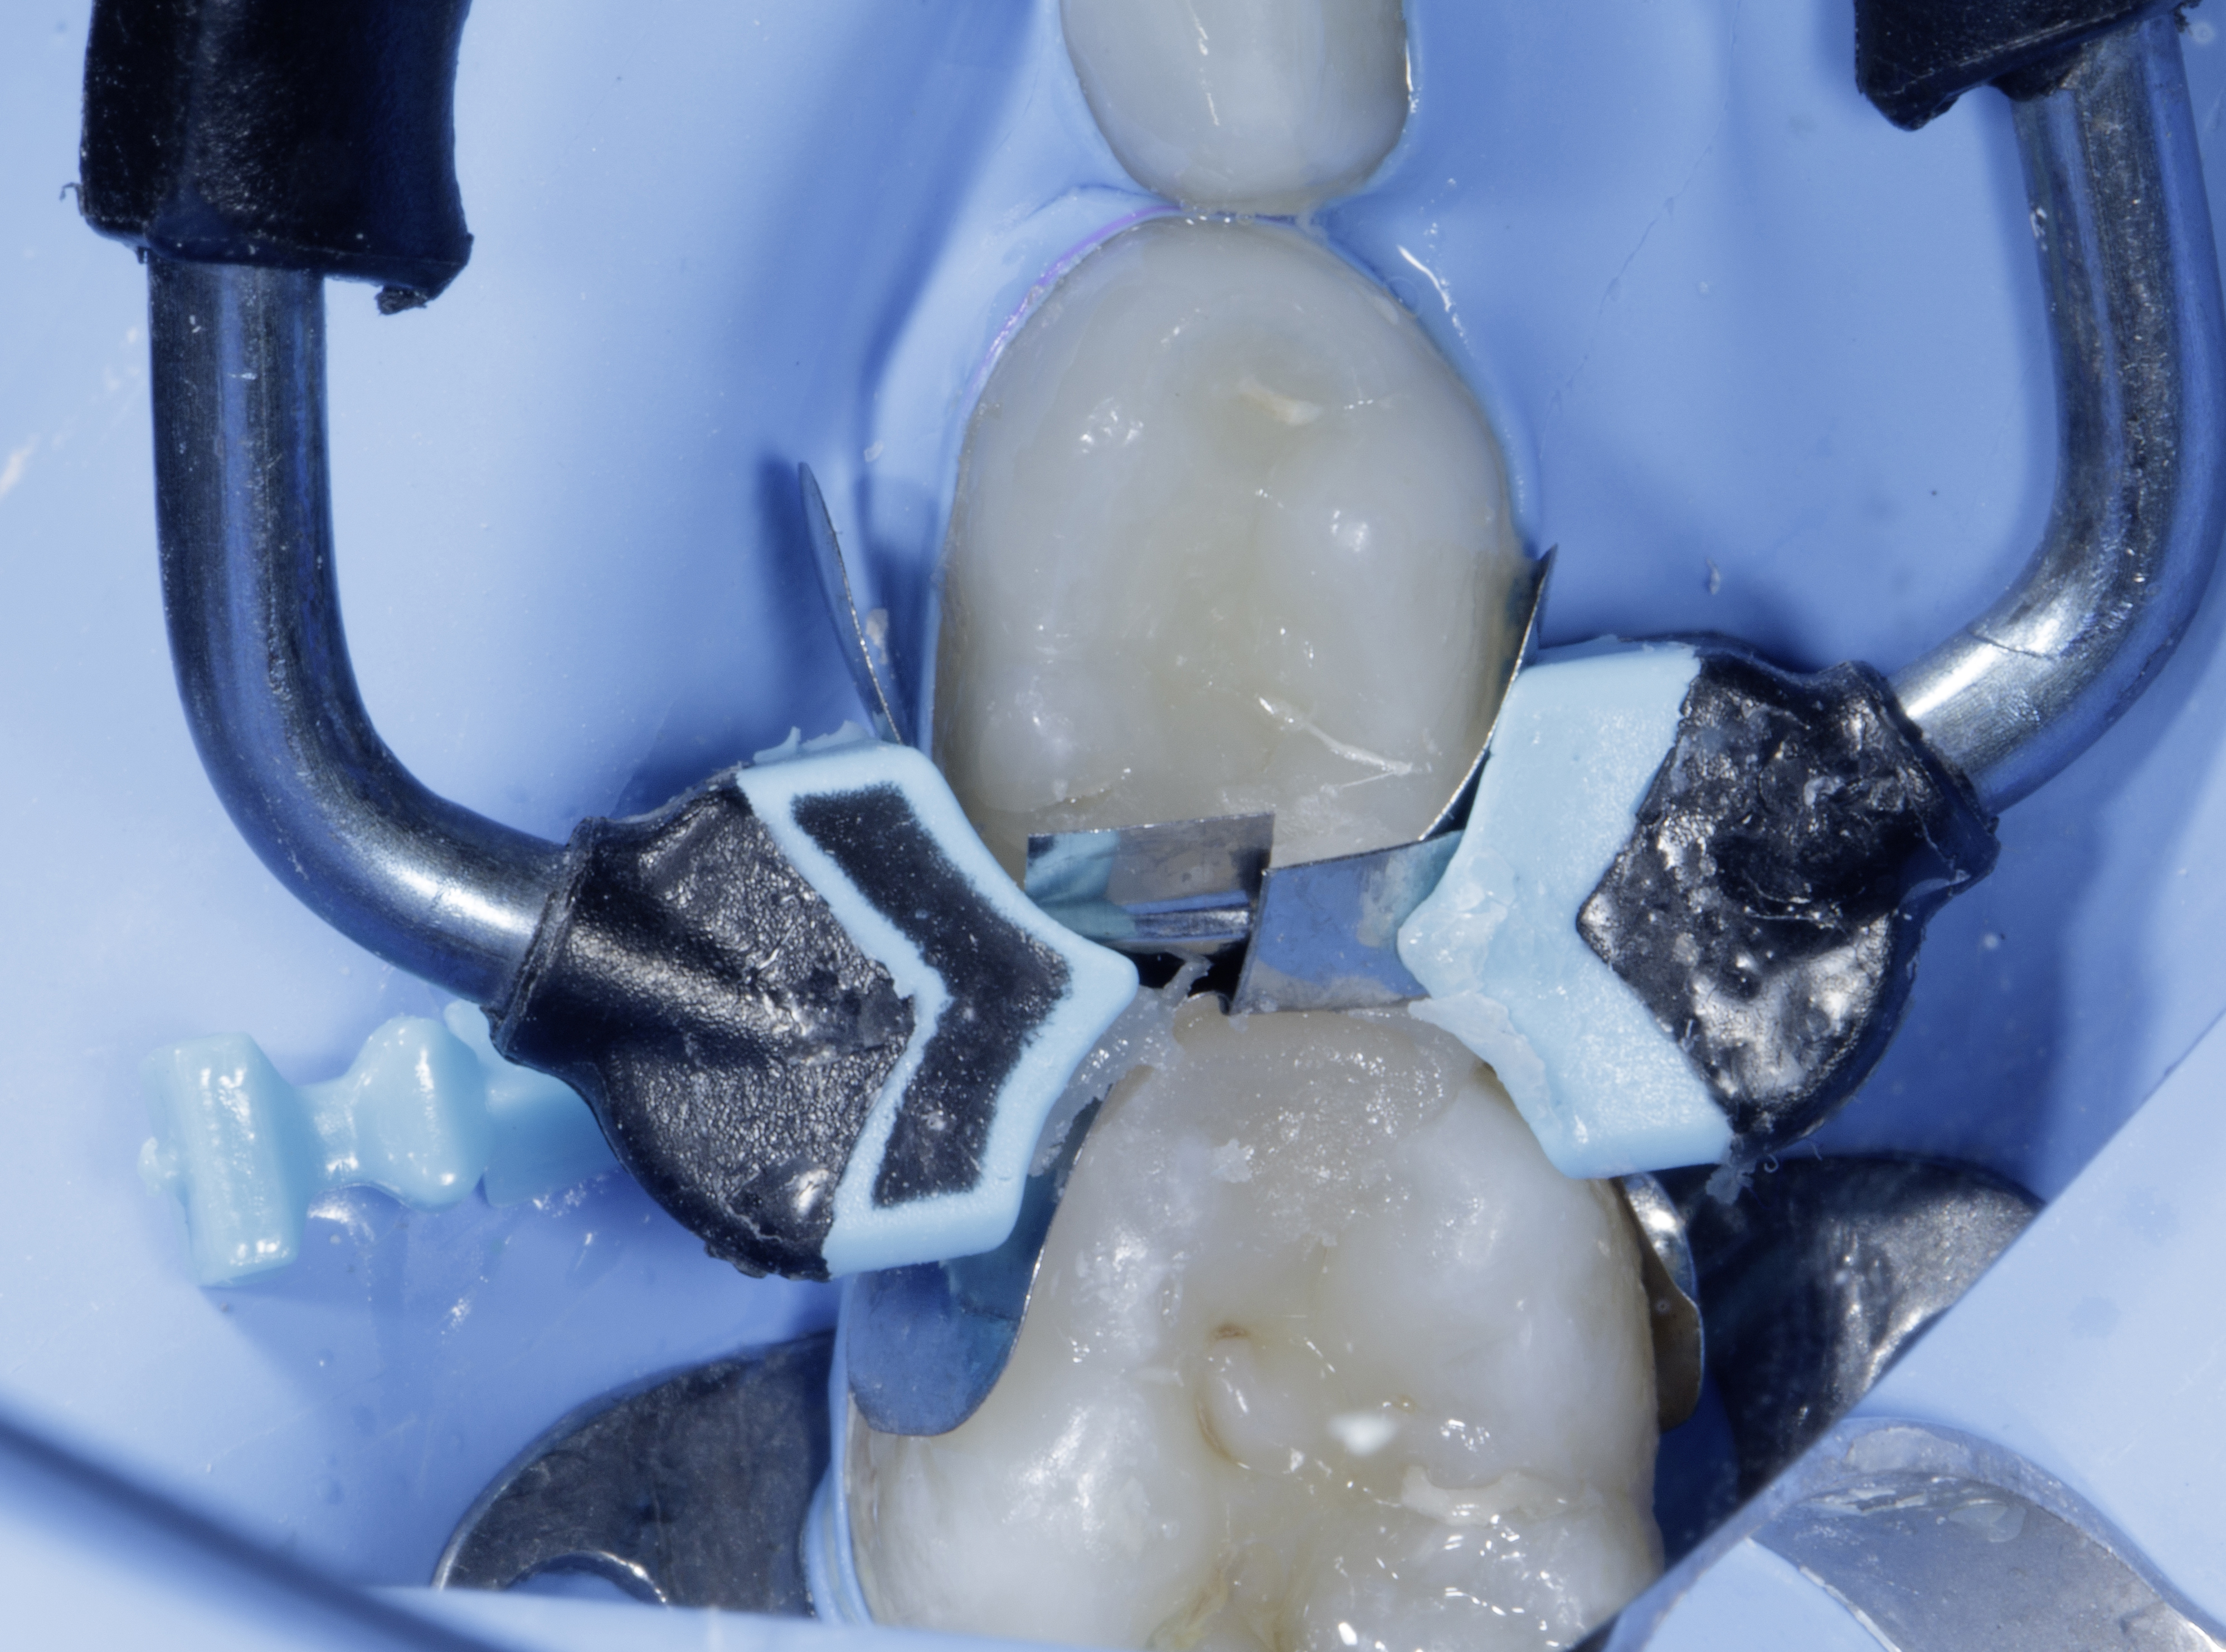
Clinical photograph demonstrating sequential composite restoration of both adjacent Class II preparations while maintaining the same matrix assembly, without removing or repositioning the matrix bands. |
Evaluation of Proximal Contacts and Final Clinical Outcome
Following completion of both restorations, the Garrison QUAD ring, matrix bands and wedge were carefully removed. Clinical examination revealed well-defined proximal contours, with no visible excess composite or marginal flash (Fig. 06).
Both restorations were evaluated for proximal contact, marginal integrity, anatomical contour and occlusal harmony. Removal of the matrix assembly allowed direct visualisation of the reconstructed proximal surfaces and assessment of the final contours.
The systematic approach, combining appropriate matrix selection, stable wedging, controlled tooth separation and incremental composite placement, facilitated the reconstruction of the previously compromised proximal anatomy. The completed restorations demonstrated well-defined proximal contacts, anatomically contoured marginal ridges and natural-looking proximal surfaces on both primary molars.
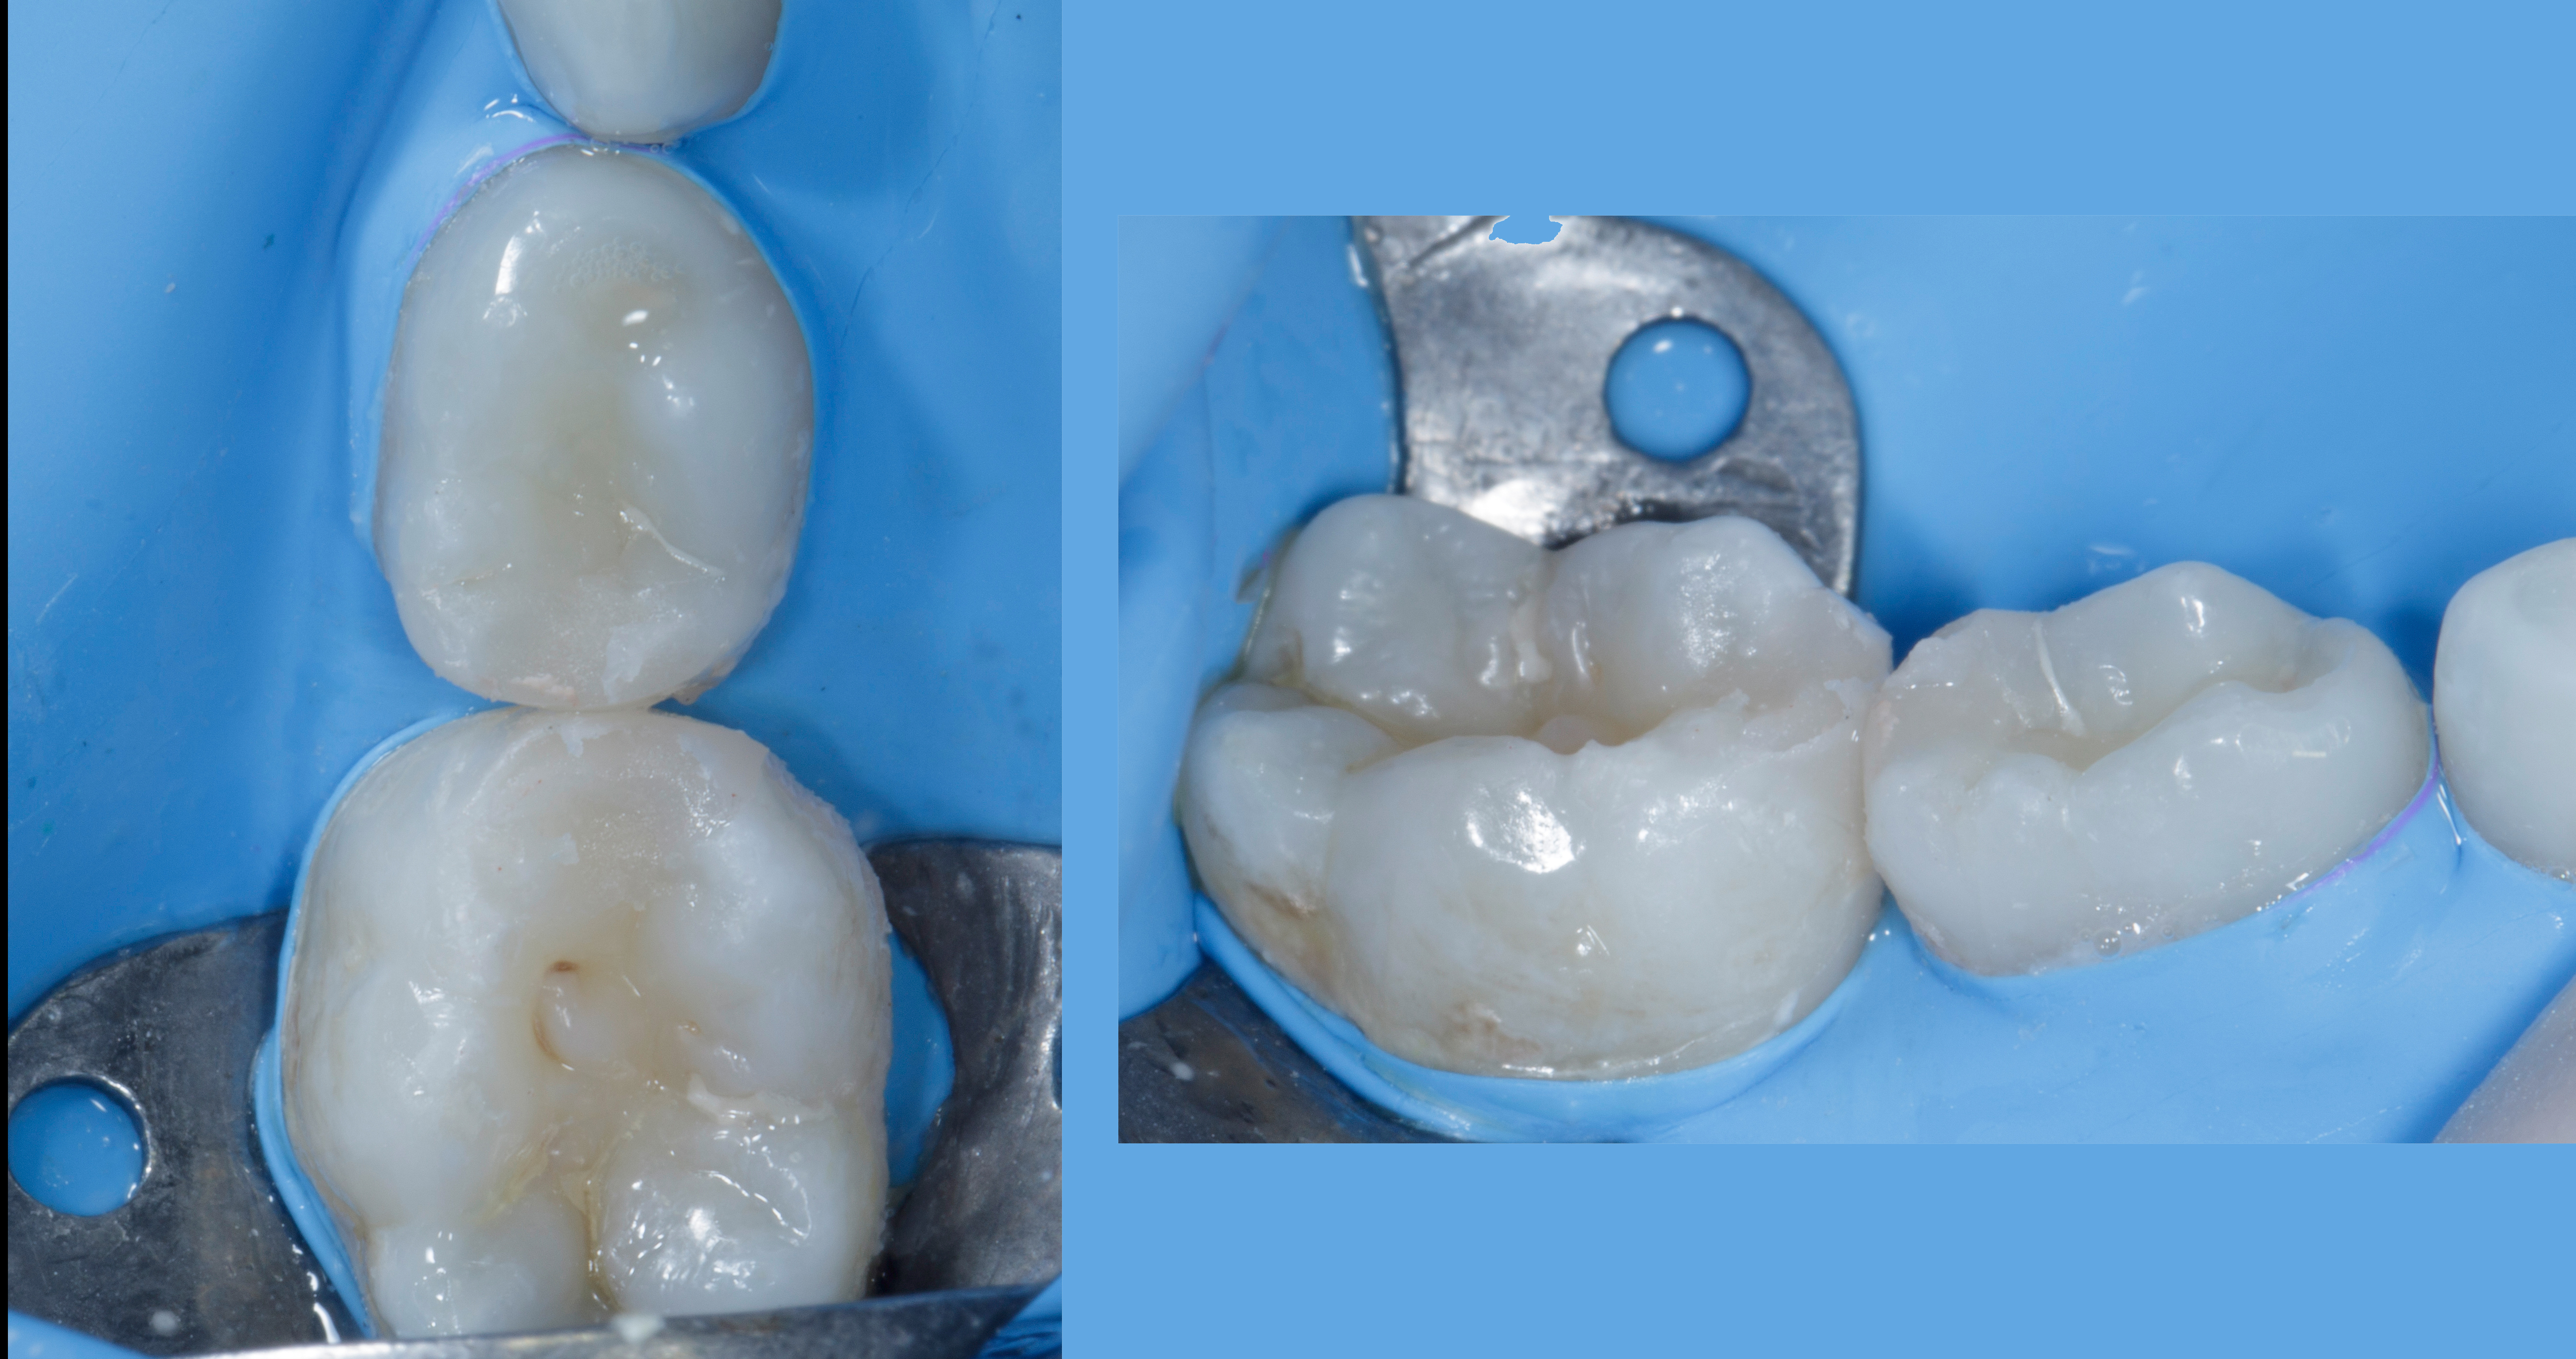
Clinical views following removal of the matrix bands, wedge and separation ring, demonstrating the reconstructed proximal contacts and contours without the need for additional proximal contour correction. |
Following removal of the rubber dam, both restorations were evaluated for occlusal discrepancies. Static occlusion was initially assessed using 40-µm articulating paper to identify premature contacts and areas requiring adjustment. An 8-µm articulating foil was subsequently used for a more precise assessment of the occlusal contact markings.
Any identified occlusal discrepancies were adjusted, followed by finishing and polishing using composite polishing spirals to achieve smooth restorative surfaces and refined occlusal anatomy (Fig. 07).
|
The patient was recalled after one week for a follow-up evaluation to assess the restorations and check for any occlusal discrepancies requiring further adjustment. The one-week postoperative clinical view is shown in (Fig. 08).
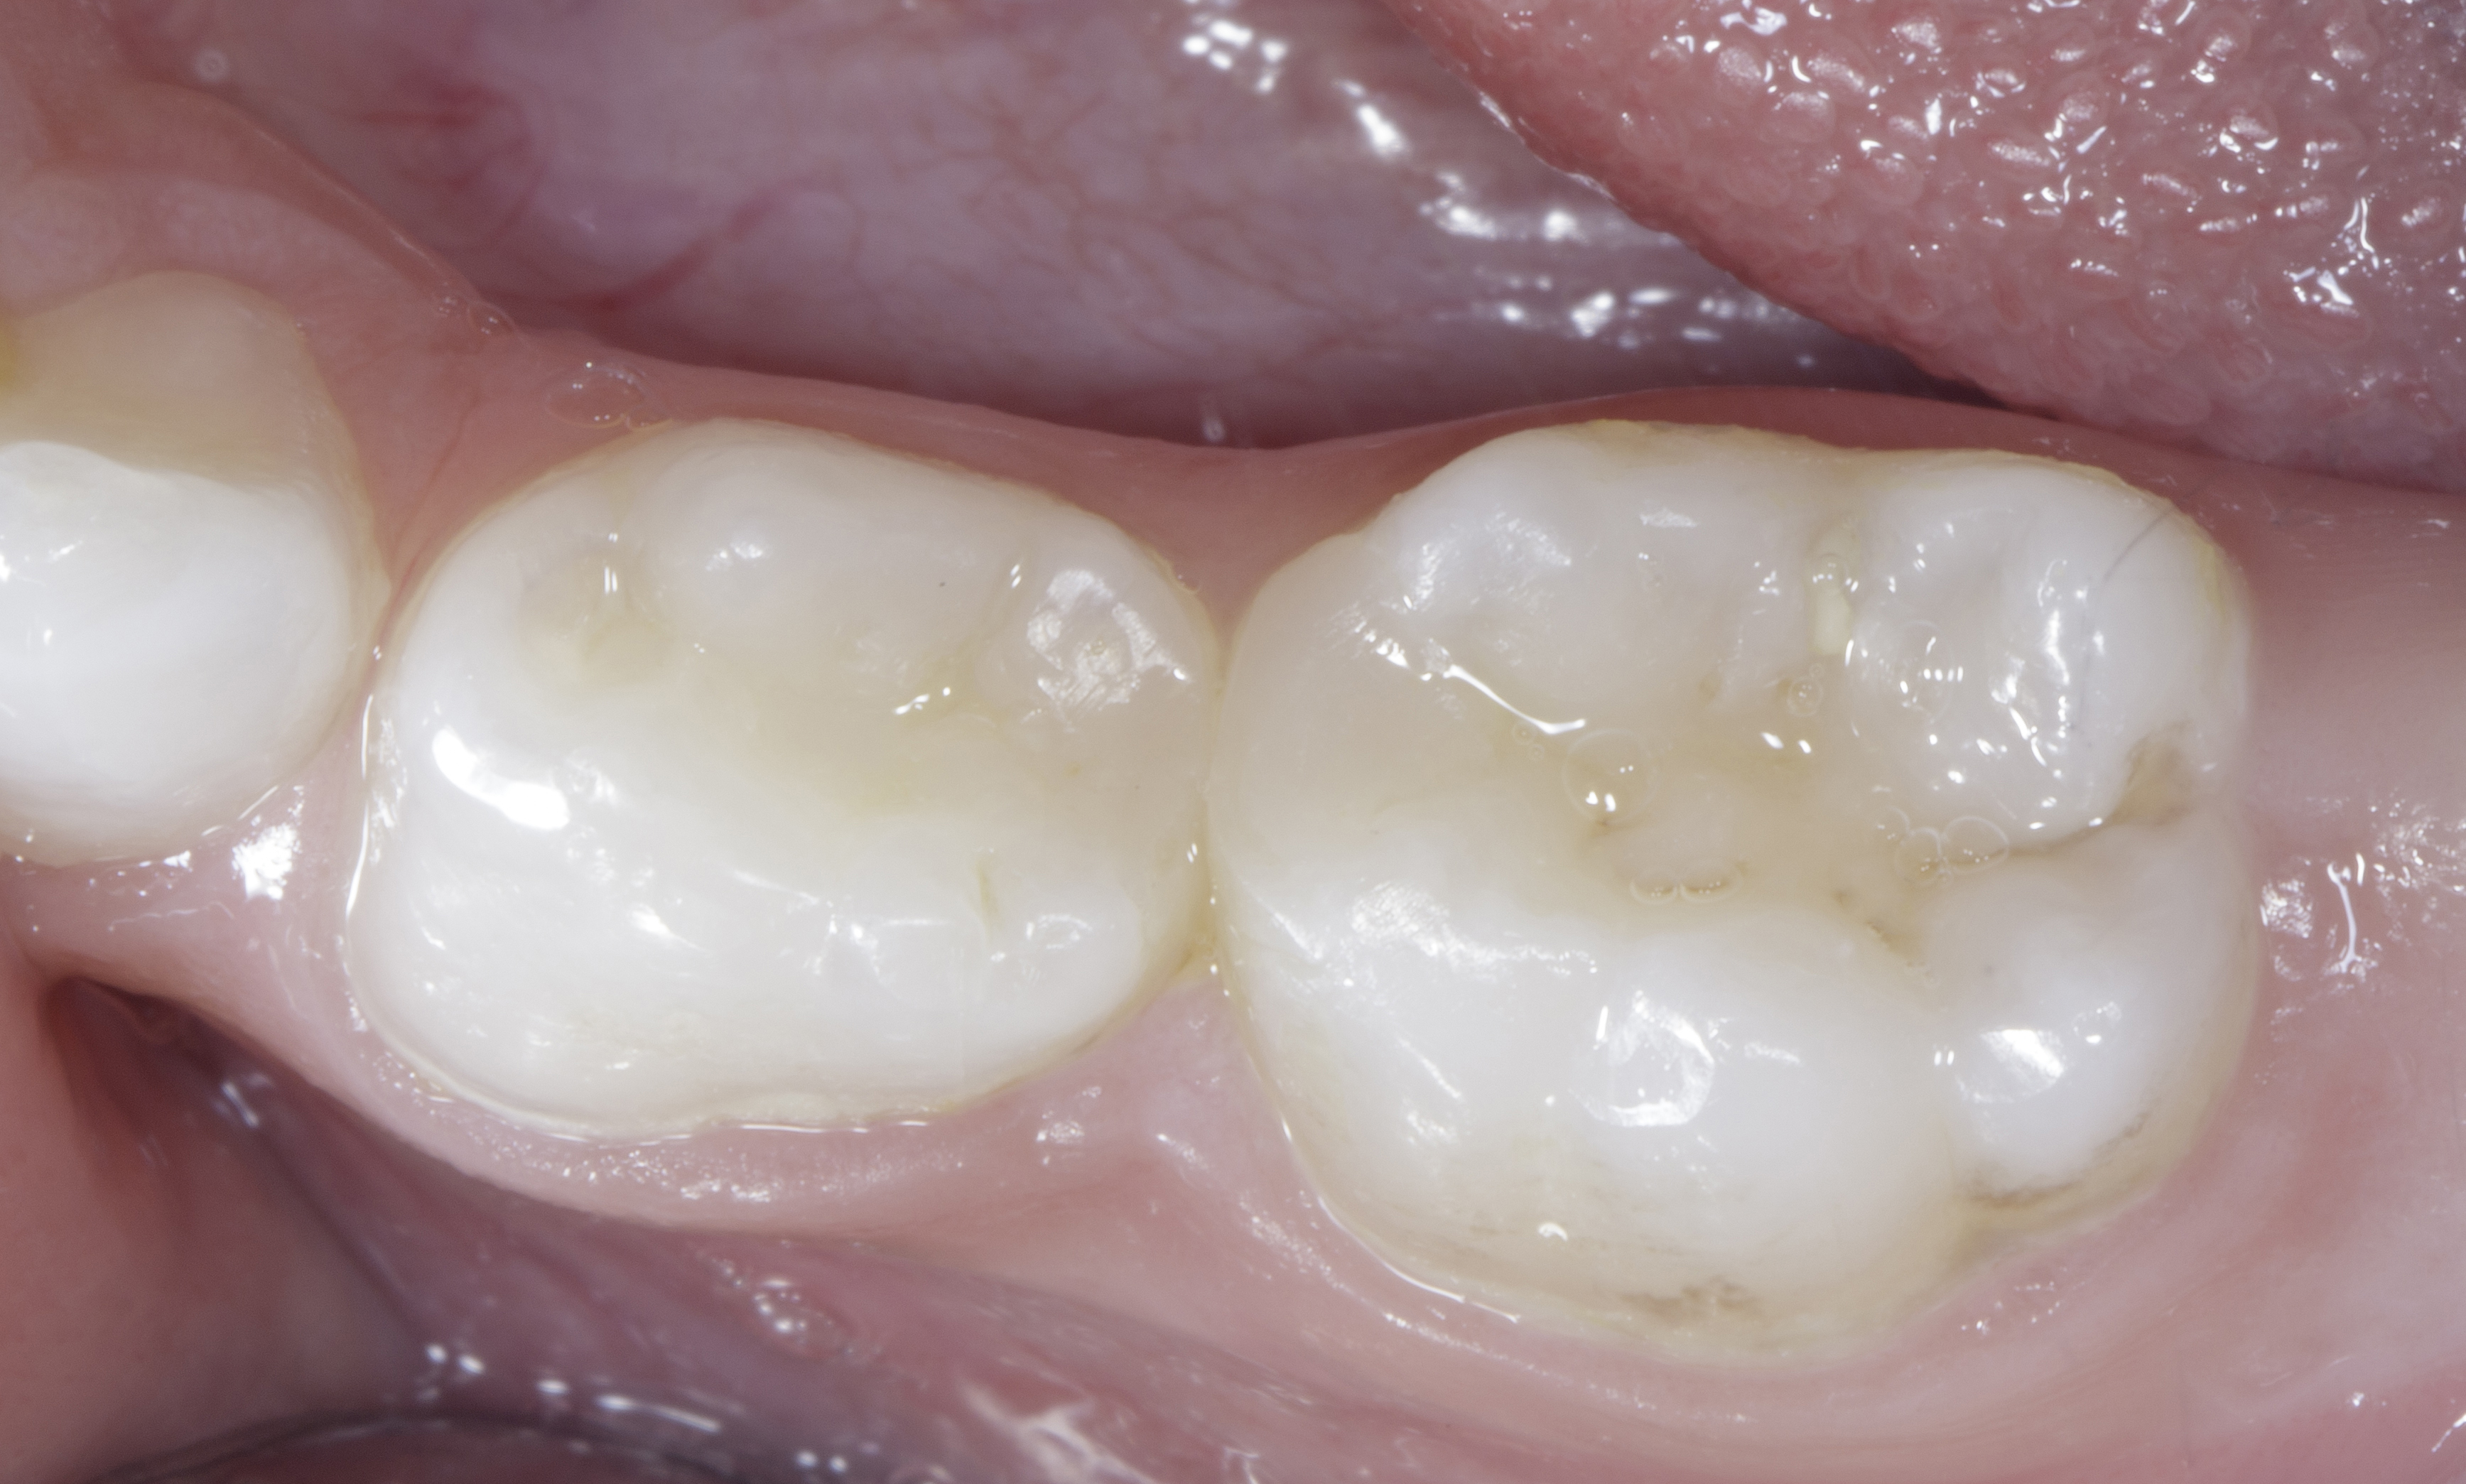
Occlusal view demonstrating natural proximal anatomy and contours, with the composite restorations blending harmoniously with the surrounding tooth structure. |
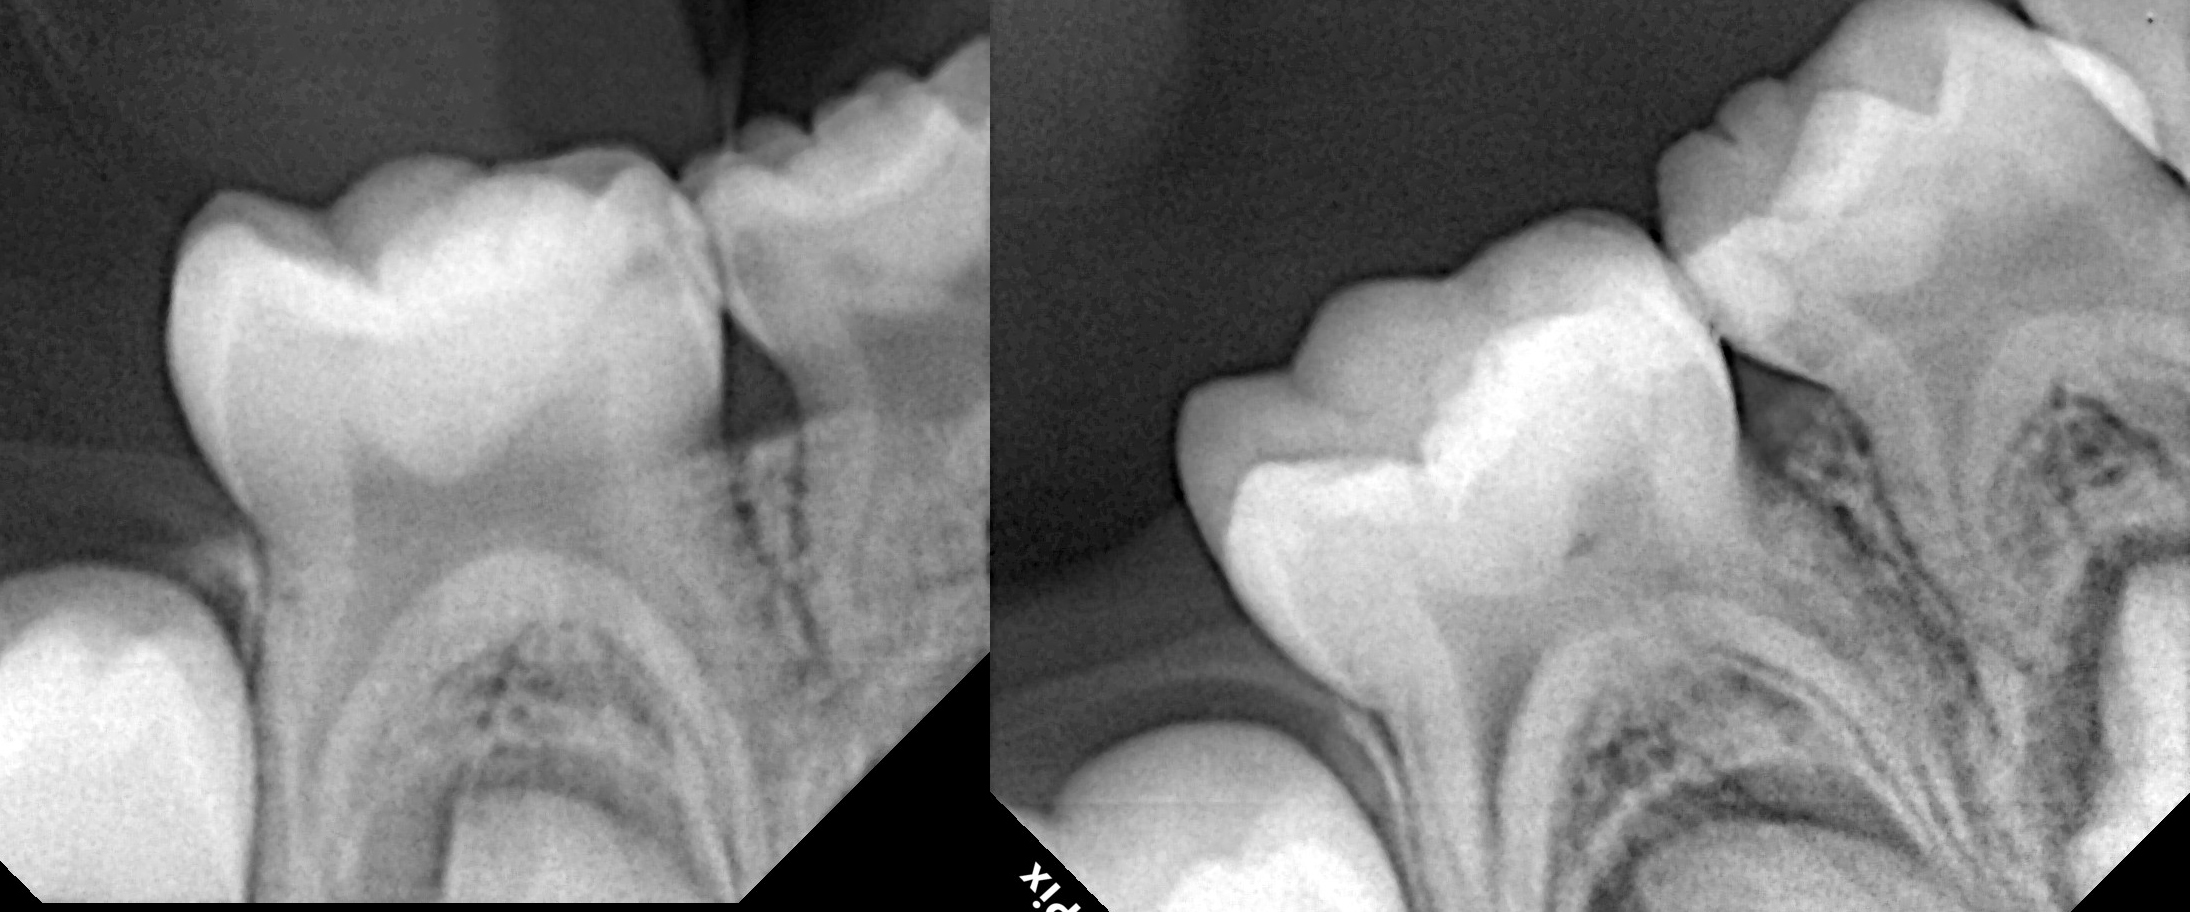
Comparison of preoperative and postoperative intraoral periapical radiographs demonstrating restoration of the proximal anatomy of both primary molars, with well-defined interproximal contours and no radiographically evident excess restorative material. |
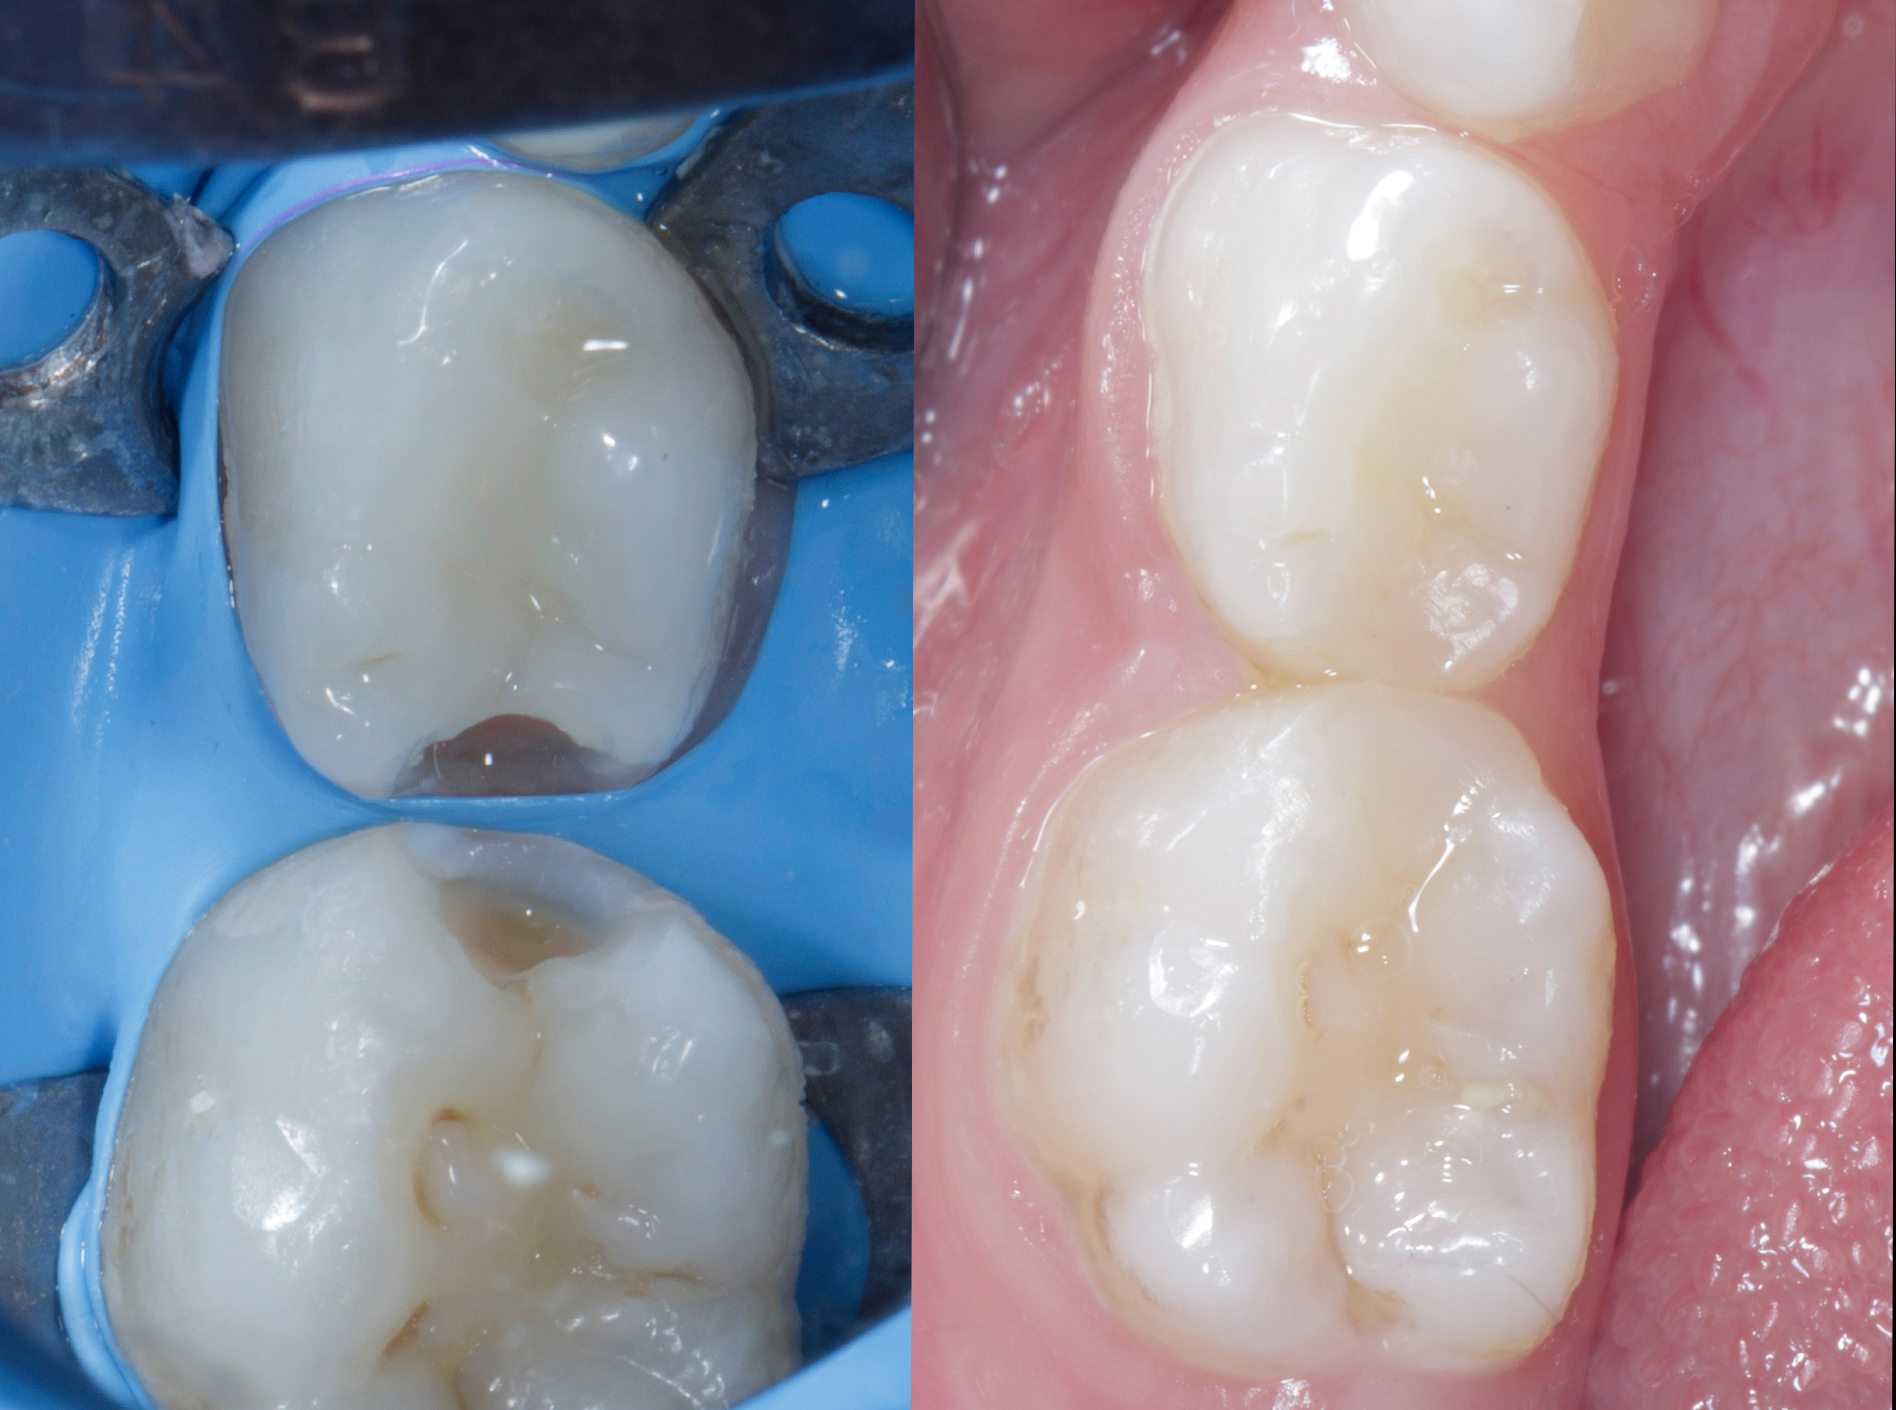
Clinical comparison demonstrating restoration of natural tooth form, proximal contours, contact areas and colour harmony in both primary molars, with minimal finishing and polishing intervention. |
Restoring adjacent Class II defects in primary molars requires more than technical restorative skill. It begins with effective patient management, building trust and creating a comfortable, reassuring environment for the child. A positive initial experience, appropriate behaviour management and effective local anaesthesia contribute significantly to making paediatric restorative treatment less stressful and more manageable.
This case also highlights the importance of regular school dental screening programmes in identifying dental problems at an early age. At around four years of age, children are in the primary dentition stage, and their primary molars still have several years of functional life ahead of them. Early identification of carious lesions through school screening, followed by a comprehensive clinical and radiographic assessment, can facilitate timely intervention and help prevent further progression of disease. Such screening is particularly valuable because proximal lesions may remain unnoticed during routine visual examination.
The child's age was also an important consideration in restorative material selection. Since the primary molars need to maintain their function for several more years, the restorative material must provide adequate mechanical performance, marginal integrity and the ability to reproduce appropriate proximal contacts and anatomical contours. In this case, the combination of a flowable composite liner to enhance internal adaptation and a sculptable restorative composite facilitated the controlled reconstruction of the proximal walls, marginal ridges and occlusal anatomy.
Achieving reliable rubber dam isolation is equally important. In this case, an additional clamp was initially used to secure the isolation. Its subsequent removal facilitated placement of the QUAD separation ring without compromising rubber dam stability. This highlights the importance of adapting isolation techniques to the clinical requirements of the restorative procedure.
The Garrison QUAD Matrix System proved particularly useful in managing both adjacent Class II defects. Simultaneous placement of the sectional matrix bands, wedge and separation ring provided a stable restorative framework. It also allowed both teeth to be restored sequentially without dismantling or repositioning the matrix assembly between restorations. This simplified the clinical workflow, reduced repeated procedural steps and helped improve chairside efficiency.
The completed restorations demonstrated well-defined proximal contacts, anatomical contours and satisfactory marginal integrity. This case illustrates how the QUAD system can be a valuable option for restoring adjacent Class II defects in appropriately selected primary molars, particularly when a stable matrix assembly is essential for reconstructing both proximal surfaces.
Ultimately, predictable paediatric restorative dentistry depends not on the restorative material or matrix system alone, but on the integration of early diagnosis, patient-centred care, effective isolation, appropriate material selection and sound restorative techniques. When these elements are carefully coordinated, even technically demanding adjacent Class II restorations can be managed efficiently while achieving satisfactory anatomical and clinical outcomes.