FREE SHIPPING on orders over $475
FREE SHIPPING on orders over $475 | No Code Needed
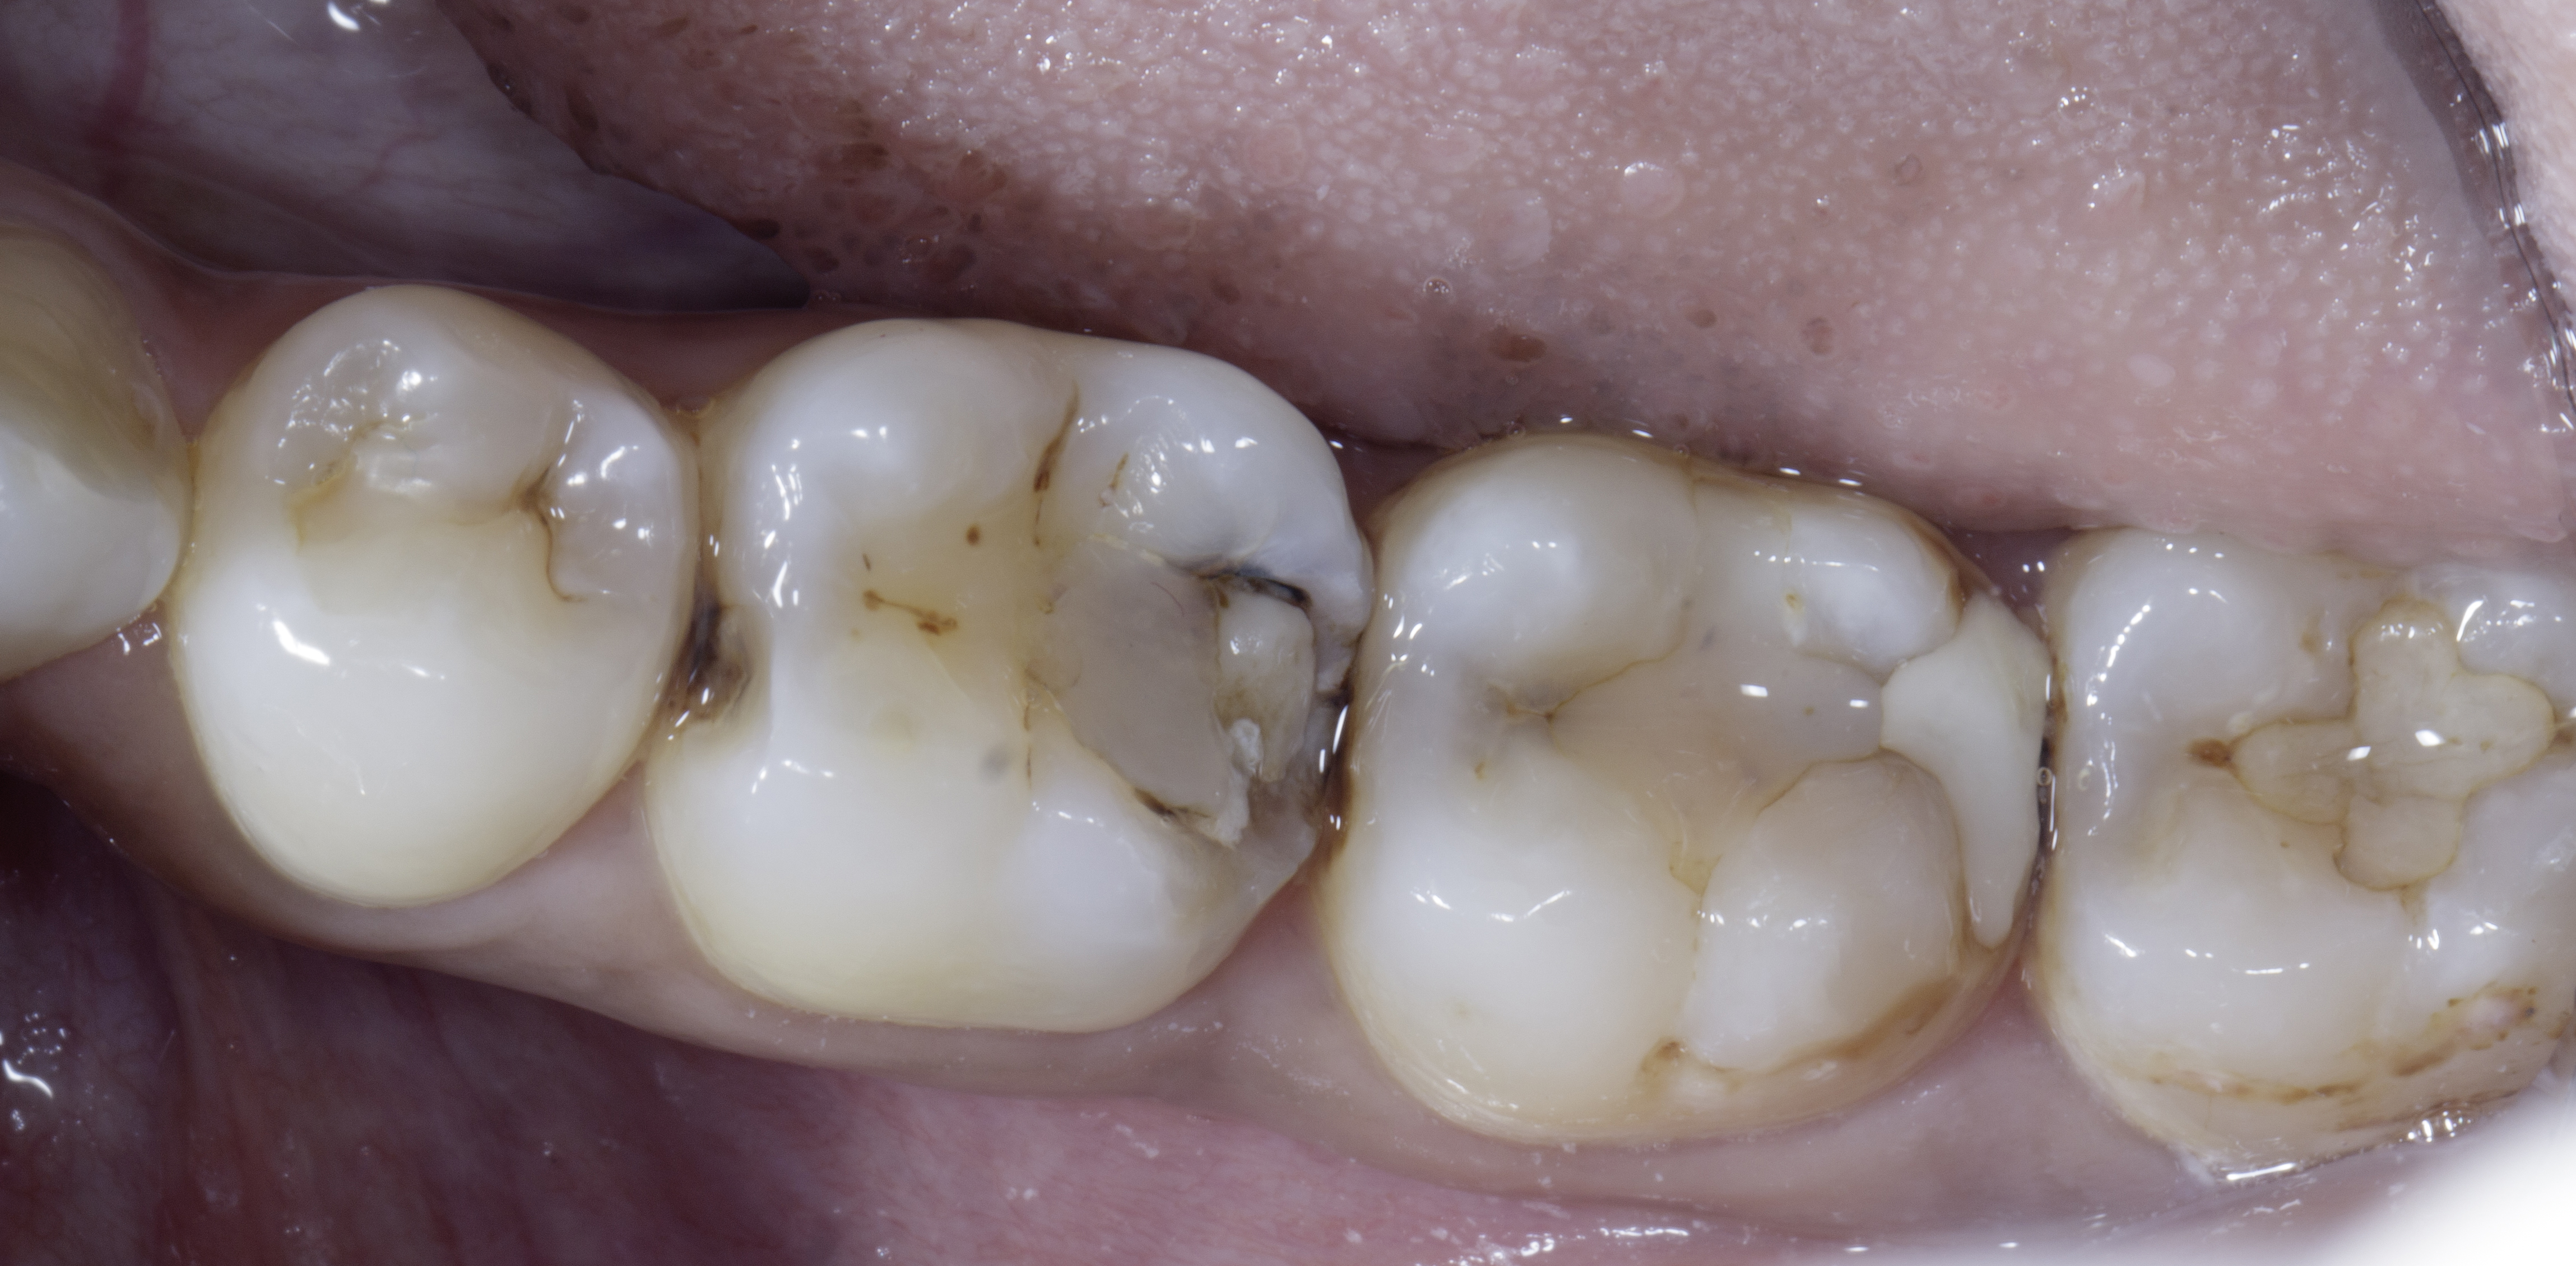
A 28-year-old woman presented to our office with complaints of sensitivity to cold temperatures and food impaction in her lower right quadrant. Her dental history revealed previous orthodontic treatment and multiple restoration failures in the same quadrant over the past 8-12 years.
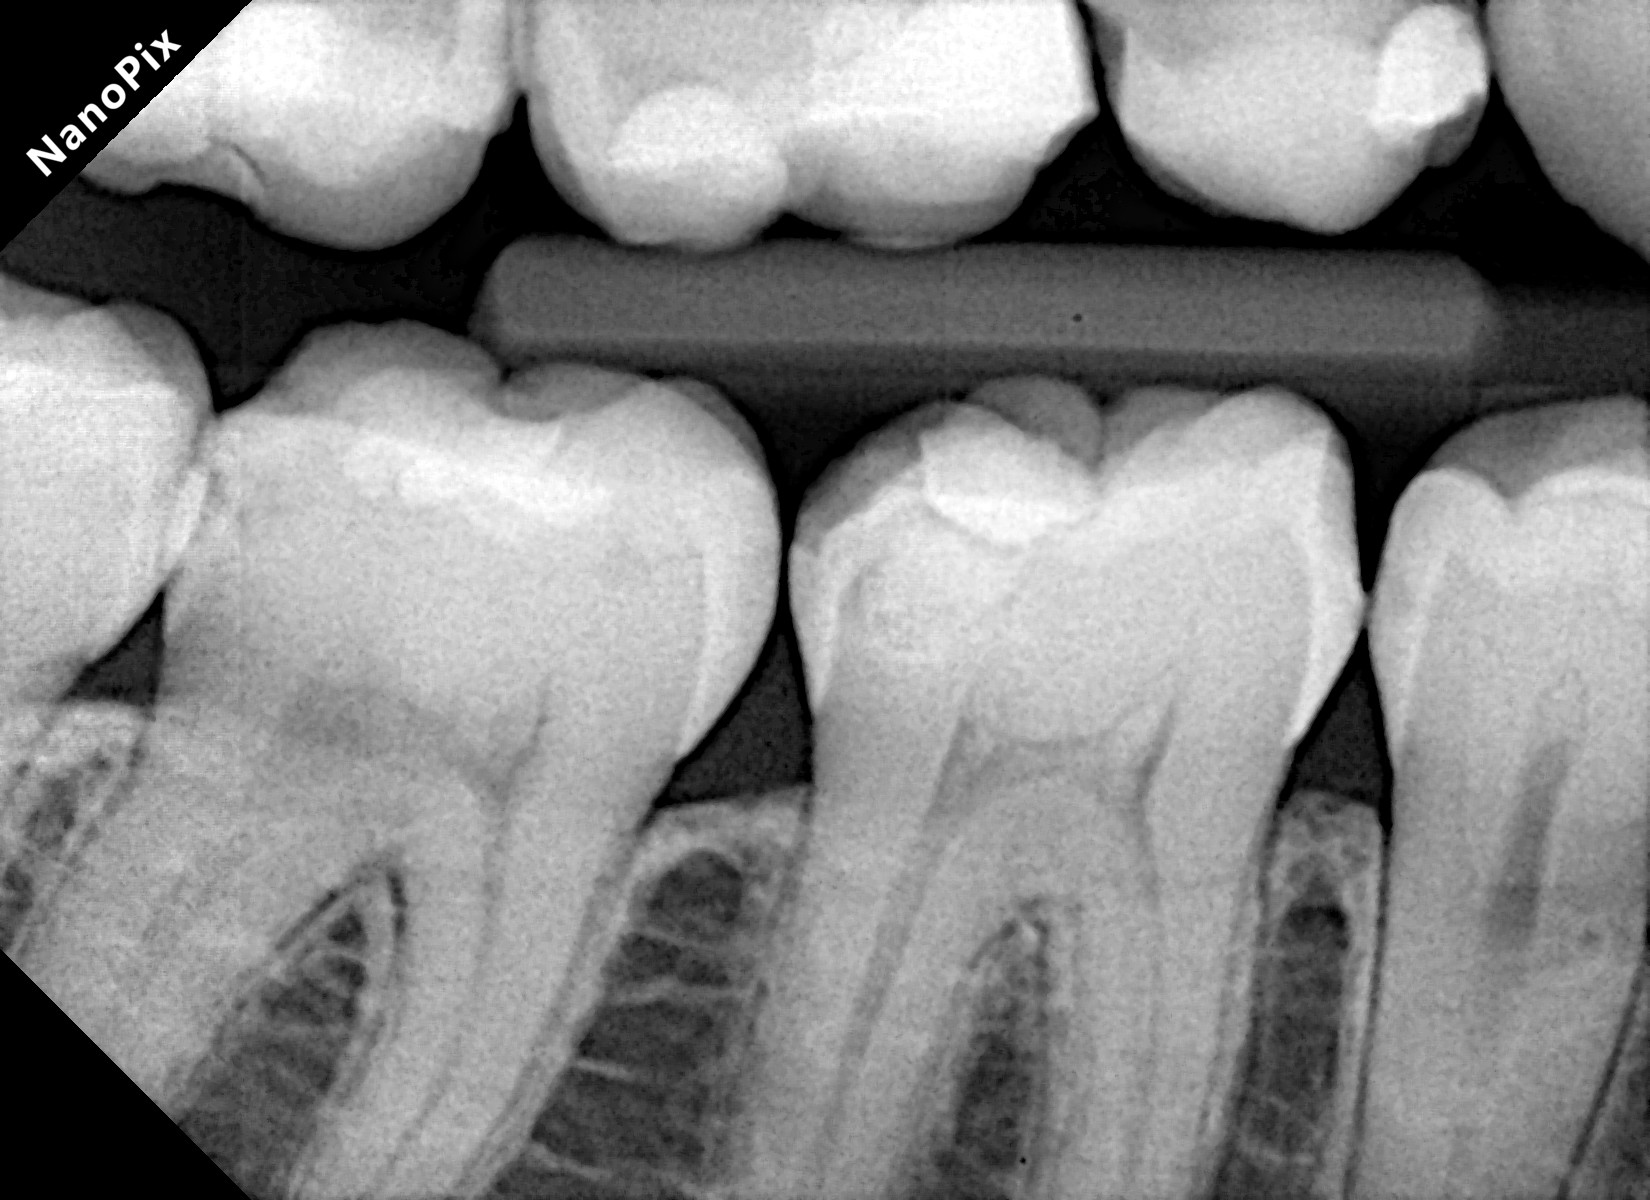
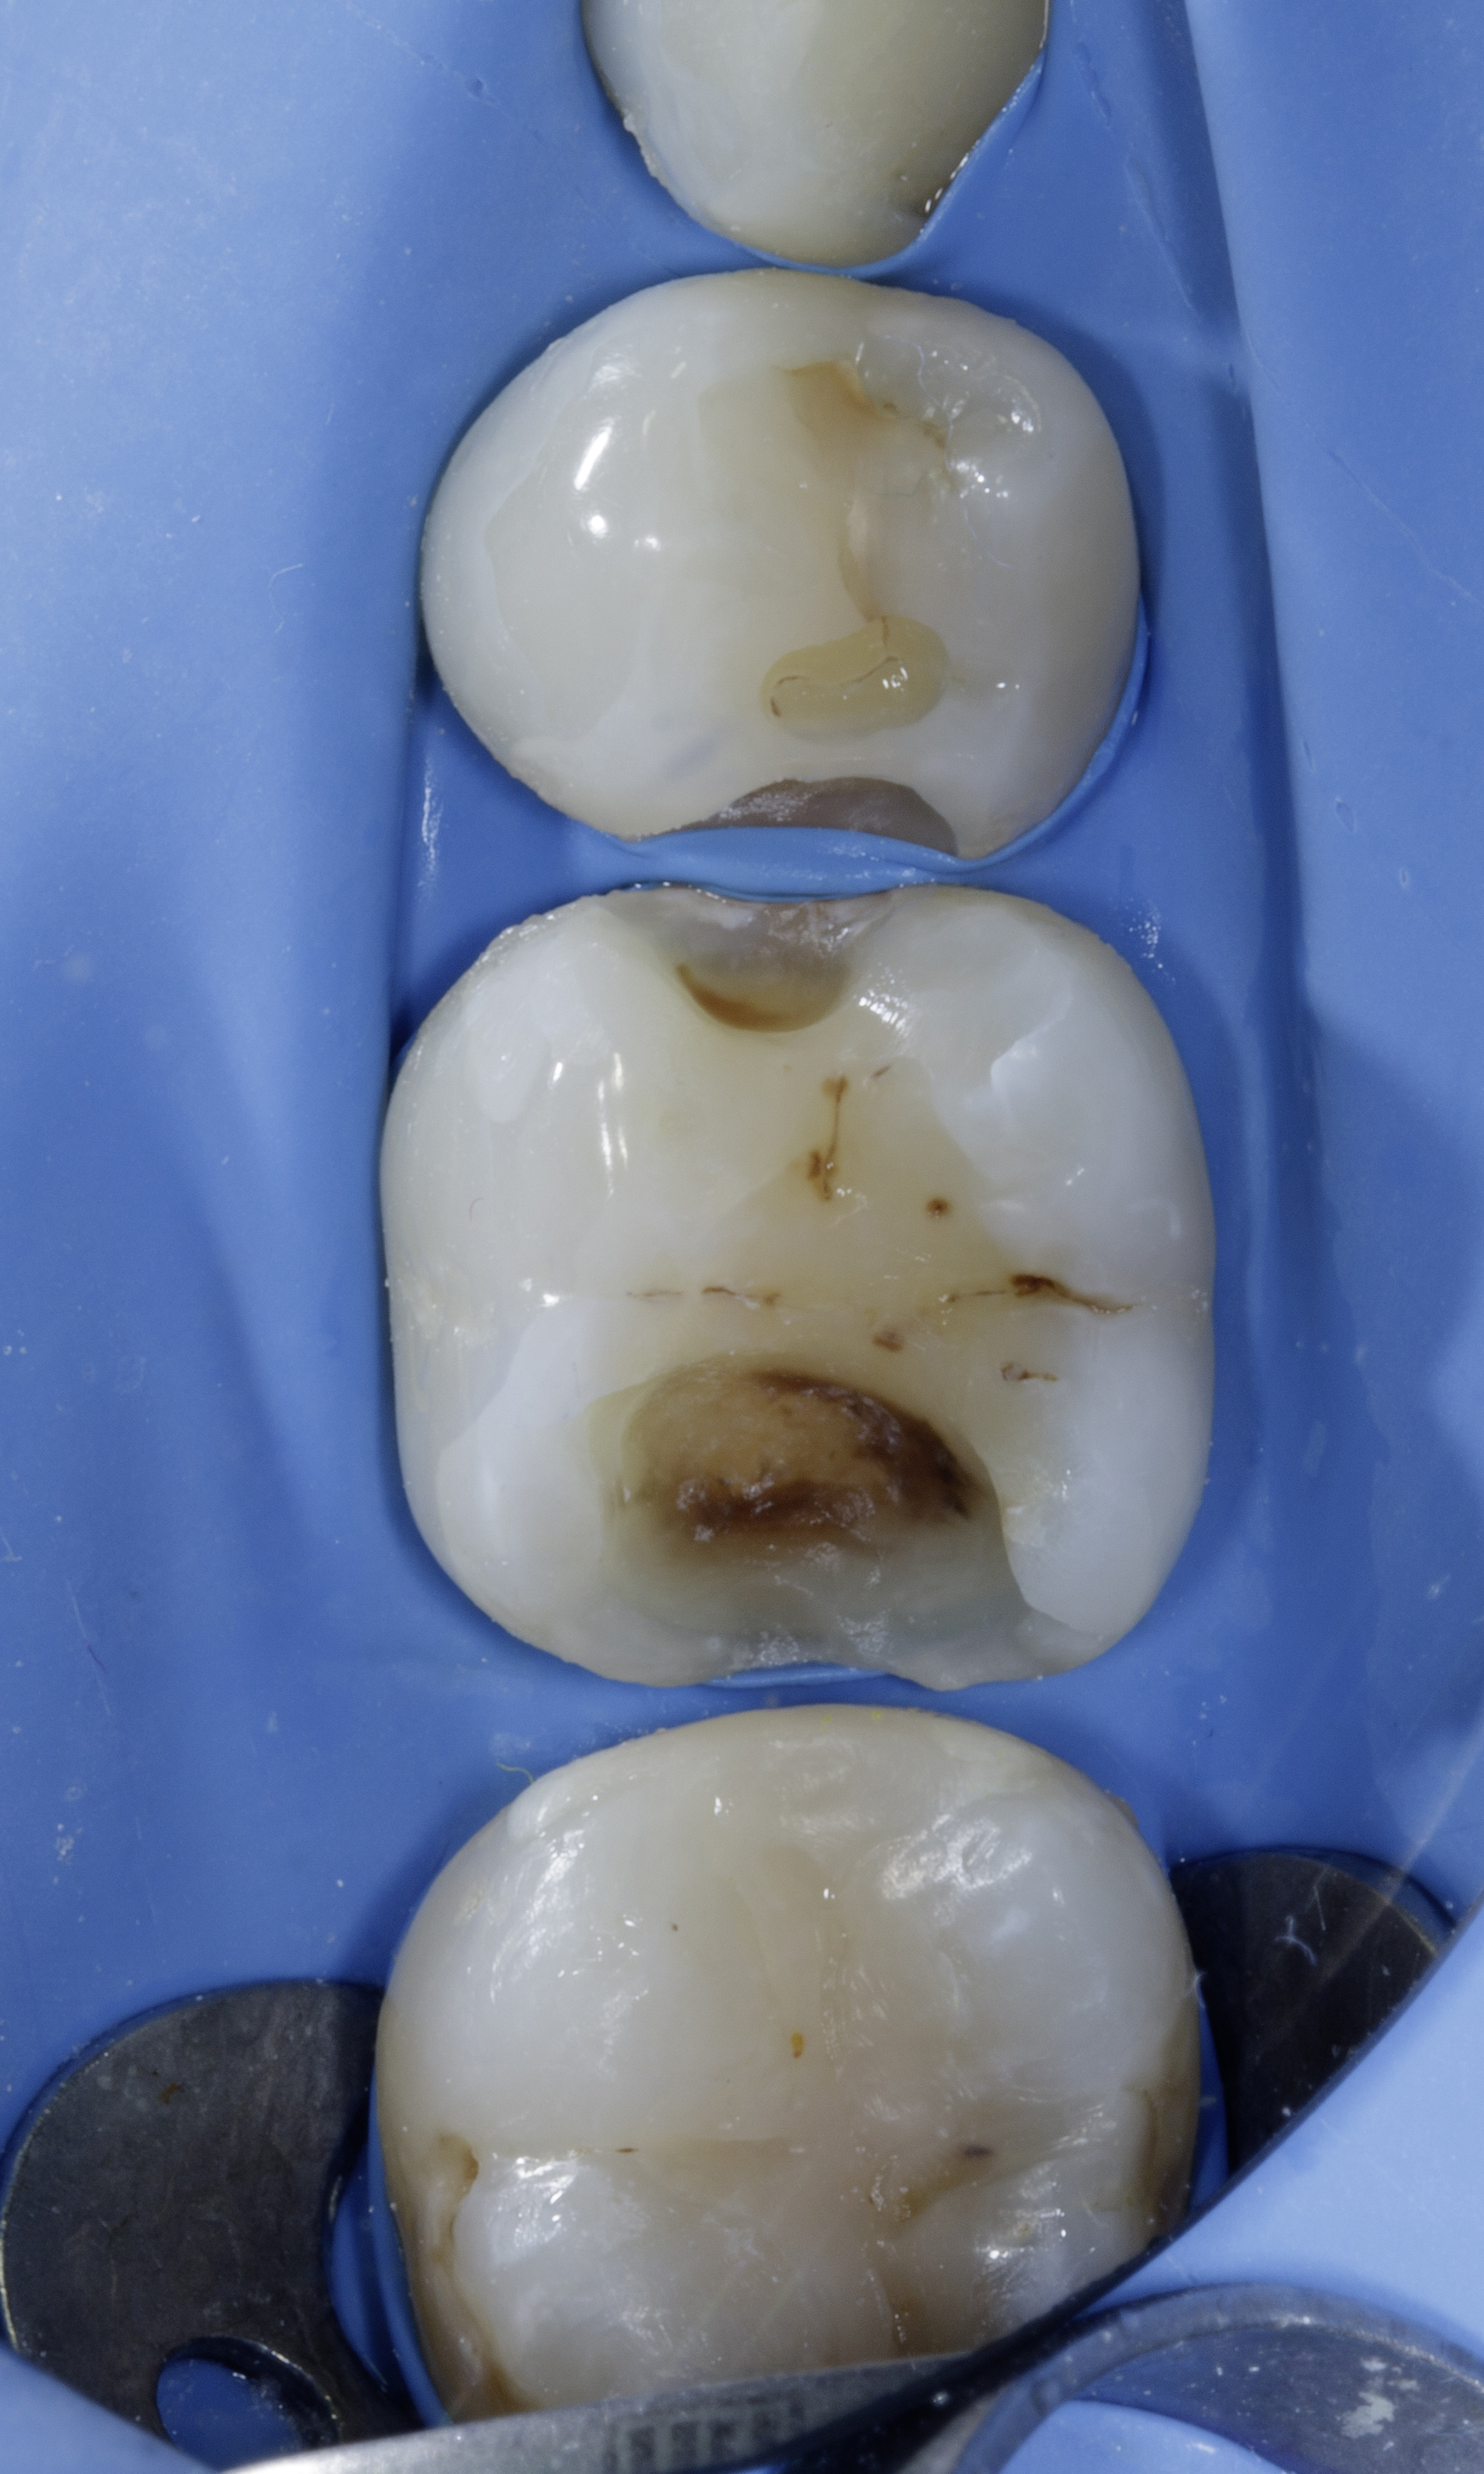
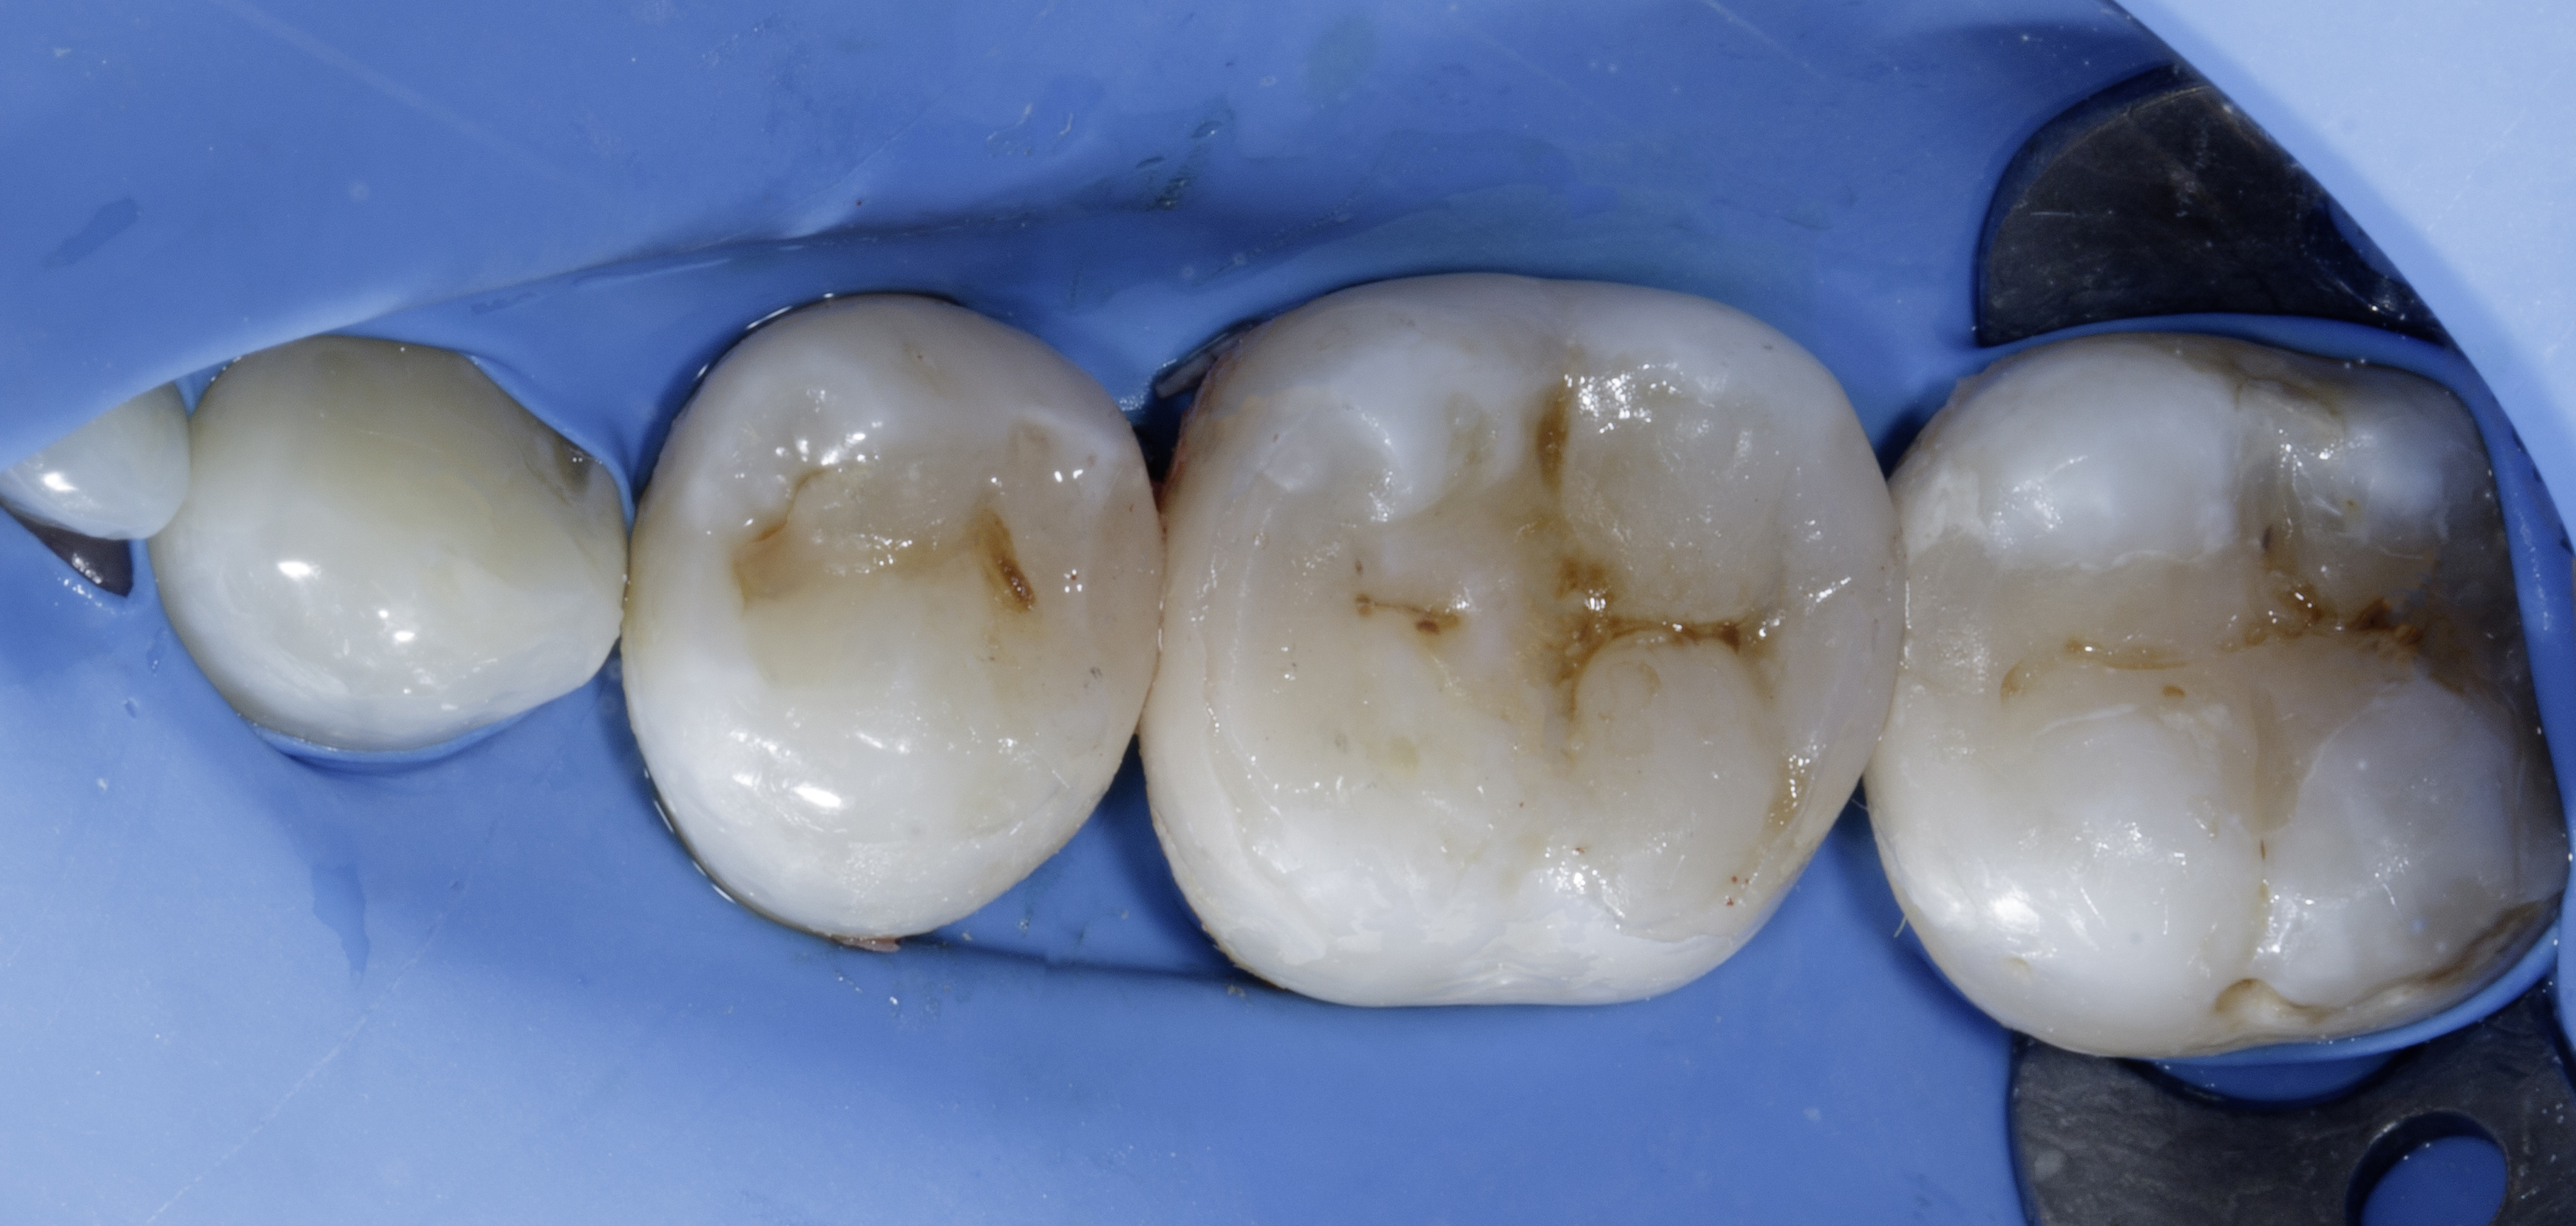
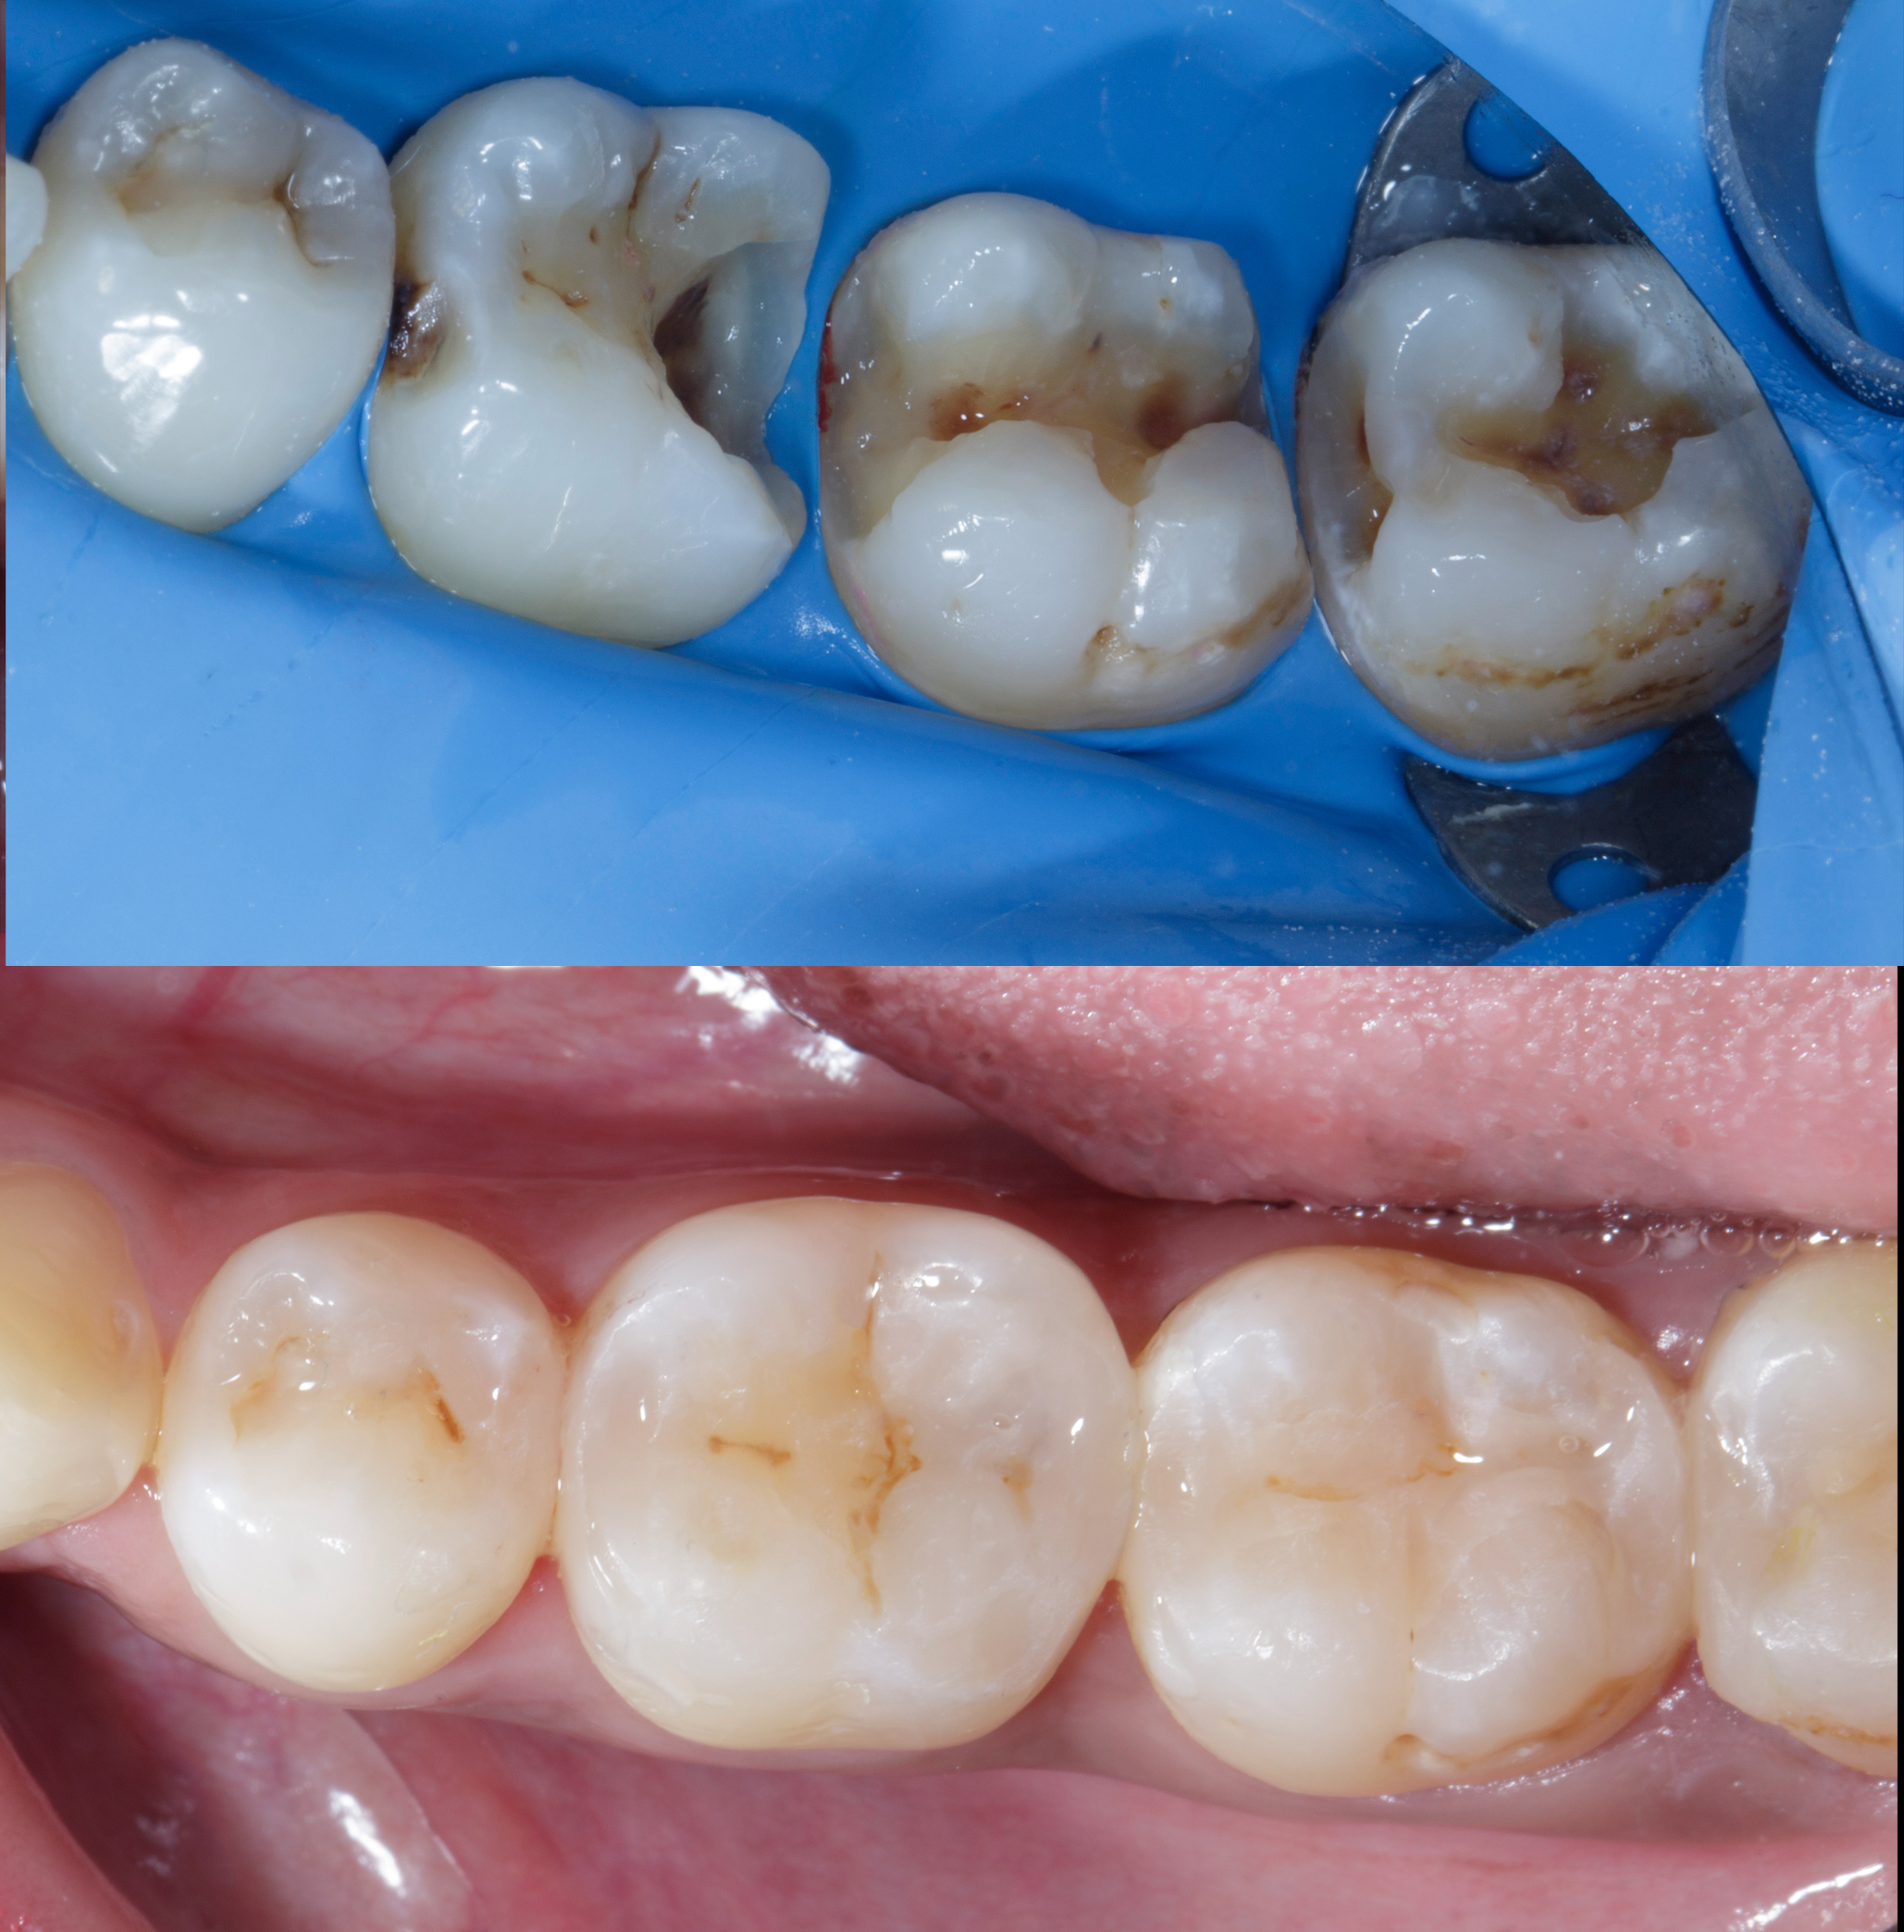
Clinical examination showed significant mesio-occluso-distal (MOD) defects and Class 2 affecting teeth from #45 to #48.
Tooth #45: A distal carious lesion is suspected, potentially secondary to the adjacent mesial defect observed on tooth #46. No existing restoration is noted in this region, however, early discoloration and anatomical concavity suggest demineralization.
Tooth #46: Clinical examination revealed a mesial proximal carious defect with complete loss of the marginal ridge. On the distal aspect, an old composite restoration was observed, appearing underfilled and extended onto the occlusal surface. Evident marginal leakage and localized chipping were present along the restoration interface. Additionally, unsupported enamel was noted on the distobuccal cusp, indicating structural compromise and the risk of cusp fracture.
Tooth #47: An existing occlusal composite restoration demonstrated marginal discoloration and leakage. The distal surface exhibited a composite material of a different shade and texture, suggestive of a restoration placed at a later date. Lack of a defined marginal ridge resulted in an improper proximal contact. On the mesial surface, dark discoloration contiguous with the existing mesial pit composite indicated the presence of a recurrent or active Class II carious lesion.
Tooth #48: The mesial aspect showed dark discoloration extending into the existing mesial pit composite restoration, consistent with a developing or recurrent Class II carious lesion.
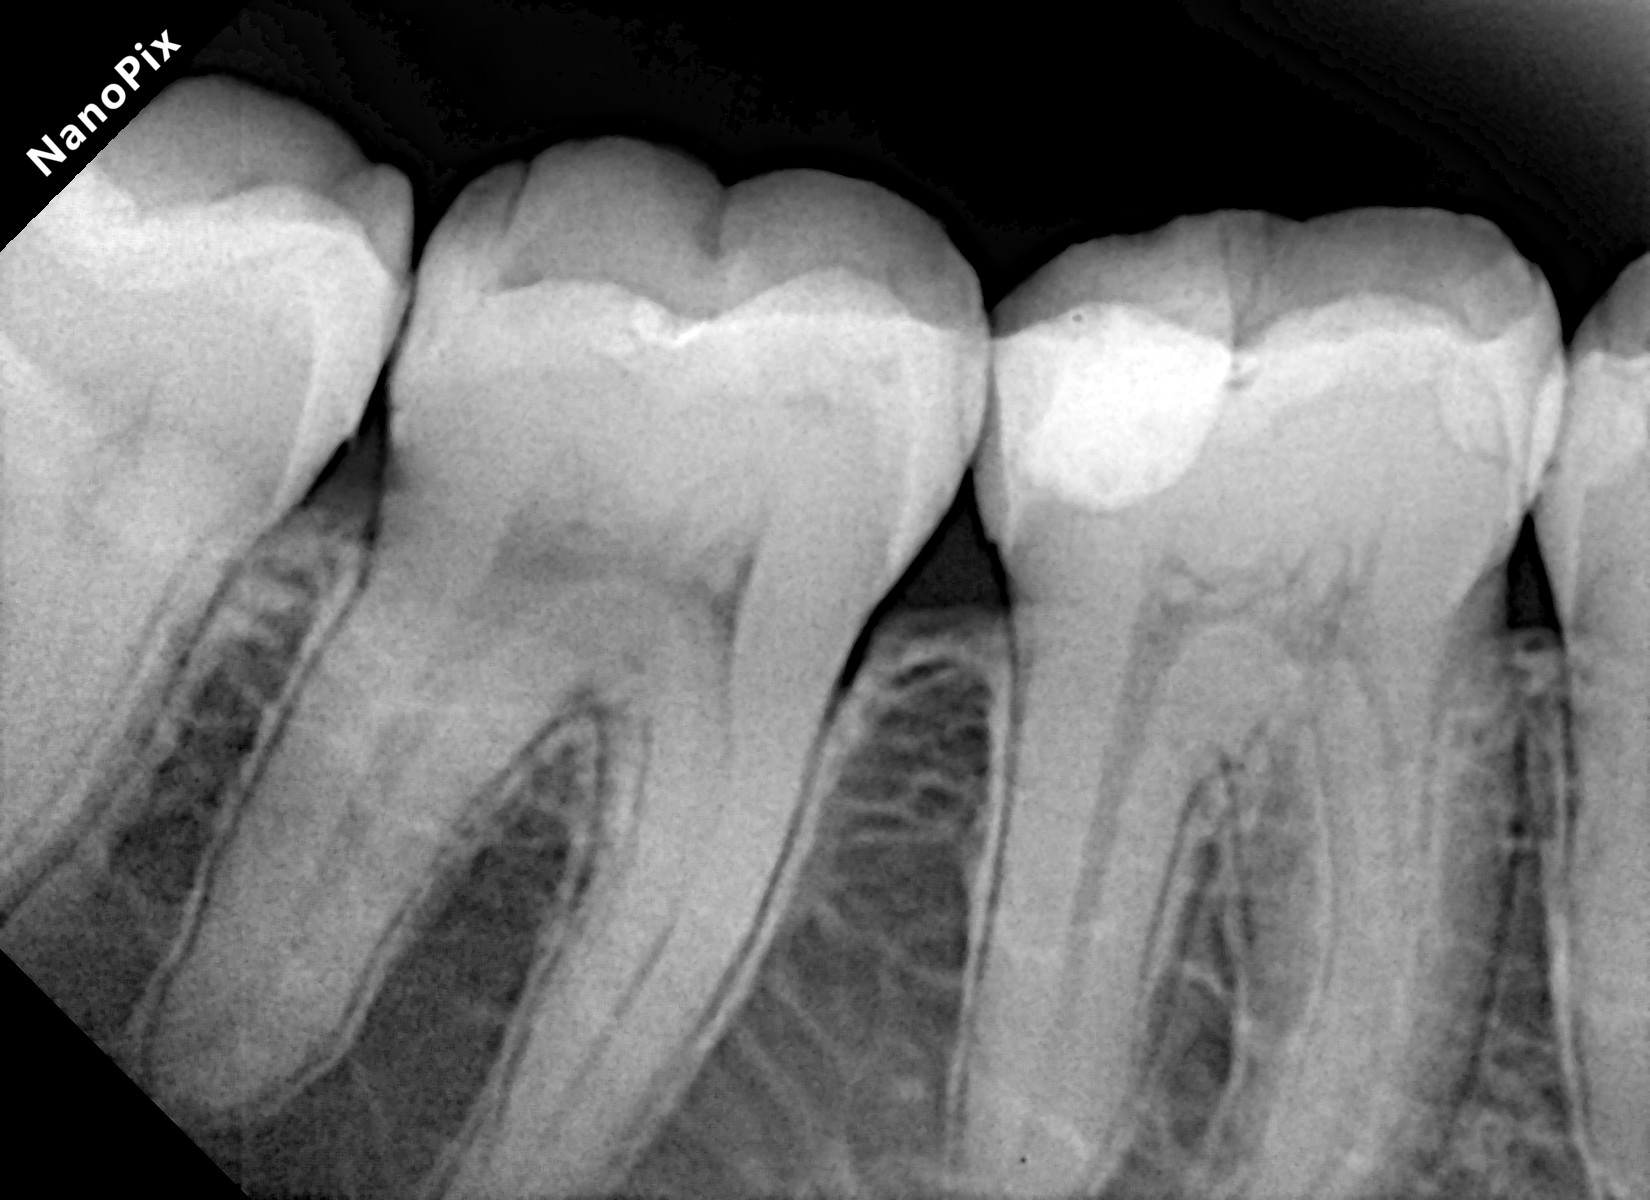
Bitewing radiograph confirmed the presence of multiple MOD / Class II carious lesions corresponding to the clinical findings. None of the defects demonstrated radiographic proximity to the pulp.
|
|
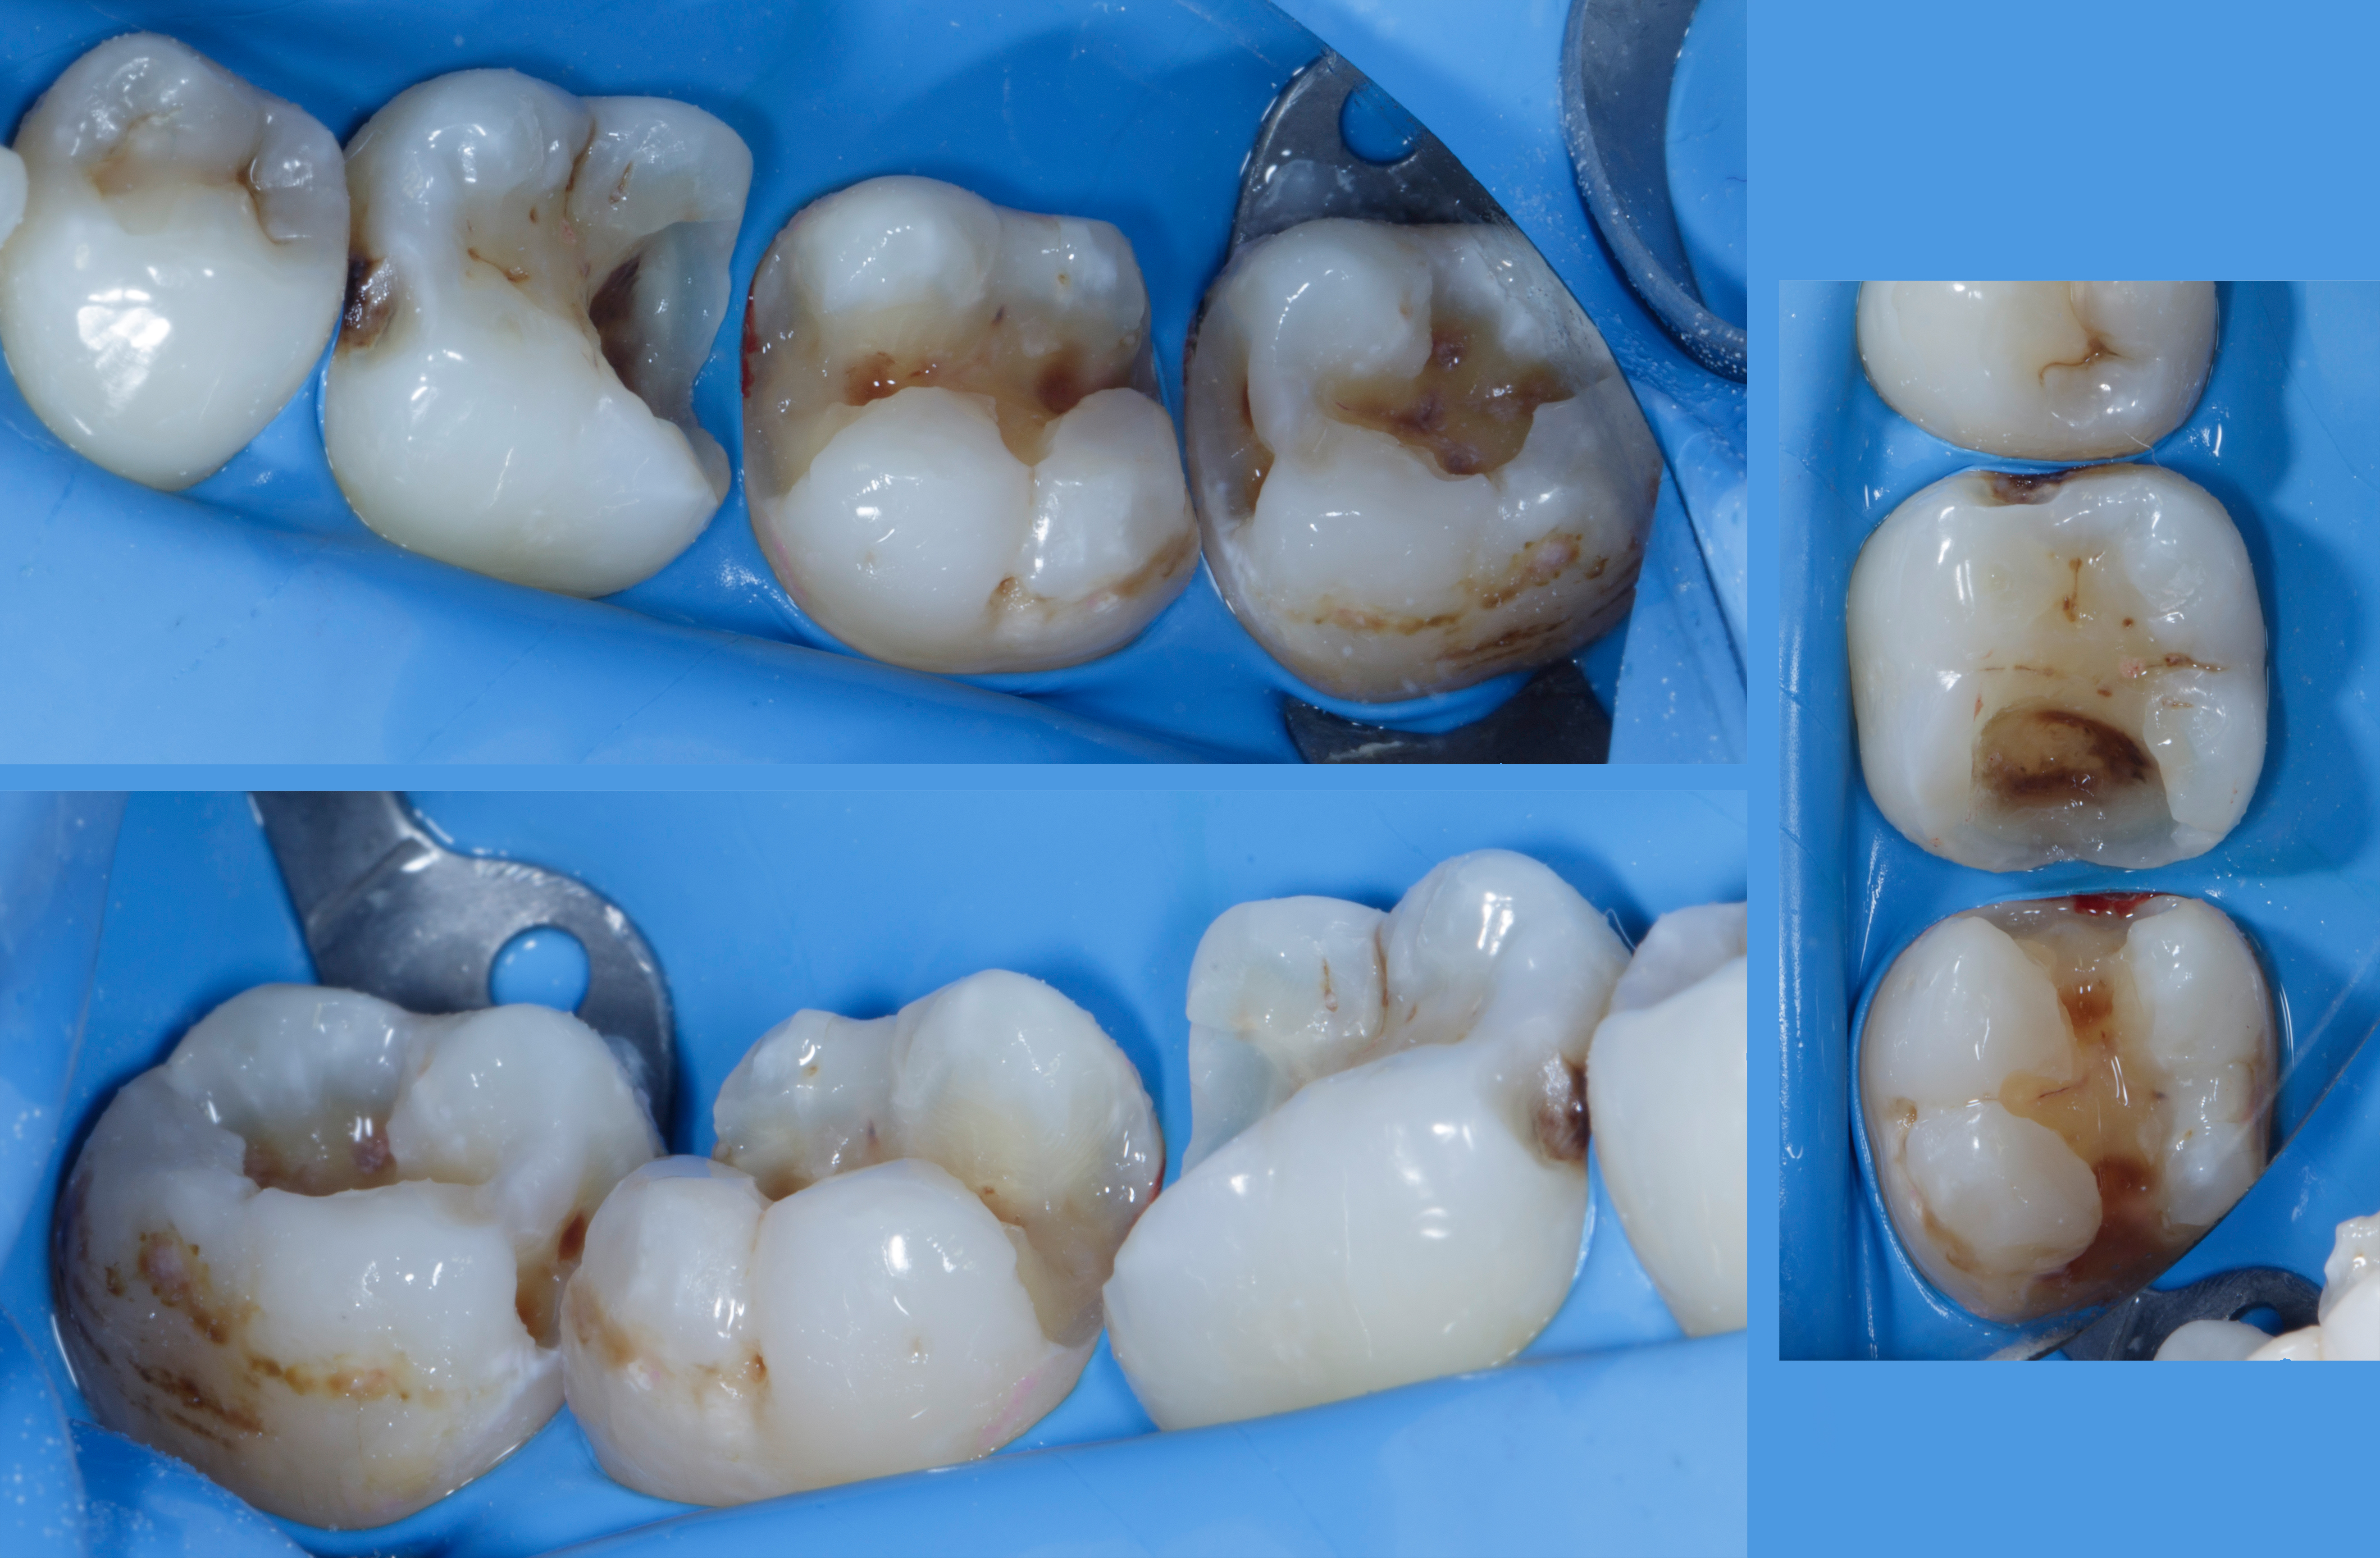
| Figure 1. Multiple defects starting from tooth #45 to #48 as described above. | Figure 2. Multiple class 2 defects starting from tooth #45 to #48 with loss of ideal contacts and contours. |
Due to extensive work, we have decided to do this quadrant in two appointments,
1st Appointment - #47 & #48
2nd Appointment - #45 & #46
Rubber dam isolation was achieved using a wingless B1 clamp and heavy-gauge rubber dam to optimize the adhesive environment and enhance restoration longevity. Adequate isolation is critical for the success of any adhesive procedure.
Caries-disclosing dye was utilized to aid in complete removal of carious tissue and residual composite material in teeth #48, #47, and the distal surface of #46. Infected dentin was carefully excavated using a slow-speed round carbide bur. Establishing a well-defined peripheral seal zone, free from infected and affected dentin, was prioritized to ensure maximum bond strength.
On tooth #46, the distobuccal cusp was selectively reduced until sound, supported enamel and dentin were achieved. For tooth #48, a conservative tunnel preparation was performed on the mesial surface to preserve the integrity of the marginal ridge. All cavity preparations were subsequently refined using a superfine (yellow-band) diamond bur to remove unsupported enamel. Additionally, abrasive finishing discs were used to further eliminate any remaining unsupported enamel and to smoothen the cavity walls.
|
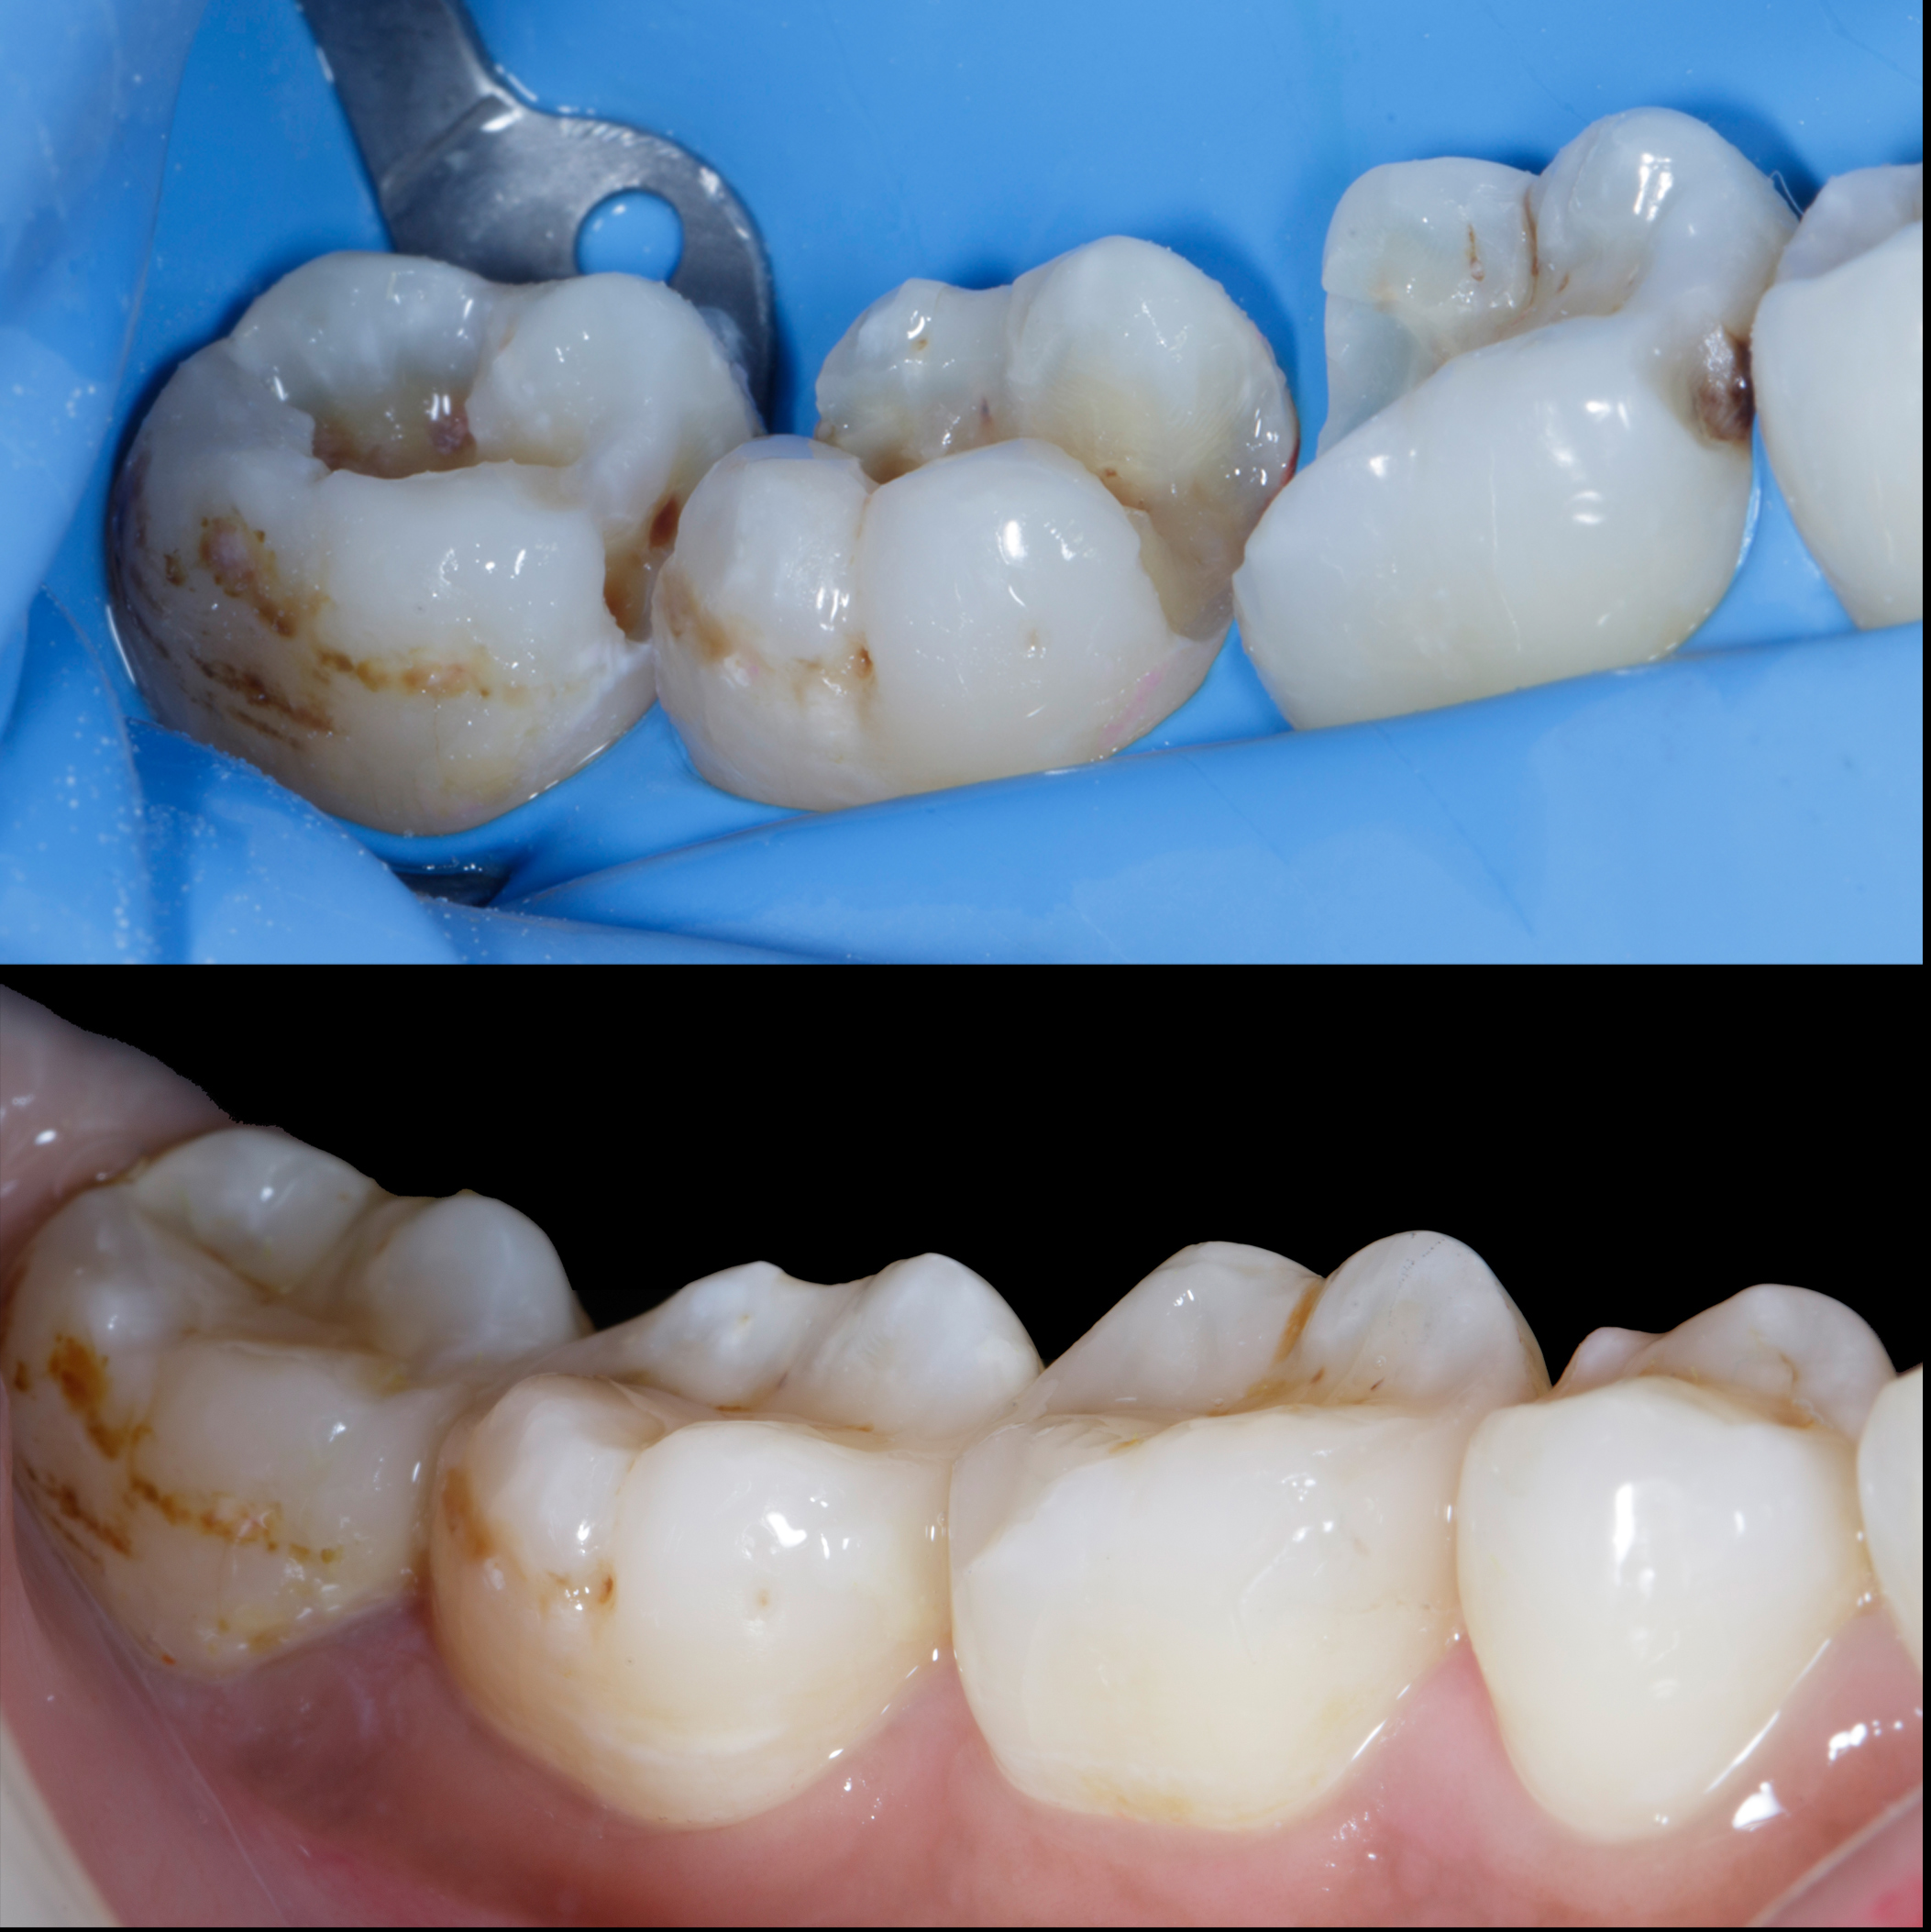
Figure 3. The collage displays the prepared teeth after caries removal, addressed as follows: - #48: Mesial tunnel preparation with an occlusal Class 1 defect. - #47: Mesio-occluso-distal (MOD) defect preparation. - #46: Class 2 defect preparation involving removal of unsupported enamel on the distobuccal cusp. All preparations focused on removing caries, establishing a peripheral seal zone, eliminating unsupported enamel, and refining the proximal box. |
Tooth #48: The mesial tunnel lesion was restored conservatively using Shofu Injectable XSL, followed by Shofu Beautifil LS II packable composite. The occlusal (Class I) defect was rehabilitated using a morphological layering technique with cusp-by-cusp build-up to replicate natural anatomy and to avoid high “C” factor. Following composite placement, the mesial surface was finished using abrasive discs to establish appropriate proximal contact and contour, thereby facilitating ideal contact formation in the subsequent restorative phase for tooth #47.
|
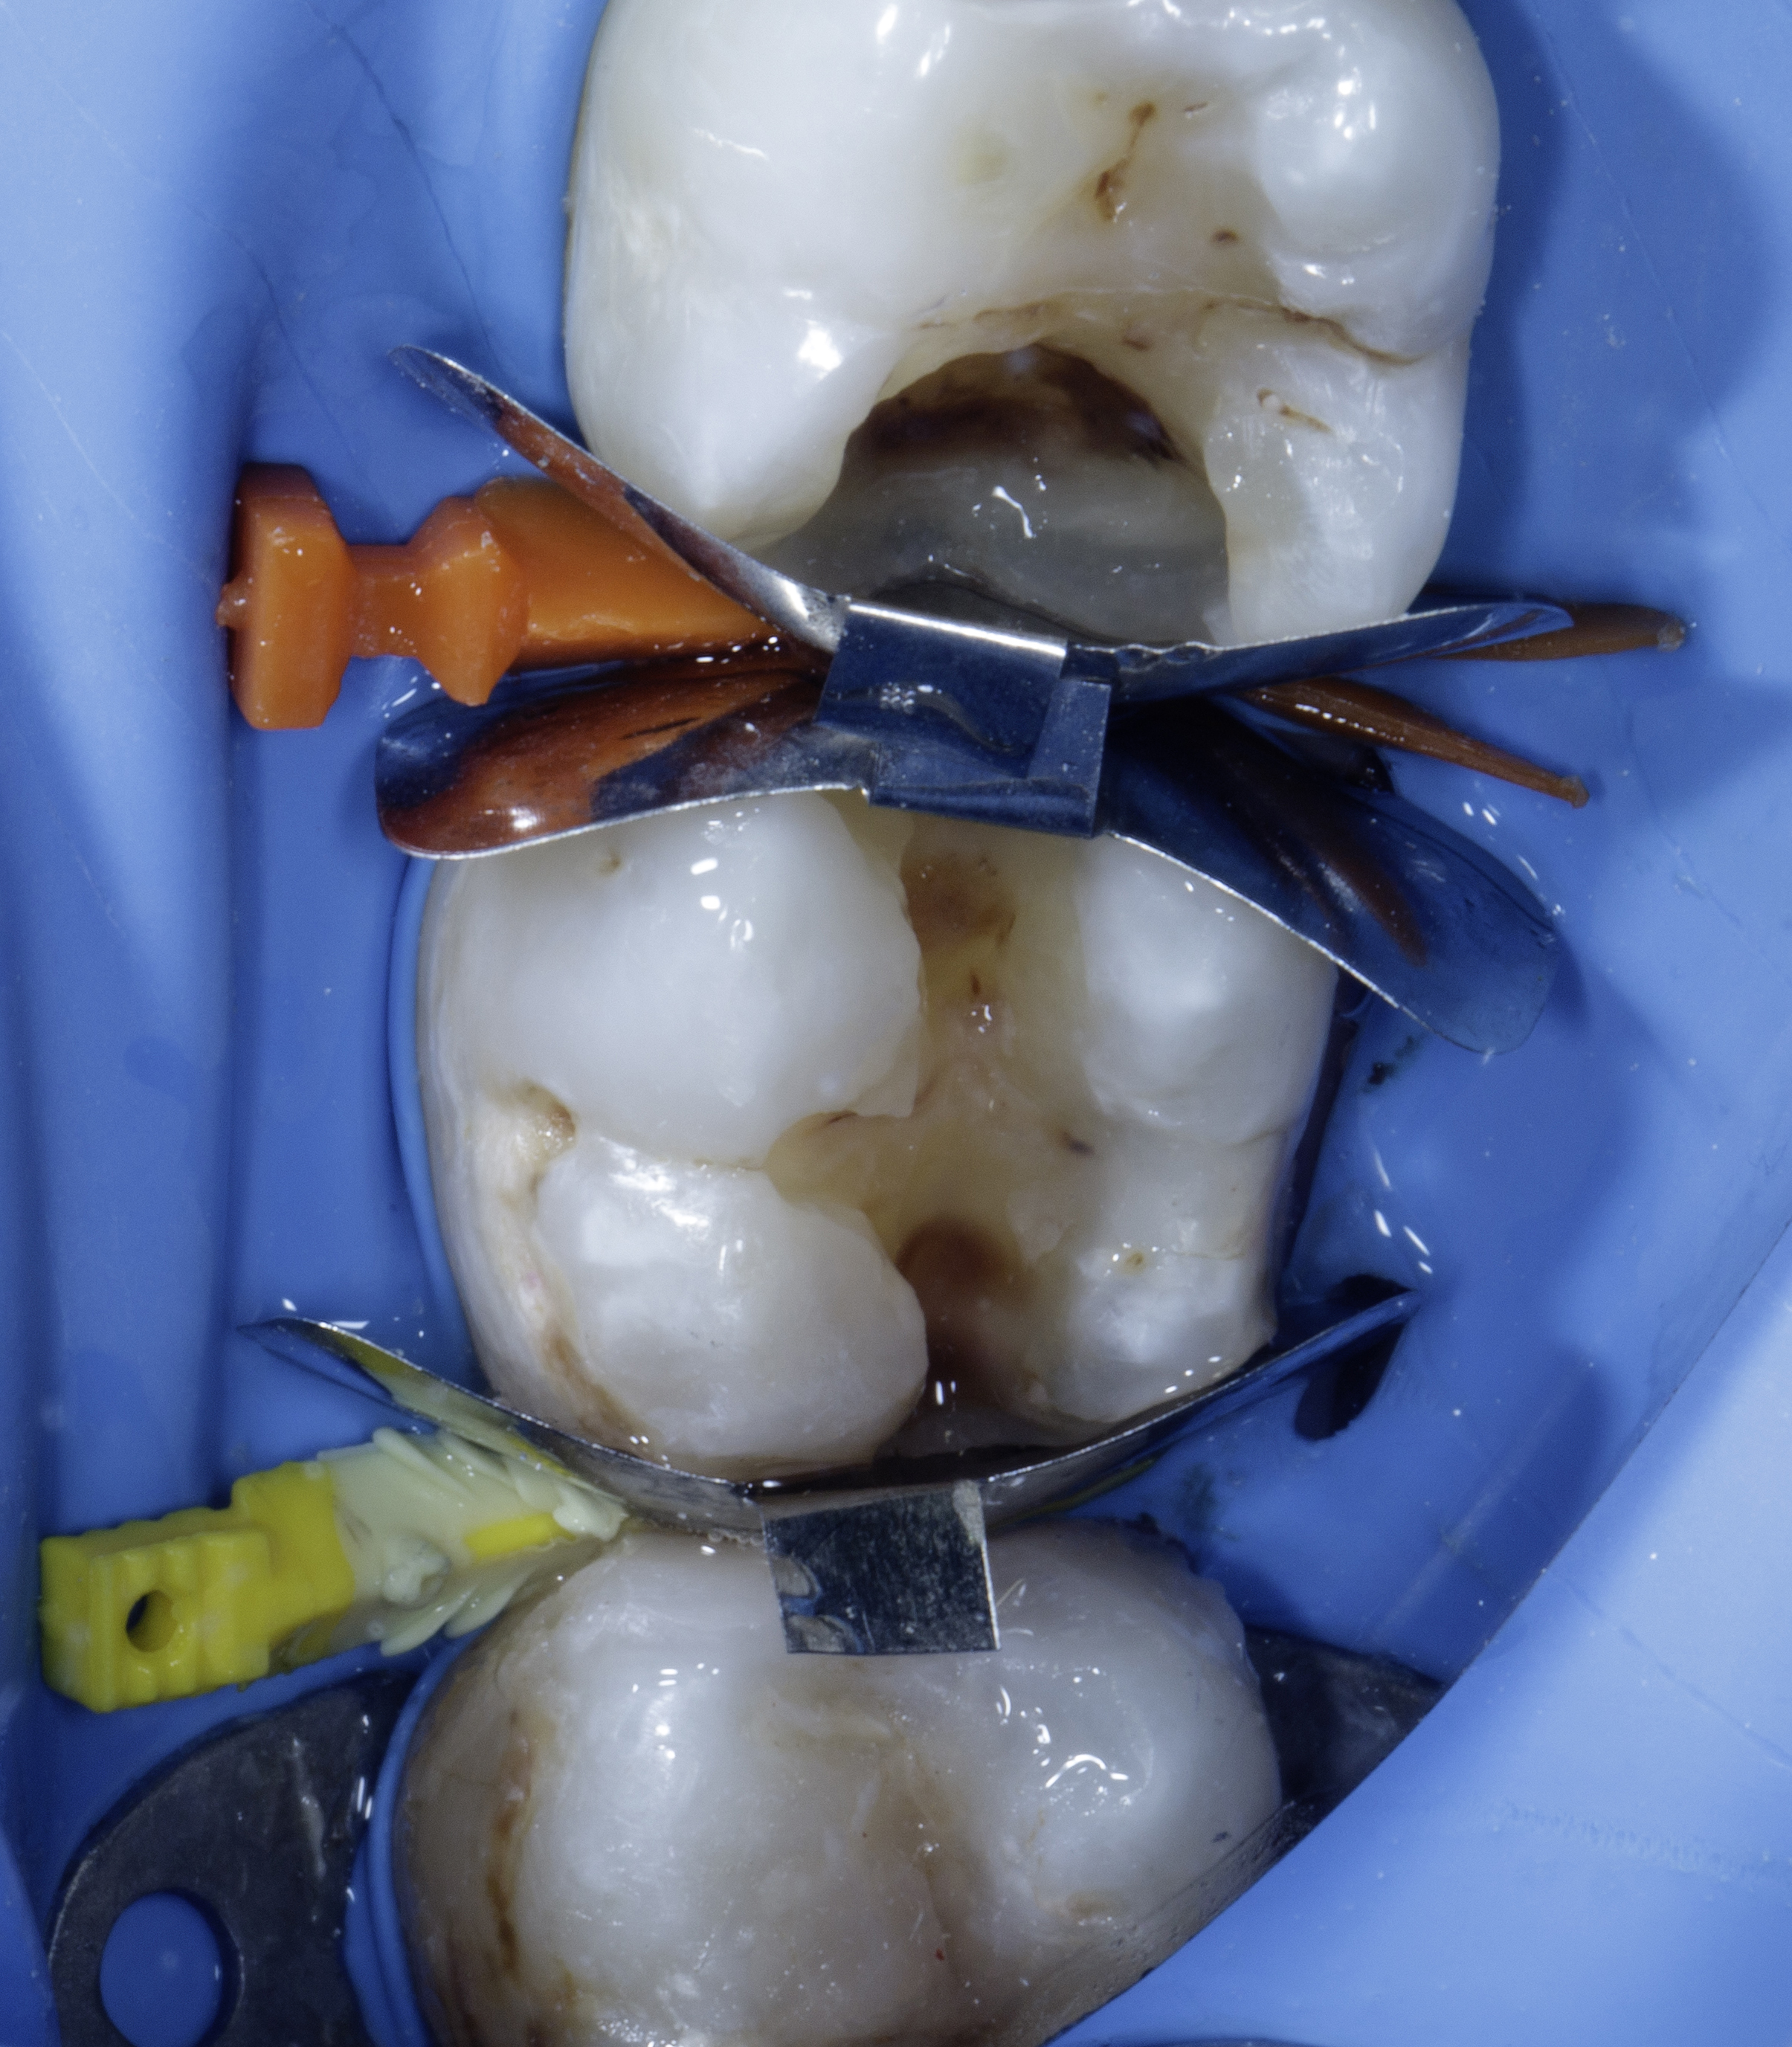
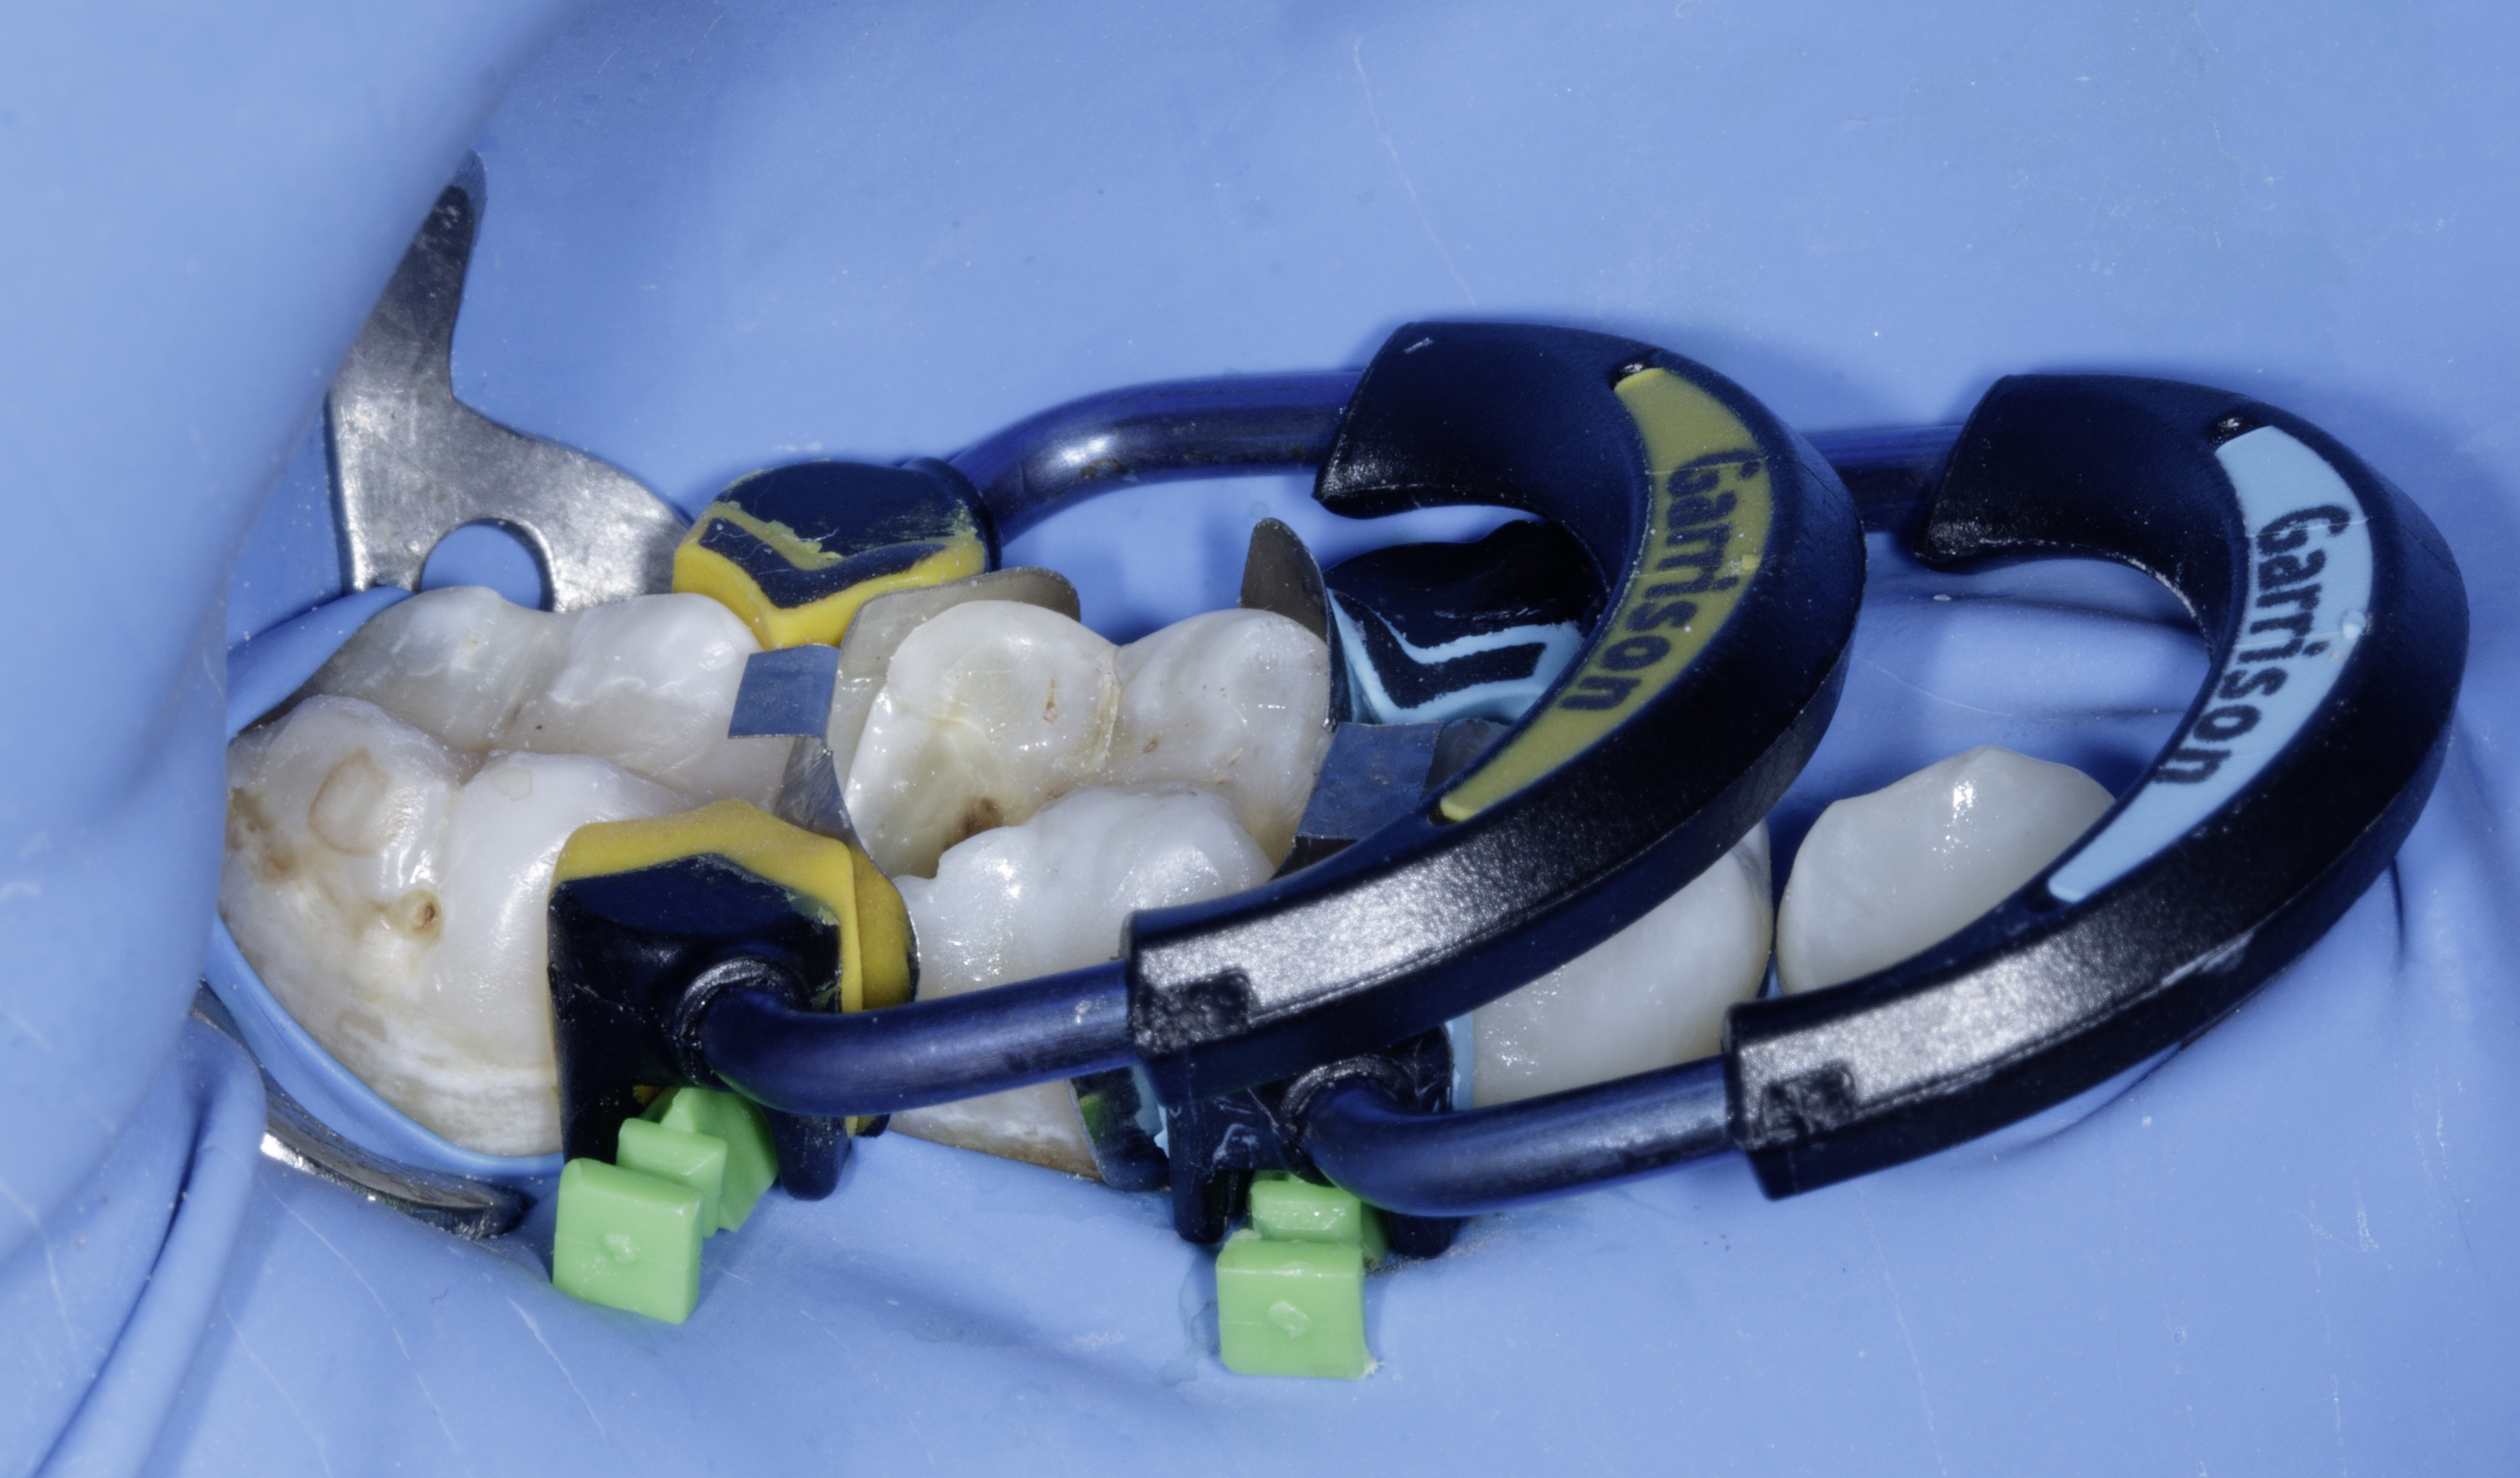
| Figure 4. Following the restoration of tooth #48, Garrison sectional matrix bands were placed and stabilized using wedges. Due to the limited interdental space between teeth #47 and #48, a Strata-G wedge was utilized to secure the matrix band effectively. For the interproximal area between teeth #46 and #47, a quad wedge was chosen to ensure firm stabilization of the matrix system. |
Sectional Matrix System Selection and Placement
In cases involving adjacent large proximal defects, selecting a suitable sectional matrix system is essential to achieve optimal anatomical form. The Garrison matrix system was used in this case due to its precision, adaptability, and stability. Proper marginal ridge height and contour are critical for replicating natural occlusal anatomy, including the adjacent triangular fossae and occlusal embrasures. Since ridge height is closely dependent on matrix band height, Firm Band FXH 175 was selected.
The rigidity of the FXH 175 bands allows for easy placement and a secure fit, while maintaining shape during the composite injection molding procedure, preventing deformation and ensuring accurate anatomical reconstruction.
Placement Protocol:
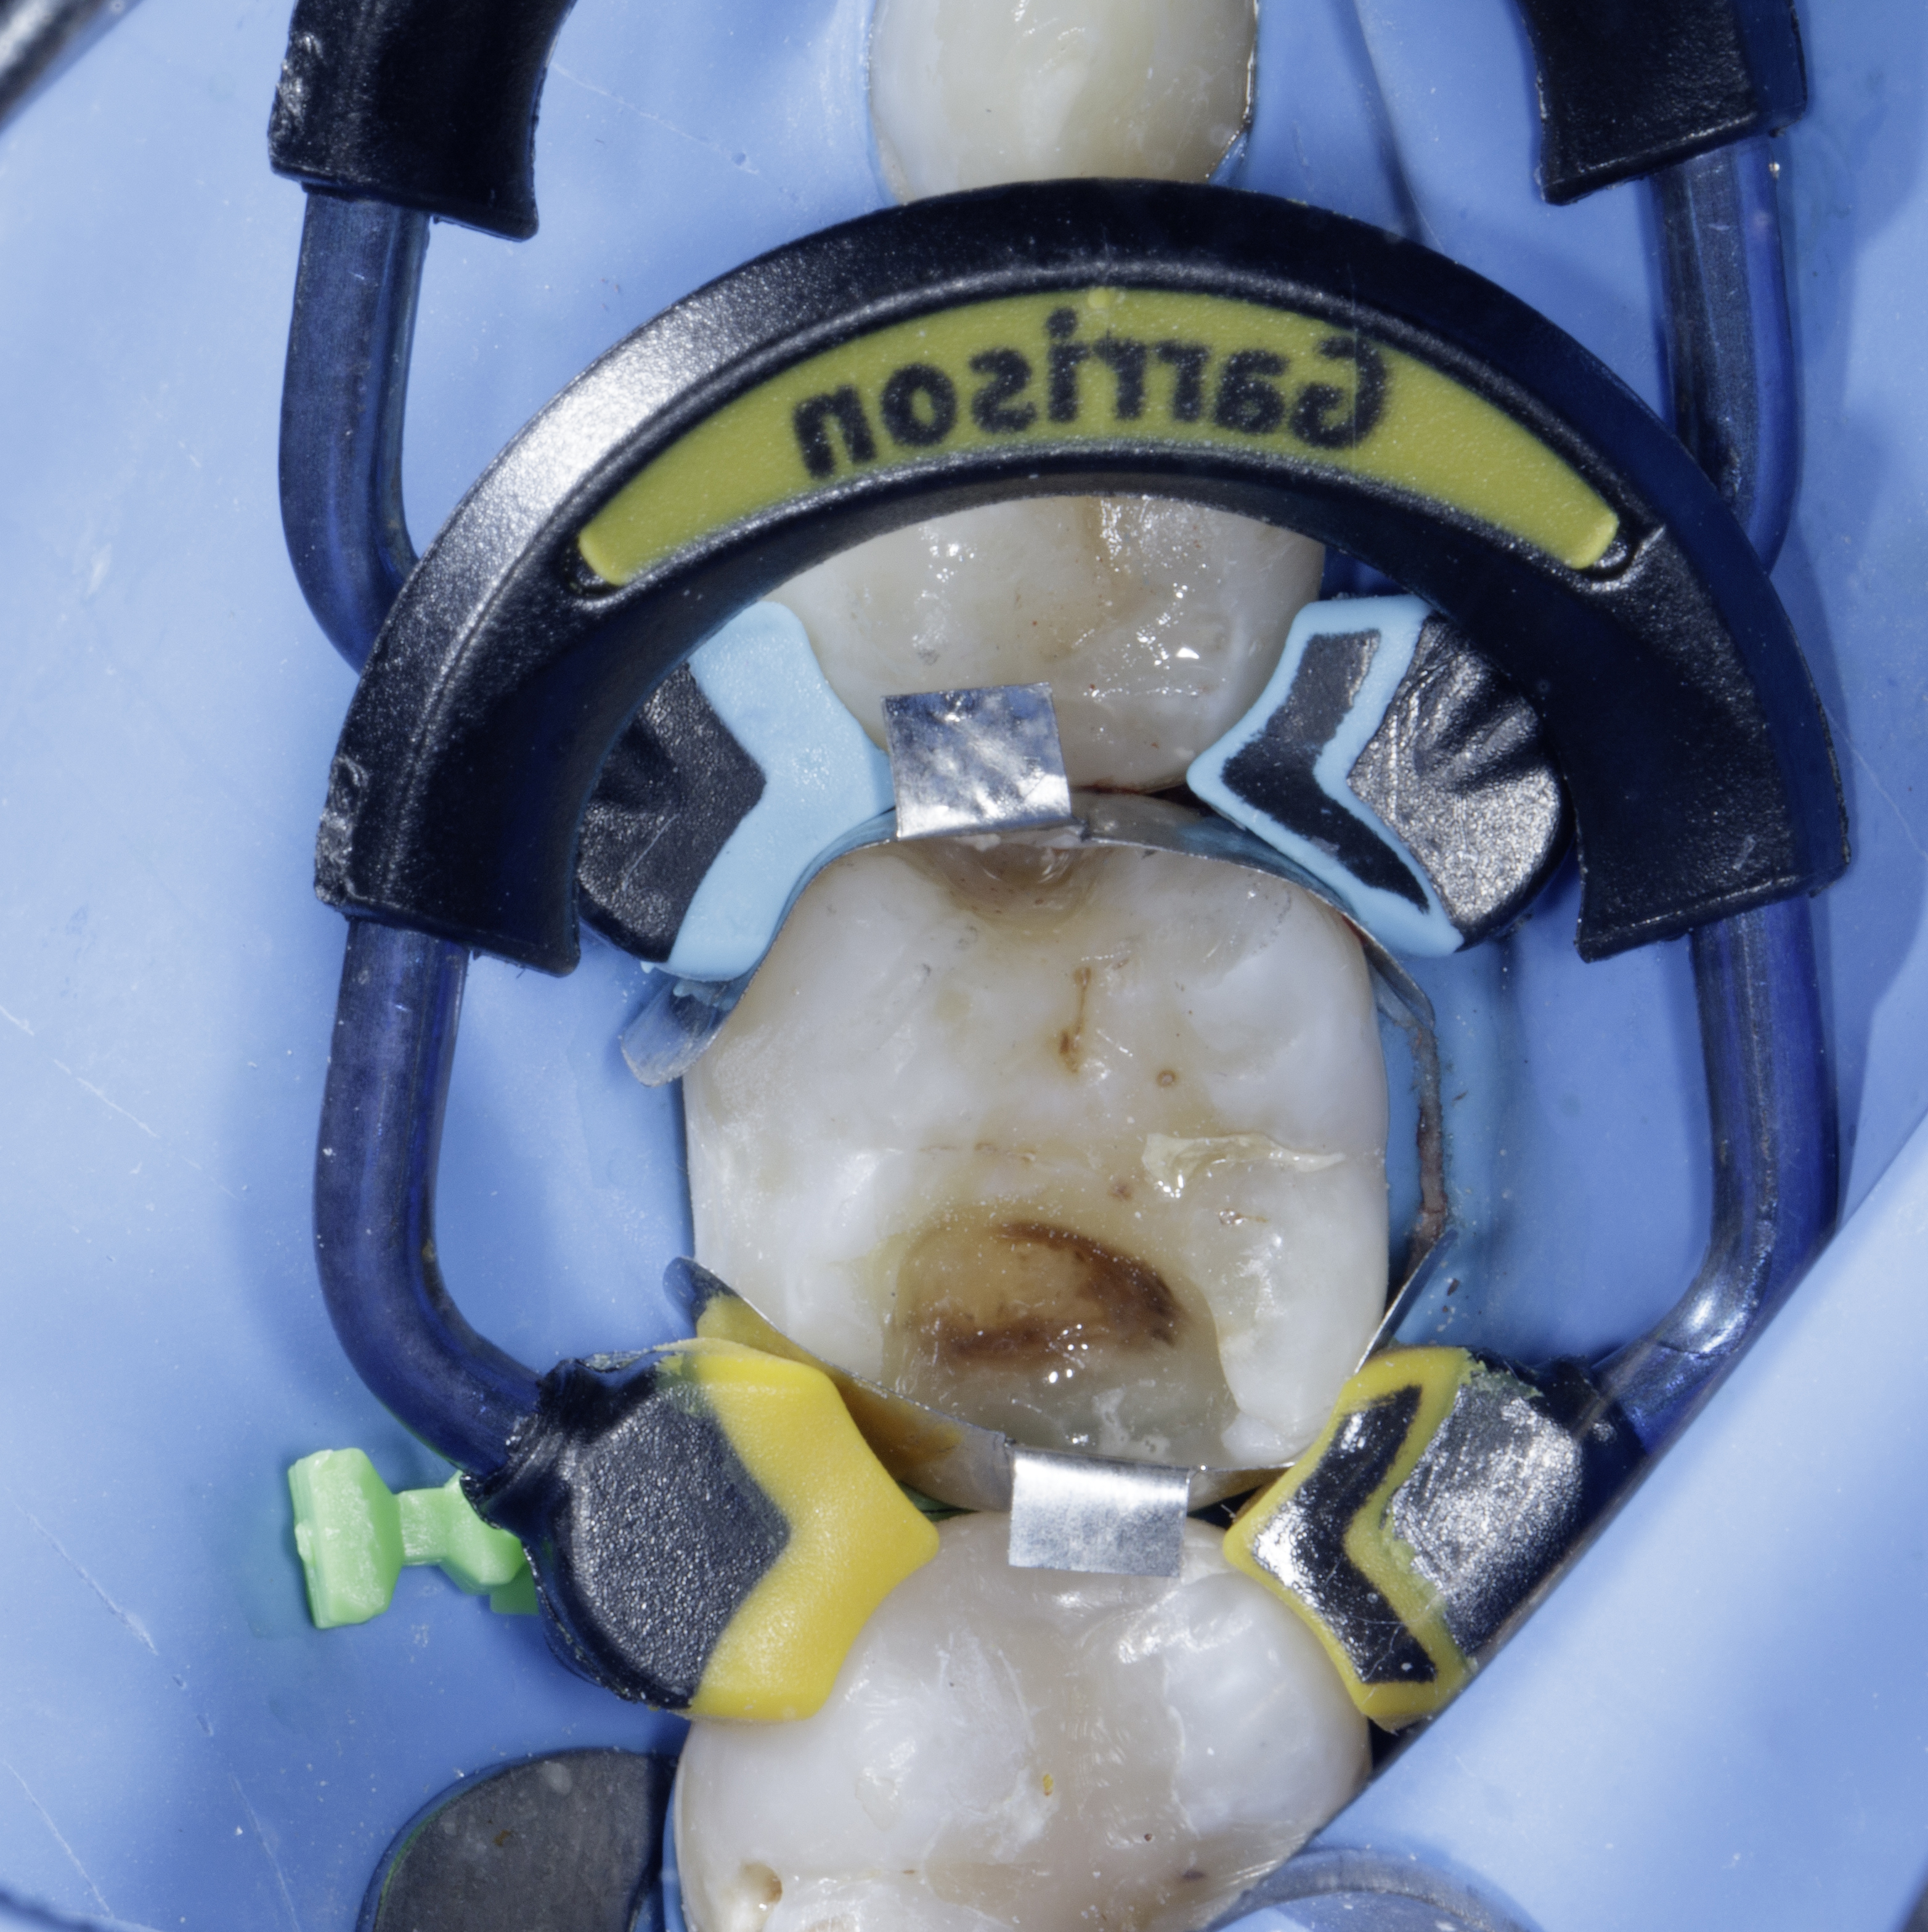
This sequential matrix-ring configuration enabled efficient restoration of multiple proximal defects while preserving proximal contacts and occlusal morphology. The Garrison matrix system proved particularly advantageous in MOD situations due to its stability, anatomical accuracy, and time efficiency.
|
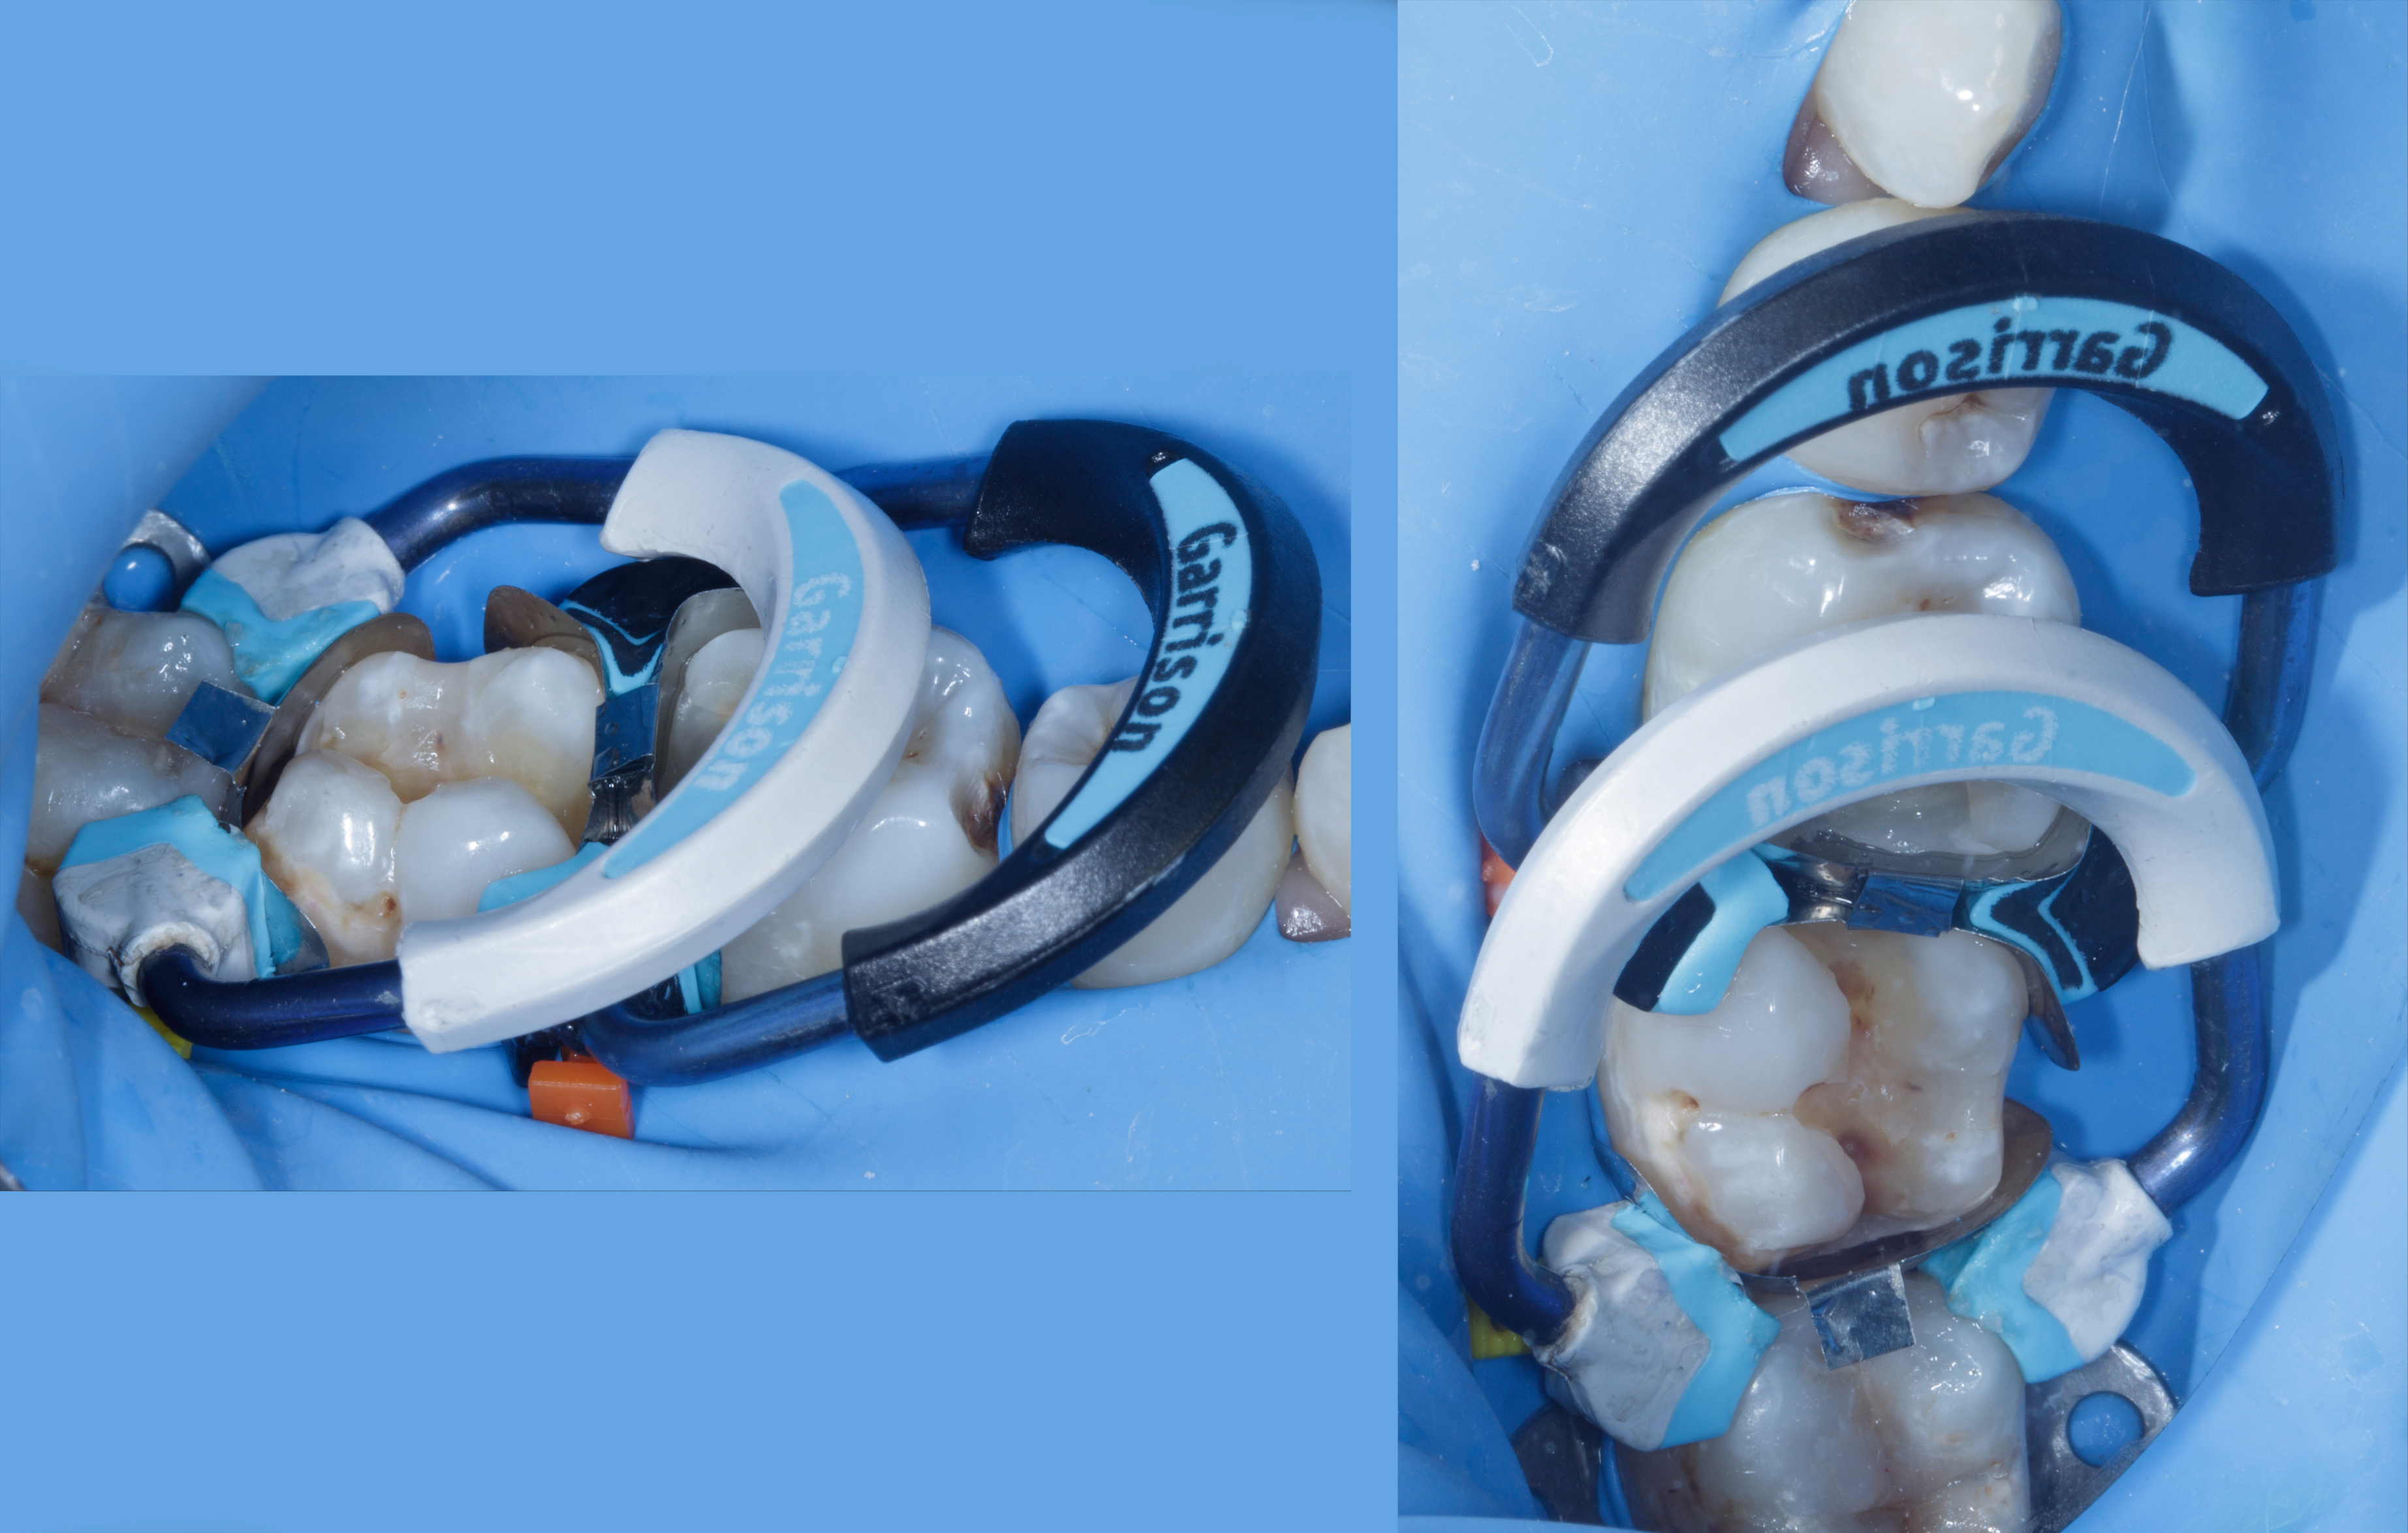
| Figure 5. Quad Blue ring placed between teeth #46 and #47 & Strata G ring stacked Region between teeth #48 & #47, saving precious time without compromising any contacts and contours. |
Due to time constraints, it was decided to restore the MOD defect on tooth #47 during this appointment. Following adhesive application, a thin 0.5 mm layer of Shofu Injectable XSL—a high-strength, second-generation, self-leveling flowable composite—was applied to seal the dentin. This layer plays a crucial role in protecting the hybrid layer from polymerization shrinkage stress. Its self-leveling properties allow excellent adaptation to internal cavity surfaces, minimizing voids, improving marginal integrity, and reducing the risk of post-operative sensitivity.
The proximal walls were then built using Shofu Beautifil LS II (shade A3), a low-shrinkage composite (polymerization shrinkage: 0.85%). The material was placed in two increments using the snowplough technique, supported by a small volume of Shofu Injectable XSL (shade A3O) to enhance adaptation at the interface. In the second increment, the marginal ridge was sculpted with a fine instrument to achieve accurate contour, proper marginal ridge height, and a well-defined occlusal embrasure. The rigidity of the sectional matrix band allowed precise reproduction of the marginal ridge and contact area.
This technique effectively converted the Class II cavity into a Class I configuration by re-establishing both proximal walls and contact. Once the proximal contour was completed, the matrix bands and rings were removed. Final occlusal morphology was then achieved with incremental layering to complete the restoration of tooth #47.
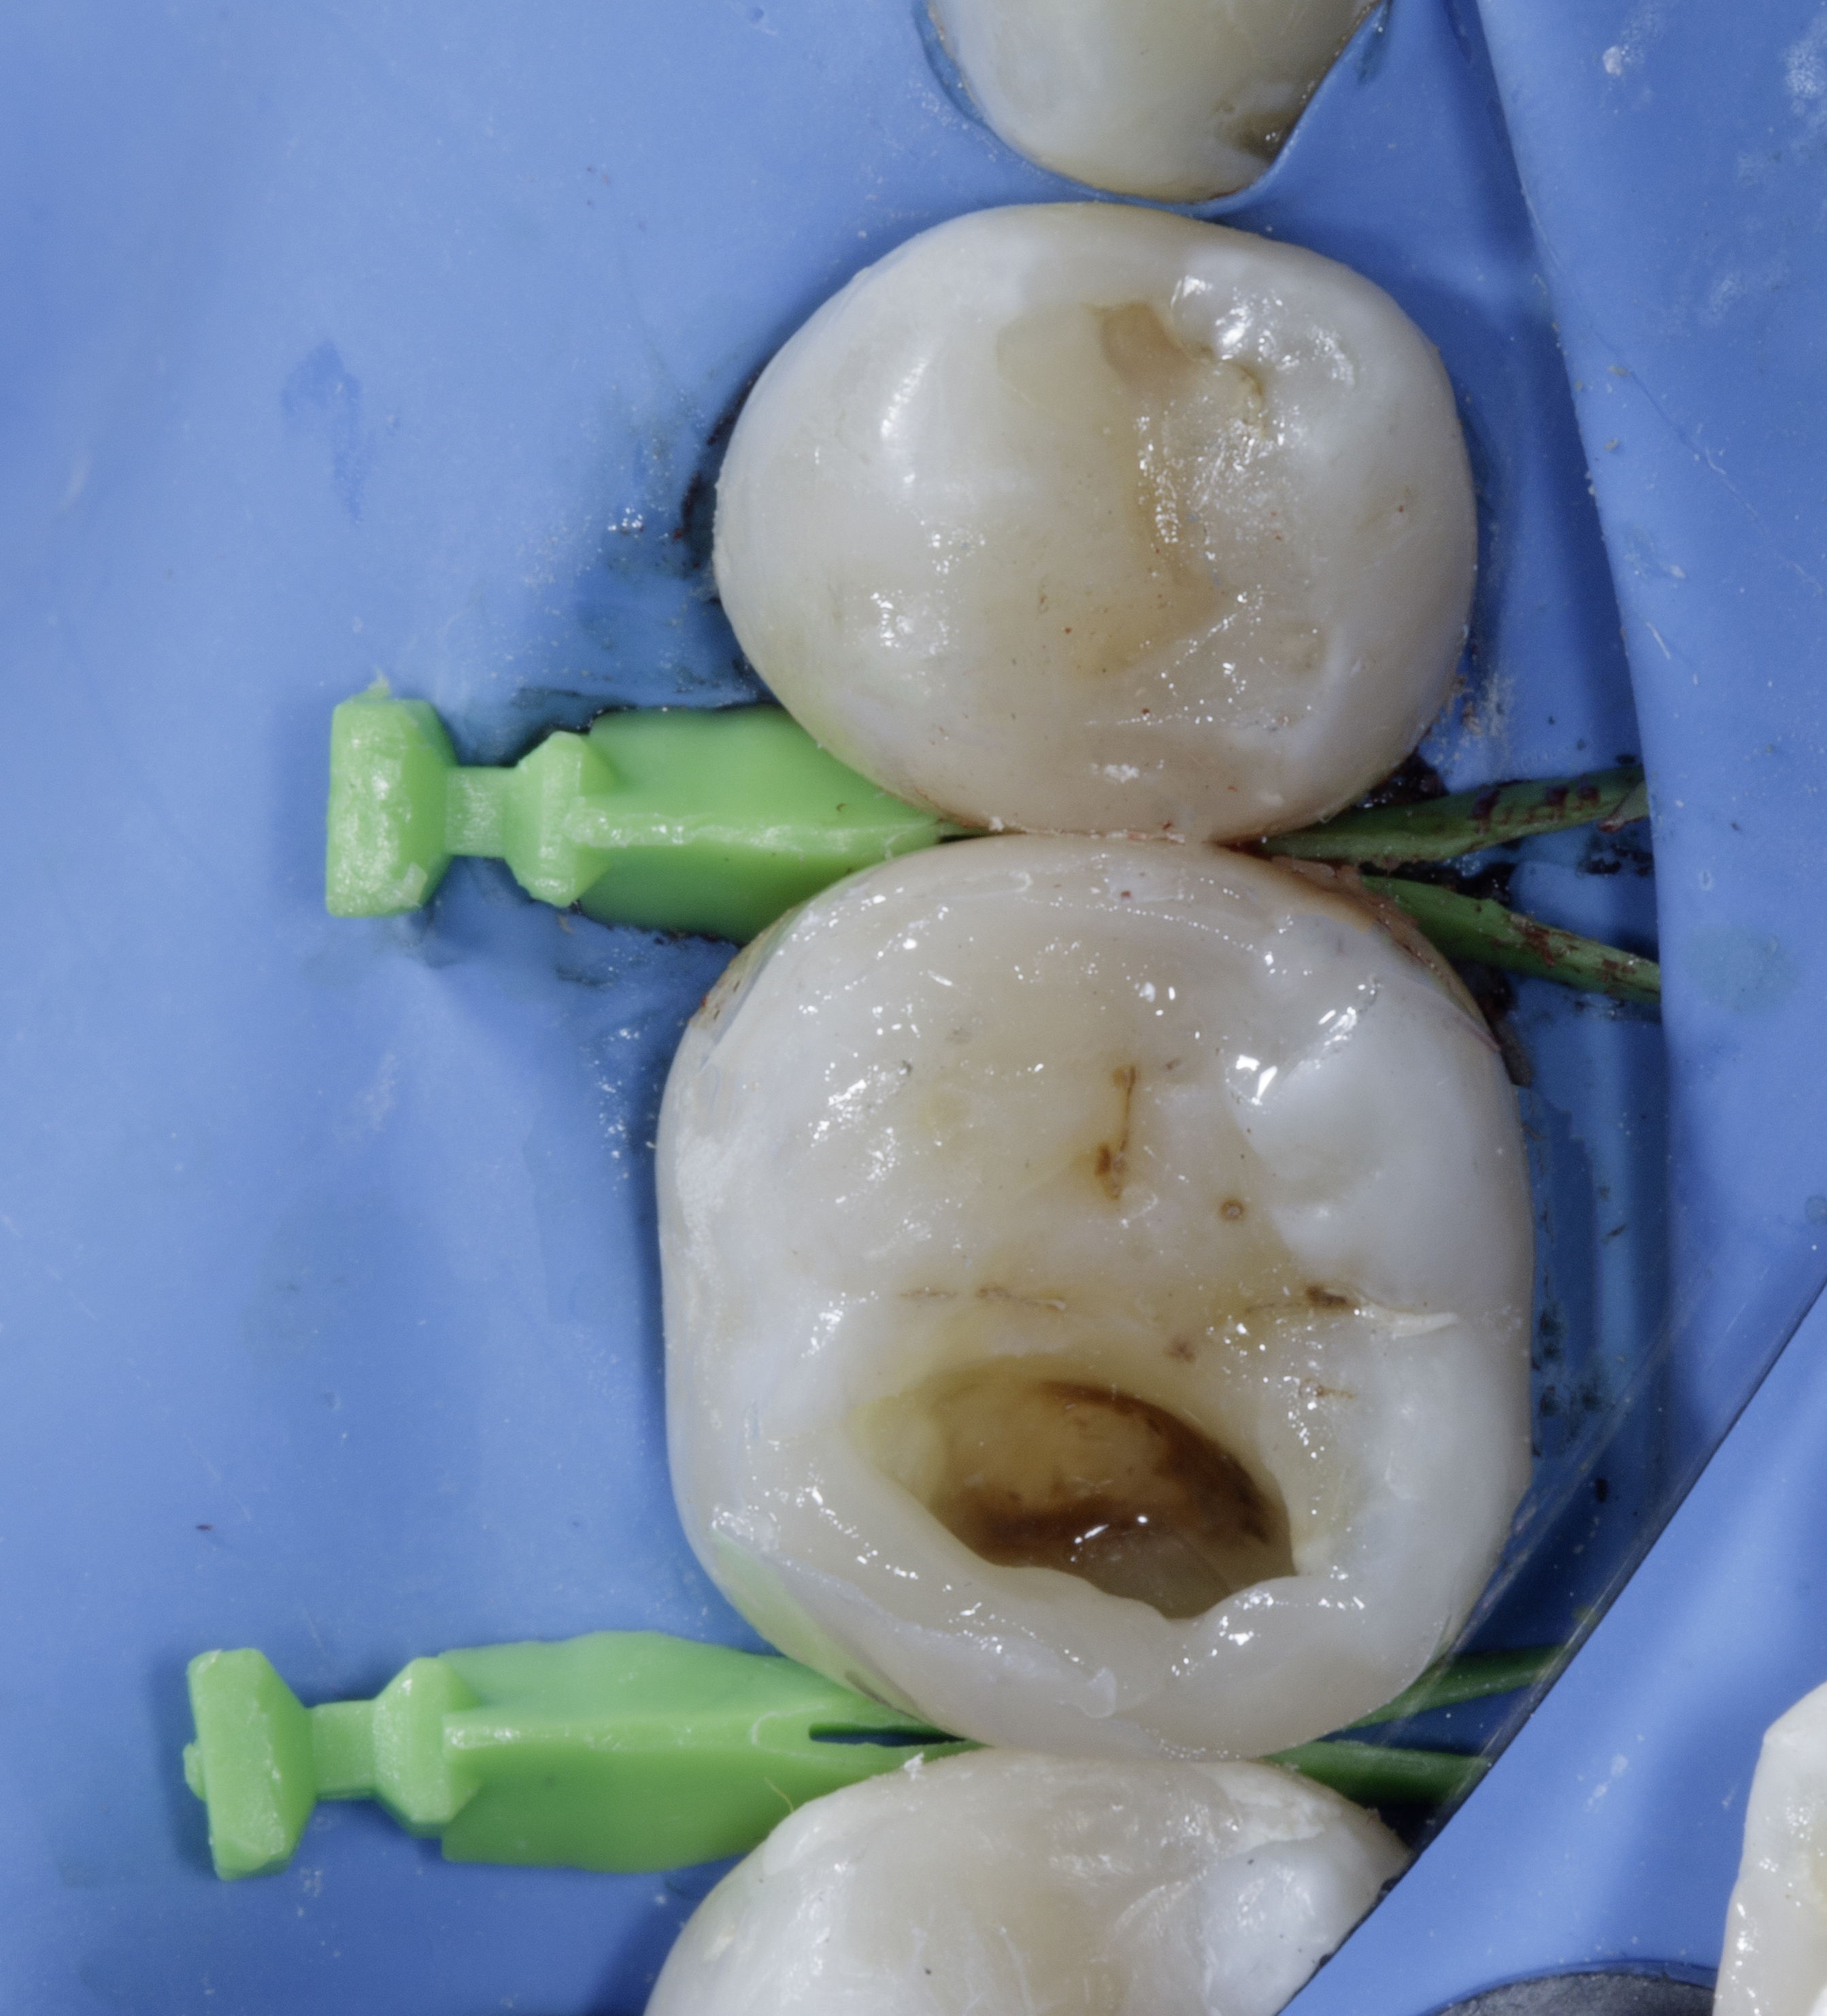
The patient was recalled after a few days to complete the restoration of the remaining defects. Caries excavation was performed on the mesial surface of tooth #46 and the distal surface of tooth #45. Cavity preparation followed the same protocol previously described for the other teeth. The restoration on tooth #47 had been fully finished and polished during the previous appointment to ensure ideal proximal contact and contour, thereby facilitating accurate contact formation for subsequent restorations.
|
| Figure 6. Appointment 02, caries removal from mesial side of #46 and #45 distal and finishing of Mesial side of tooth #47. |
Tooth #45 was restored using a freehand technique due to the small size of the defect. Shofu Injectable XSL was first applied, followed by Shofu Beautifil LS II packable composite. The distal contour was subsequently refined using finishing discs to establish proper contact and emergence profile in preparation for the restoration of the adjacent tooth.
Restoration of the MOD defect on tooth #46 was then initiated. The use of stacked Quad rings once again facilitated accuracy and predictability in achieving ideal proximal form. FXH175 firm sectional matrix bands were positioned and stabilized using a quad green wedge inserted from the buccal aspect. After confirming an adequate seal of the proximal box, the first blue Quad ring was placed, followed by an orange Quad ring to enhance separation and matrix stability.
|
|
| Figure 7. Stacking for Quad Rings for MOD defect on tooth #46. | Figure 8. Restoring #45 , Quad rings (Blue & orange) are stacked, checking the proximal box seal. |
The mesial proximal box of tooth #46 was restored entirely using Shofu Injectable XSL and Shofu Beautifil LS II packable composite, employing the snowplough technique due to the relatively small size of the defect. On the distal aspect, only the proximal wall was reconstructed in order to convert the Class II defect into a Class I configuration.
Given the large size of the distal wall defect, the proximal wall was built in two increments—first from the buccal side and then from the lingual. This incremental approach was selected to minimize polymerization shrinkage stress. Once the walls were completed, the matrix bands were carefully removed. Notably, no excess composite flange or flash was observed, demonstrating the precision and sealing efficiency of the Garrison Quad Matrix system.
|
| Figure 9. Restoring #46 mesial defect and distal wall in stress reducing layering in two increment, one buccal and one lingual, converting MOD to Class, Bands are removed for final restoring the distal defect. |
Due to large defect on distal side we decided to use short fiber composite followed Shofu Beautifil LS II packable as a final layer. All the layer placed incrementally in order to reduce shrinkage stress. Stains have added to make restoration look like more natural. The contours and embrasures were well established and finished using a Shofu Super Snap purple disk. The oxygen inhibition layer was removed using sodium bicarbonate powder with an air polisher unit (image 11).
The rubber dam was removed, and high points were checked using 40-micron paper, followed by 8-micron foil in static occlusion. For dynamic occlusion, 200-micron paper was used, and adjustments were made to the cuspal slopes and non-functional cusps.
|
|
| Figure 10. Before removal of rubber dam | Figure 11. IOPA to check no overhangs. |
The quadrant restorative approach using the Garrison Quad Matrix System allowed precise reconstruction of proximal contacts, anatomical contour, and occlusal morphology in multiple adjacent Class II lesions. By first converting extensive MOD cavities into controlled Class I preparations through incremental wall build-up, polymerization shrinkage stress was minimized and tooth structure was preserved. The combination of Shofu Injectable XSL and Beautifil LS II packable composites, along with selective use of short-fibre composite, provided excellent marginal adaptation and structural reinforcement. This technique proved to be highly predictable, time-efficient, and minimally invasive, making it an ideal protocol for restoring multi-surface posterior defects while ensuring long-term functional stability and aesthetics.

|
|
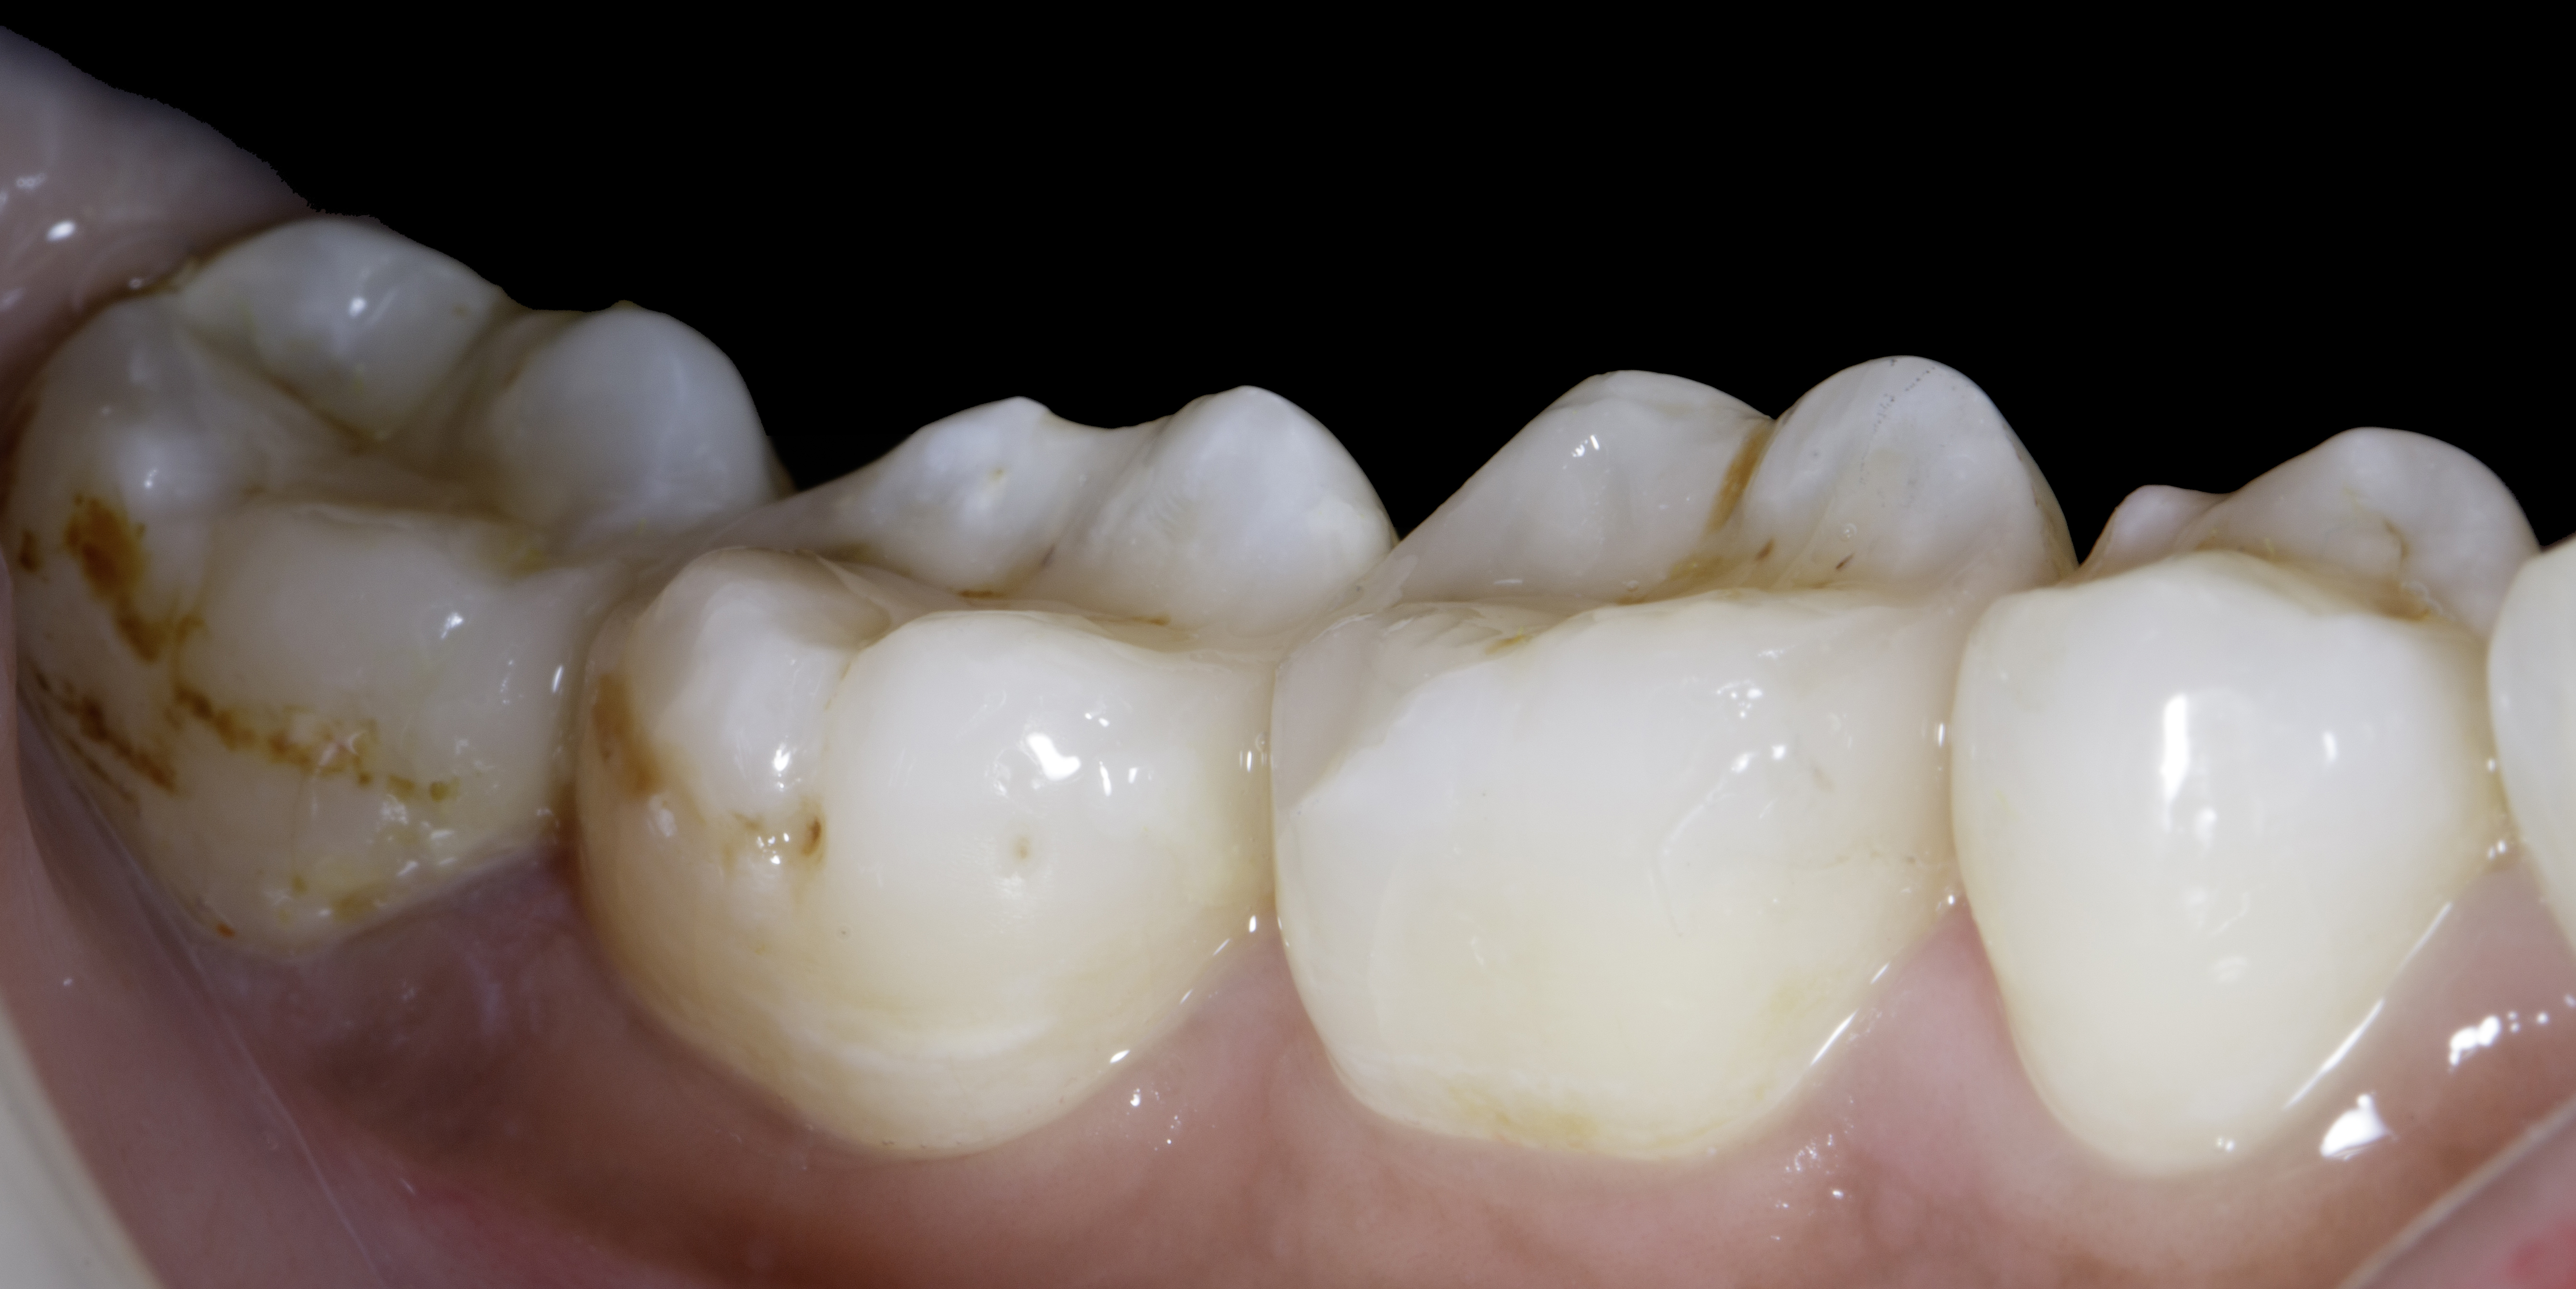
| Figure 12. Post op after 15 days. | Figure 13. Buccal view, Post of after 15 days shows healthy gums with papilla filled with ideal contacts and contours. |
|
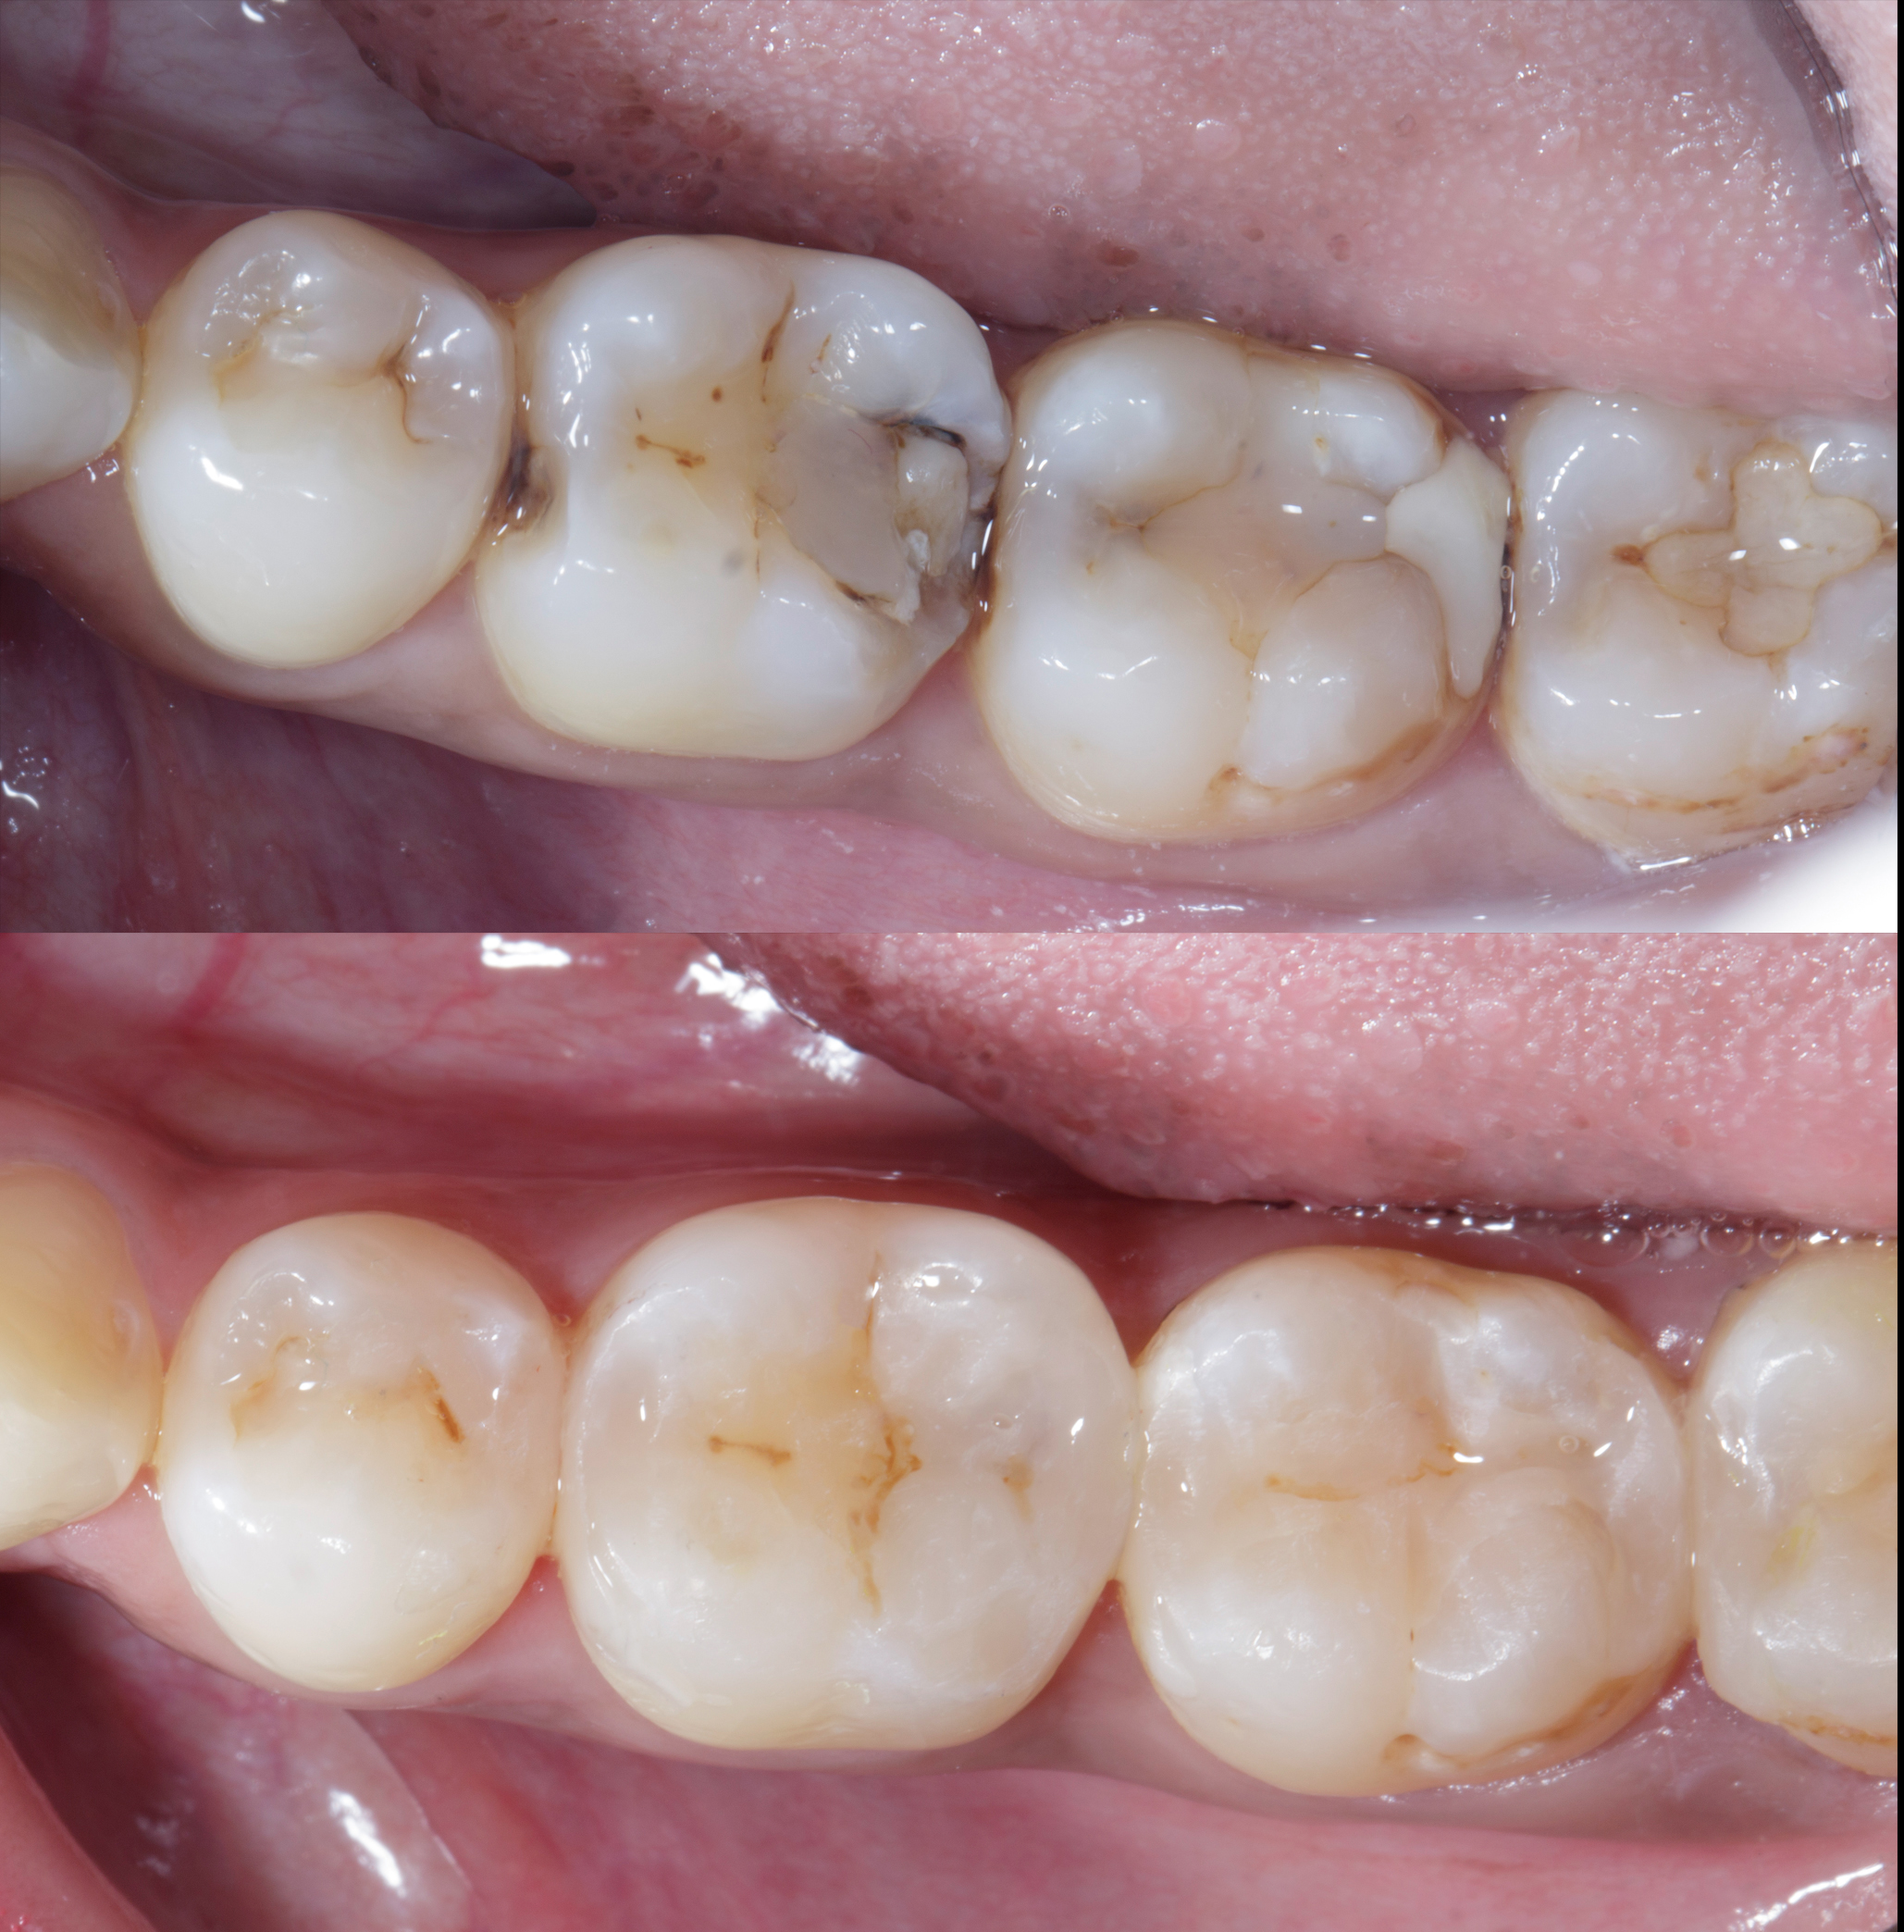
| Figure 14. Before and after showing close to natural contacts / contours. |
|
| Figure 15. Showcasing extent large defect restored back to its natural form and function. |
|
| Figure 16. Buccal view - Showcasing extent large defect restored back to its natural form and function. |